
PyNVMe3 User Guide
Last Modified: April 6, 2026
Copyright © 2020-2026 GENG YUN Technology Pte. Ltd.
All Rights Reserved.
- 0. Change Log
- 1. Introduction
- 2. Platform
- 3. Install
- 4. Configuration
- 5. PAM Setup
- 6. Test
- 7. Results
- 8. Certification
- 9. Contact
0. Change Log
| Version | Author | Date | Changes |
|---|---|---|---|
| 3.9 | cranechu | 2026-02-20 | Add TP2 benchmark items: basic_cdm, link speed stress, and llm_loading in certification flow. |
| 3.8 | cranechu | 2025-08-18 | Update for PyNVMe3 R25.8. |
| 3.7 | cranechu | 2025-05-28 | Update for PyNVMe3 R25.5. |
| 3.6 | cranechu | 2025-02-19 | Update Certification. |
| 3.5 | cranechu | 2024-11-25 | Update for PyNVMe3 R24.11. |
| 3.4 | cranechu | 2024-08-16 | Update for PyNVMe3 R24.8. |
| 3.3 | cranechu | 2024-05-28 | Update for PyNVMe3 R24.5. |
| 3.2 | cranechu | 2024-05-10 | certification.sh requires one parameter as the test phase to execute. |
| 3.1 | cranechu | 2024-03-20 | Update test platform |
| 3.0 | cranechu | 2024-02-20 | Add Certification chapter |
| 2.2 | cranechu | 2024-01-07 | PyNVMe3 R24.x recommends Ubuntu 22.04. Ubuntu 20.04 will be obsoleted in 2025. |
| 2.1 | cranechu | 2023-08-25 | PyNVMe3 R23.8 now supports Ubuntu 20.04 and 22.04. |
| 2.0 | cranechu | 2022-12-28 | Re-distributed as an online document. |
| 1.5 | cranechu | 2022-11-28 | 1GB-hugepage configuration is now required. |
| Updated for PyNVMe3 R22.11. | |||
| 1.4 | cranechu | 2022-05-26 | Support for NVMe v2.0 added. |
| Updated for PyNVMe3 R22.5. | |||
| 1.3 | cranechu | 2021-11-25 | PAM is now required for TCG and benchmark tests. |
| 1.2 | cranechu | 2021-08-03 | Added benchmark test suite. |
| Introduced Quarch PAM setup. | |||
| 1.1 | cranechu | 2021-05-25 | Changed recommended platform. |
| Reports should be kept in the ‘results’ folder. | |||
| 1GB hugepage setup introduced. | |||
| Updated for PyNVMe3 R21.5. | |||
| 1.0 | cranechu | 2021-02-25 | Added an email address for technical support. |
| 0.9 | cranechu | 2021-02-06 | Updated for PyNVMe3 R21.2. |
| 0.1 | cranechu | 2021-01-11 | Initial version. |
1. Introduction
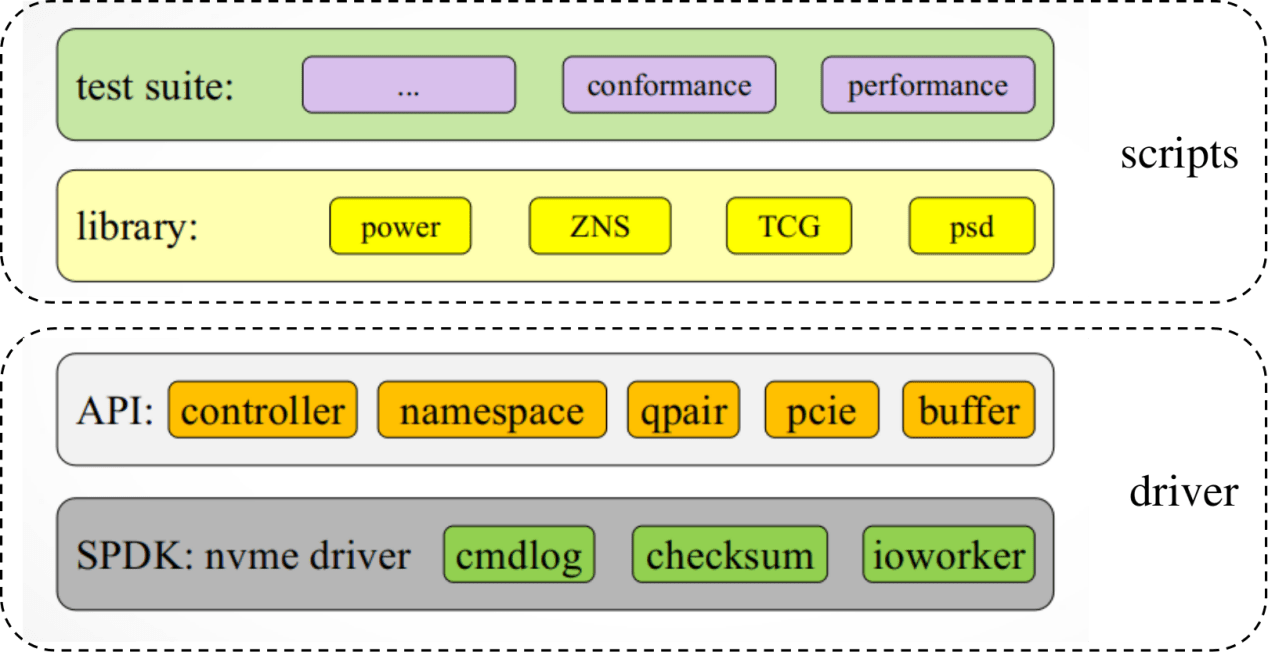
PyNVMe3 is a suite of NVMe SSD test tools implemented in Python3, supported by a dedicated NVMe testing driver developed in-house. This driver takes full command over the Device Under Test (DUT), from its registers and memory to its data buffers and commands. It delivers extensive and potent capabilities through an easy-to-use Python API. Based on this driver, PyNVMe3 offers a professional and meticulously maintained collection of NVMe test scripts.
 |
|---|
| Image 1 PyNVMe3 Block Diagram |
PyNVMe3 adheres to the NVMe Specification versions 1.4 and 2.x but is not confined by these specifications.
2. Platform
To run PyNVMe3 effectively, please ensure your setup meets the following requirements:
- CPU: x86_64 architecture.
- Memory: 16 GB or more.
- OS: Ubuntu LTS (e.g., 24.04). It is recommended to install the OS on a SATA drive.
- RAID mode (Intel® RST): Must be disabled in the BIOS.
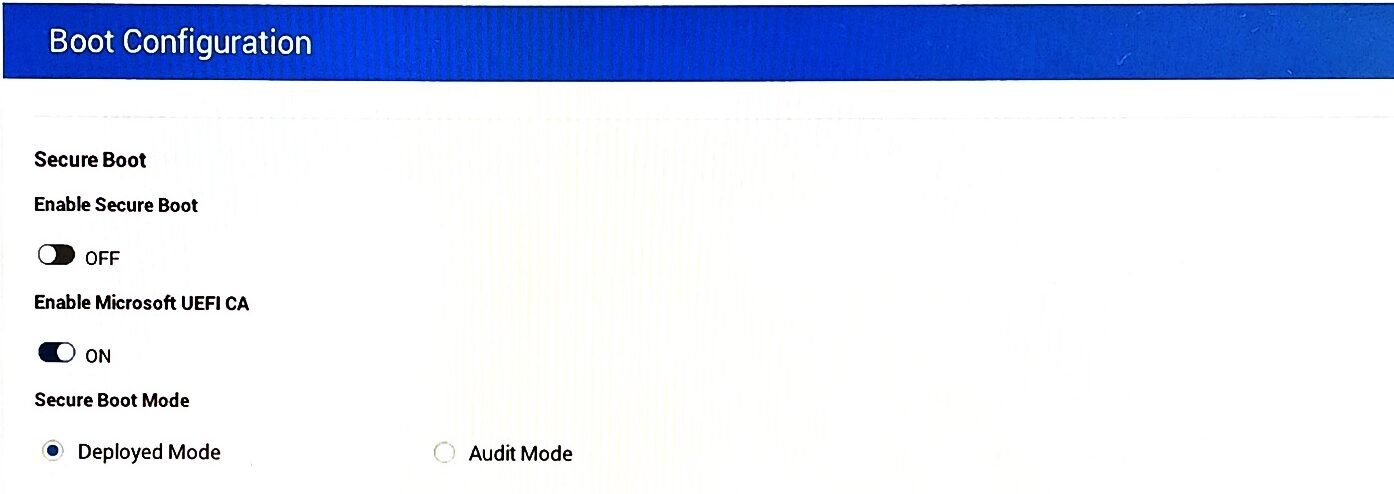
- Secure Boot: Must be disabled in the BIOS.
- IOMMU (VT for Direct I/O): Must be disabled in the BIOS.
 |
|---|
| Image 2. BIOS: Disable RAID / RST |
 |
|---|
| Image 3. BIOS: Disable Secure Boot |
We recommend using the Dell Alienware 16 Area-51 Gaming Laptop as a reference platform. Install Ubuntu on a SATA SSD to minimize interference from the kernel’s built-in NVMe driver. The PCIe M.2 slot should be reserved exclusively for the DUT (Device Under Test). If the system does not provide a native SATA slot, you can attach the OS drive through an external USB-SATA adapter.
 |
|---|
| Image 4. Recommended System |
⚠️ Note: Thunderbolt SSDs also use PCIe and require the NVMe driver. Therefore, they cannot be used as the OS drive for PyNVMe3.
3. Install
Before installing PyNVMe3, please first install Ubuntu LTS. After that, open a Terminal to install PyNVMe3 via command lines. Ensure you have internet access during the installation process.
- Update Ubuntu
sudo apt update
sudo apt upgrade - On Ubuntu 24.04, disable PEP 668
sudo rm -f /usr/lib/python3.12/EXTERNALLY-MANAGED
- Install pip3
sudo apt install -y python3-pip
- Uninstall PyNVMe3 if it has already been installed
sudo pip3 uninstall PyNVMe3
sudo rm -rf /usr/local/PyNVMe3 - Install PyNVMe3 using pip3. If you do not have the installation file, please contact sales@pynv.me.
sudo pip3 install PyNVMe3-xx.yy.z.tar.gz
PyNVMe3 is installed in the folder
/usr/local/PyNVMe3.
4. Configuration
Follow these steps to configure the Ubuntu Linux kernel.
- Open GRUB configuration file to edit:
sudo gedit /etc/default/grub
- Modify the
GRUB_CMDLINE_LINUX_DEFAULTline to:GRUB_CMDLINE_LINUX_DEFAULT="quiet splash default_hugepagesz=2M hugepagesz=1G hugepages=1 iommu=off intel_iommu=off amd_iommu=off modprobe.blacklist=nvme pcie_aspm=off" - Update GRUB
sudo update-grub
- Open the
fstabconfiguration file for editing:
sudo gedit /etc/fstab
- Add the following line to the end of
/etc/fstab:none /mnt/huge hugetlbfs pagesize=1G,size=1G 0 0 - Reboot Ubuntu.
sudo reboot
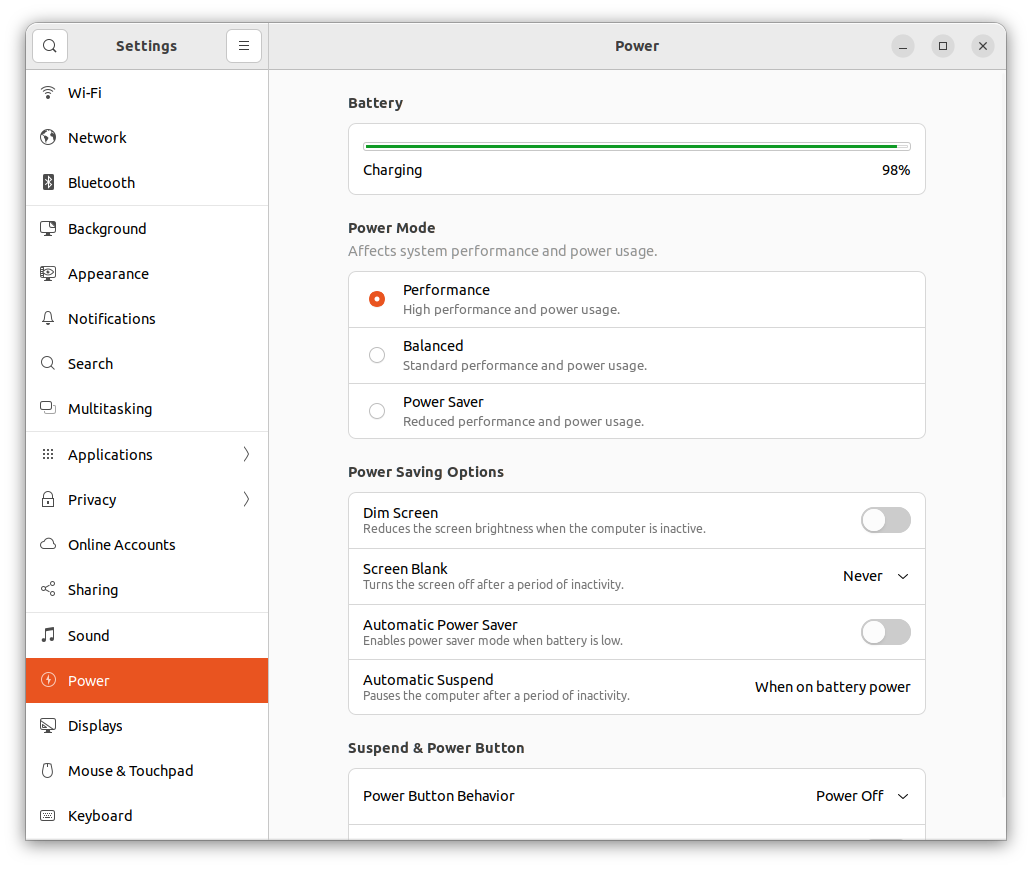
And change the Ubuntu power setting as below, to keep the test platform working all the time.
 |
|---|
| Image 5. Ubuntu power setting |
5. PAM Setup
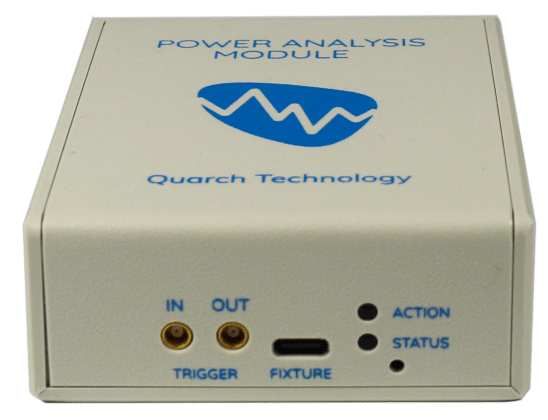
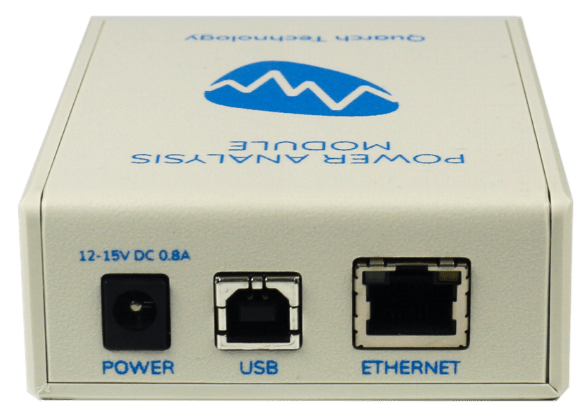
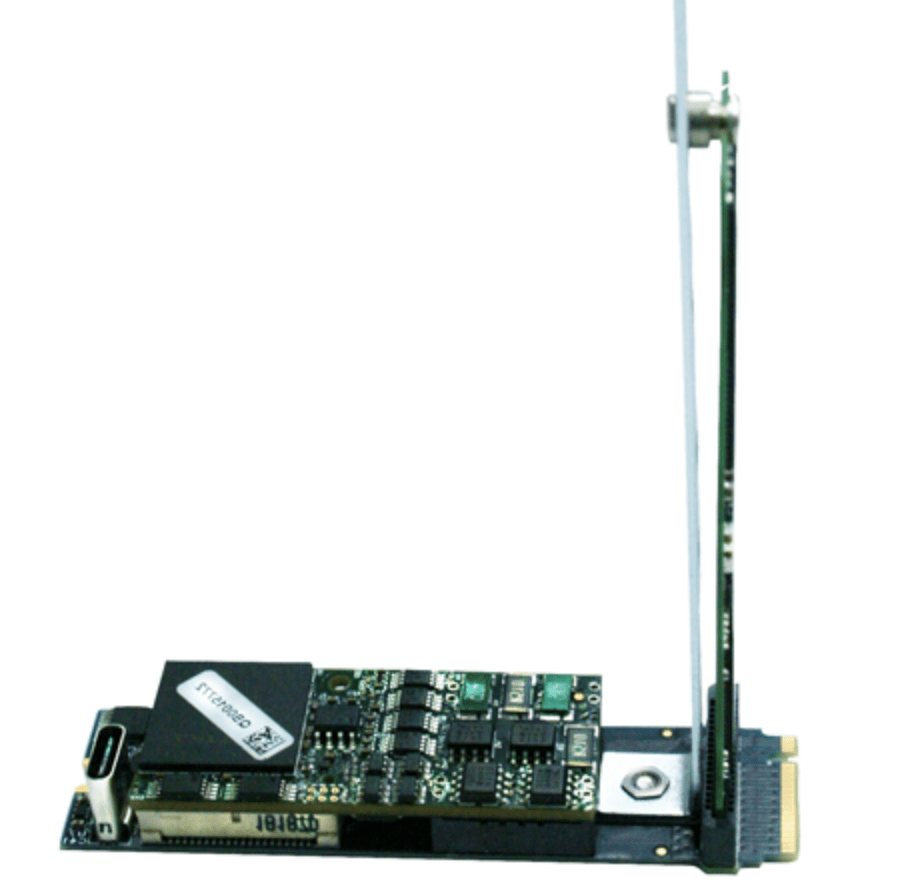
The Quarch Power Analysis Module (PAM) is a third-party power module used to control PCIe power (on/off) and monitor device power consumption. It is required by TCG tests, as well as power-related benchmark tests in PyNVMe3. PAM consists of two units: a control unit in a white box and an M.2 fixture in the 2280 form factor.
 |
 |
|---|---|
| Image 6 Front-view of the control unit | Image 7 Back-view of the control unit |
 |
|---|
| Image 8 M.2 Fixture |
Connect the two units to the System Under Test (SUT) as follows:
- Insert the M.2 fixture into the SUT, for example, the SSD-2 (PCIe Gen4) slot of the recommended system.
- Plug the DUT into the M.2 fixture.
- Connect the control unit and the M.2 fixture with the Quarch-provided USB Type-C to USB Type-C cable.

Image 9 Connection among SUT, DUT, fixture, and control unit - Connect the control unit to the SUT with the Quarch-provided USB Type-B to USB Type-A cable.
- Connect the Quarch-provided power adapter to the control unit and power it on.
- Power on the SUT.
6. Test
In Ubuntu, open a terminal to run PyNVMe3 from the command line. Internet access is not required to run PyNVMe3 tests. The external power supply should remain connected throughout the test.
- Change to the PyNVMe3 directory.
cd /usr/local/PyNVMe3
- Switch to the root user.
sudo su
- run the conformance tests with NVMe DUT.
make test
- Or run specific tests with the NVMe DUT in the following ways.
make test TESTS=scripts/test_folder
make test TESTS=scripts/test_folder/test_file.py
make test TESTS=scripts/test_folder/test_file.py::test_functionFor more information, please refer to pytest documents.
- or when multiple NVMe DUTs are attached in the SUT, run the tests with a specified NVMe DUT by its BDF address.
make test pciaddr=0000:BB:DD.F
⚠️ Note: The test may remove or overwrite the data in your NVMe DUT. Before running any PyNVMe3 test, please backup your data and delete all partitions in your DUT.
When PyNVMe3 test is running, the test-dedicated driver takes over control of NVMe DUT from Linux Kernel’s inbox driver. So, the Kernel, as well as the Kernel-based utilities (e.g. fio, nvme-cli), cannot detect and manipulate the NVMe DUT during PyNVMe3 tests.
6.1 Conformance Tests
PyNVMe3 provides a conformance test suite to validate the DUT against the specifications. Quarch PAM is required by some test scripts (e.g. TCG tests). If PAM is not available, these tests are skipped.
Conformance tests verify compliance with NVMe, PCIe, TCG, and OEM protocols, ensuring SSDs meet industry standards and vendor-specific requirements. The following table outlines the implemented test categories.
| Test Category | Test Description | Test Cases |
|---|---|---|
| NVMe admin command compliance | Tests admin commands such as Abort, AER, DST, Identify, Format, Firmware Download, Log Page, and Queue Management. | 155 |
| NVMe I/O command compliance | Tests all I/O commands including Read, Write, Flush, and Deallocate, with valid and invalid SQE parameters. | 400 |
| HMB (Host Memory Buffer) tests | Verifies HMB initialization, memory layout variations, interaction with I/O, and error injection. | 57 |
| Boot partition tests | Evaluates read/write consistency of the boot partition and resilience to unexpected power loss. | 24 |
| Reset behavior tests | Assesses PCIe, controller, and subsystem resets and their impact on I/O operations. | 33 |
| Power management tests | Tests power state transitions and SSD behavior under various power conditions. | 64 |
| Register handling tests | Validates PCIe and NVMe register operations such as CAP, CC, and CSTS. | 58 |
| Controller functionality tests | Examines SQ arbitration, PRP/SGL handling, interrupts, SQ/SQE operations, and error recovery. | 161 |
| TCG storage security tests | Verifies compliance with TCG Opal and Pyrite security specifications. | 109 |
| OEM-specific tests | Custom tests for vendor-specific SSD validation and platform compatibility. | 60 |
PyNVMe3 goes beyond standard NVMe specification requirements by introducing extensive corner cases, stress conditions, and negative or illegal test scenarios. This approach provides a more rigorous and thorough examination of SSD performance and reliability.
For example, PyNVMe3 significantly expands HMB (Host Memory Buffer) testing, offering 57 test cases compared to the 5 basic cases from UNH-IOL. These test cases include:
- Functional validation of HMB allocation, deallocation, and operational correctness.
- Stress testing under high I/O loads, including random read/write pressure and HMB failure conditions.
- Coverage of different memory layouts, allocation methods, and size configurations to ensure compatibility across various host environments.
- Error injection to simulate access failures, timeouts, and interrupts, assessing SSD error handling and recovery mechanisms.
By incorporating these extensive test scenarios, PyNVMe3 provides deeper insights into SSD behavior under real-world conditions, improving overall product quality and reliability.
6.2 Benchmark Tests
PyNVMe3 provides a benchmark test suite to evaluate the DUT under realistic workloads. Users can compare the test results of different DUTs. Quarch PAM is required by some of the benchmark tests (e.g. performance.py). Users can run the benchmark test as shown below:
make test TESTS=./scripts/benchmark/performance.py
Benchmark tests evaluate SSD performance, power efficiency, and durability under different workloads, simulating real-world usage scenarios. These tests record various metrics such as IOPS, latency, power consumption, temperature, and wear leveling efficiency. The results provide valuable insights into SSD behavior over extended periods and under extreme conditions.
The following table summarizes the benchmark tests:
| Test Category | Description |
|---|---|
| Low power test | Evaluates SSD power state transitions, issuing read/write I/Os during power-saving modes like PS3/PS4. Measures power switching robustness and latency when exiting low-power states. |
| Performance test | Analyzes SSD performance under different workloads, measuring sequential/random I/O, IOPS, latency, temperature, and power consumption. |
| Basic CDM benchmark test | Runs a CrystalDiskMark-style workload mix (sequential and 4K random) to quickly compare bandwidth and IOPS consistency across firmware revisions. |
| I/O stress test | Conducts comprehensive stress tests, running multiple randomized I/O operations alongside NVMe commands such as SMART retrieval, feature management, and abort operations. Ensures data integrity and resilience in demanding environments. |
| Dirty power cycle test | Simulates unexpected power loss (SPOR) without shutdown notification, assessing SSD recovery and readiness. Measures response times for key phases such as BAR access, admin command availability, and first I/O completion. |
| Clean power cycle test | Evaluates SSD power-off behavior with proper shutdown procedures. Similar to the SPOR test but simulates controlled power cycles to measure system recovery times. |
| Long-term read/write test | Assesses SSD endurance by consuming a significant percentage of program/erase (PE) cycles, tracking read/write degradation over time. Tests multiple PE consumption levels to evaluate wear and performance consistency. |
| Interval read disturb test | Reads specific Logical Block Addresses (LBAs) repeatedly over a long duration to assess the impact of read disturb on NAND endurance and data integrity. Uses JEDEC enterprise workload patterns for realistic evaluation. |
| PCIe link speed stress test | Evaluates SSD stability by dynamically adjusting PCIe link rates while under continuous I/O load. |
| LLM workload test | Measures SSD performance in high-load conditions, particularly for handling large-scale data operations required in AI and large language model (LLM) training. Simulates sustained sequential/random data transfers. |
| Read retention test | Fills the SSD with data, records CRC values, and verifies data integrity after an extended power-off period (e.g., two months) to test NAND retention capabilities. |
| Trace replay test | Replays recorded I/O workloads from a trace file, including write, trim, and read operations. Simulates real-world SSD usage patterns and verifies power cycle recovery. |
| Wear leveling test | Simulates hot and cold data scenarios, monitoring wear leveling efficiency and garbage collection impact on performance. Measures IOPS over time to detect uneven wear patterns. |
| Write latency test | Measures long-tail write latency by sequentially writing large 128K blocks at low queue depths (QD=1). Tracks latency distributions and ensures 99th percentile latency remains within acceptable limits. |
These benchmark tests provide a detailed assessment of SSD behavior under various conditions, complementing conformance and feature tests. By incorporating real-world scenarios such as power loss, AI workloads, and long-term endurance evaluations, PyNVMe3 enables a thorough performance analysis of NVMe SSDs across consumer and enterprise applications.
6.3 Enterprise Tests
PyNVMe3 also provides enterprise-oriented test scripts covering features such as FDP, MI, and more. The NVMe specification defines a number of advanced capabilities—such as Protection Information (PI), Controller Memory Buffer (CMB), and Zoned Namespace (ZNS)—that are primarily leveraged in enterprise-class SSDs.
Because these features are implemented differently across manufacturers, the enterprise test scripts in PyNVMe3 are provided as reference demos. They serve as a foundation for users to extend, adapt, and tailor tests to meet specific project requirements.
PyNVMe3 ensures that Enterprise users have:
- Full Access to API documentation and all test script source code
- Flexibility to customize and expand scripts within the existing framework
- Support through comprehensive technical guidance, enabling engineers to rapidly gain proficiency and effectively validate enterprise SSD features
In addition to NVMe host-path tests, PyNVMe3 also supports a growing range of management interface tests, including:
- I2C / SMBus
- I3C
- VDM
- MI
- SPDM
- DOE
Our management test suite is actively expanding to cover more protocols and advanced enterprise features, helping users validate the full lifecycle of enterprise SSD management and security.
7. Results
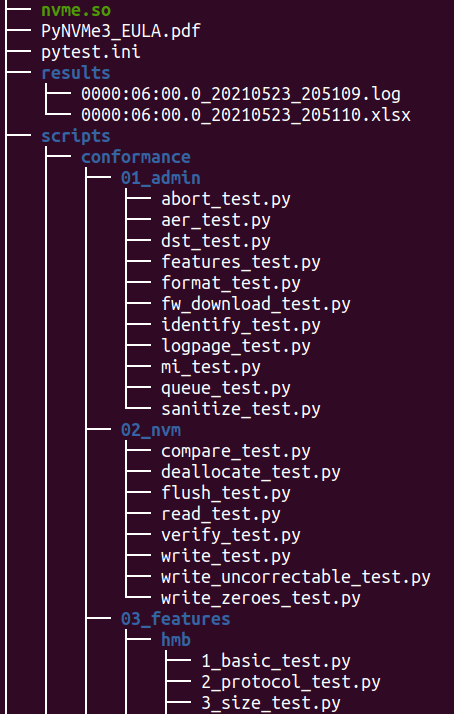
After the test is completed, the test report (*.xlsx) and test log (*.log) can be found in the PyNVMe3/results folder. Benchmark tests may generate additional files and images in the same folder.
 |
|---|
| Image 10: Test result files |
Each test item may have one of the following results:
- SKIPPED – The test was skipped.
- FAILED – The test failed.
- PASSED – The test passed but may include warnings.
For more details on the test logs and reports, please refer to the official pytest documentation.
7.1 Troubleshooting
If the test terminates abnormally, users can find debug information in the log files located in the PyNVMe3/results folder. If further investigation is needed, please provide the test log file to assist in troubleshooting. To temporarily bypass failed tests, users can prefix the function name with an underscore (_) in the test script.
8. Certification
Users have the flexibility to define test parameters and execution order based on their specific needs. However, to ensure consistent and comparable results across different SSDs, PyNVMe3 introduces the QLC Client SSD Certificate. This certification framework is tailored for consumer-grade QLC SSDs, providing a standardized approach that defines the testing platform, parameters, and procedures.
The QLC certification process is built entirely upon existing basic scripts, incorporating conformance and benchmark tests. By standardizing the testing platform, parameters, and procedures, this certification ensures reliable and repeatable evaluation of SSD performance, endurance, and reliability.
- Comprehensive Test Library: PyNVMe3, through extensive collaboration with industry vendors, has built a robust SSD test script library covering protocol, performance, functionality, reliability, endurance, and data retention.
- Exposing QLC Challenges: We understand the performance and endurance challenges of QLC SSDs, particularly how SLC cache, while boosting initial performance, accelerates QLC wear.
- In-Depth Performance Testing: PyNVMe3 conducts rigorous tests on QLC SSDs across various fill levels and aging conditions, identifying potential functional and performance issues under different usage scenarios.
- Automated Testing Processes: Using Python scripts and test fixtures, PyNVMe3 ensures a consistent and fully automated testing environment, delivering reliable and comparable results.
- Independent Certification: PyNVMe3 offers comprehensive and independent third-party assessments of QLC SSDs, helping manufacturers identify and address potential issues early.
8.1 Test Phases
We have over 1,000 test cases divided into the following four test phases. TP1 and TP2 can be completed within one day, while the full test process takes 3-4 months.
| Test Phase | Description | Duration | Platform |
|---|---|---|---|
| TP1 | Protocol Tests: Verifies compliance with NVMe, PCIe, TCG, MI, and more. | 1-2 hours | Laptop w/ PAM |
| TP2 | Benchmark Tests: Evaluates performance, stress, power state transitions, I/O, CDM profile, PCIe link speed behavior, LLM loading workload, and power cycling. | 1-2 days | Laptop w/ PAM |
| TP3 | Endurance Tests: Consumes the SSD’s full TBW across 3 stages, with performance, stress, and reliability tests interspersed. | 1-2 months | PC/Server |
| TP4 | Retention Tests: Conducted after TP3, assessing data reliability after a prolonged period of inactivity at room temperature. | 1 hour (after a 2-month power-off period) | PC/Server |
TP1: Protocol Tests
The first phase focuses on protocol compliance testing, covering NVMe, PCIe, TCG, MI, and other relevant standards. TP1 requires approximately 2 hours to complete.
| TP1.a | NVMe Admin Command Compliance |
|---|---|
| Criteria | All tests should pass, with allowances for some to be skipped if not applicable. |
| Duration | < 1 hour |
| Notes | Tests all admin commands, including various legal or illegal parameters in SQE. |
| TP1.b | NVMe I/O Command Compliance |
|---|---|
| Criteria | All tests should pass, with allowances for some to be skipped if not applicable. |
| Duration | < 1 hour |
| Notes | Tests all I/O commands, including various legal or illegal parameters in SQE. |
| TP1.c | Host Memory Buffer Test |
|---|---|
| Criteria | All tests should pass. Skipped tests are acceptable if the feature is not applicable. |
| Duration | < 1 hour |
| Notes | Tests various memory layouts for initializing HMB, the interaction stress test between HMB and IO, and error injection tests for HMB memory. It’s acceptable if error injection tests cause ERROR in the test disk, but it should not affect the execution of subsequent tests. |
| TP1.d | Boot Partition Functionality |
|---|---|
| Criteria | All tests should pass. Skipped tests are acceptable if the feature is not applicable. |
| Duration | < 1 hour |
| Notes | Write and read tests for BP, checking the consistency of image data. Test the impact of abnormal power-off on BP data consistency. |
| TP1.e | Reset Behavior |
|---|---|
| Criteria | All tests should pass, with allowances for some to be skipped if not applicable. |
| Duration | < 1 hour |
| Notes | Various PCIe, controller, subsystem reset operations, and their interactions with IO tests. |
| TP1.f | Power Management |
|---|---|
| Criteria | All tests should pass, with allowances for some to be skipped if not applicable. |
| Duration | < 1 hour |
| Notes | Tests on NVMe power states, reliability of switching power states under various conditions. |
| TP1.g | Register Handling |
|---|---|
| Criteria | All tests should pass, with allowances for some to be skipped if not applicable. |
| Duration | < 1 hour |
| Notes | Tests on the operations of PCIe and NVMe registers. |
| TP1.h | Controller Functionality |
|---|---|
| Criteria | All tests should pass, with allowances for some to be skipped if not applicable. |
| Duration | < 1 hour |
| Notes | Tests NVMe controller features, such as SQ arbitration, PRP, interrupts, SQ, SQE, and other legal and illegal operations. |
| TP1.i | TCG Storage Security |
|---|---|
| Criteria | All tests should pass, with allowances for some to be skipped if not applicable. |
| Duration | < 1 hour |
| Notes | Implemented according to the TCG test specification for testing applicable to Opal/Pyrite. |
| TP1.j | OEM-Specific Testing |
|---|---|
| Criteria | All tests must pass, with exceptions for tests that are not applicable and can be skipped. |
| Duration | Less than 1 hour |
| Notes | Tests customized for OEM manufacturers’ specific requirements. Obtain the test script files from the respective PC OEM vendors. |
This structured testing process ensures a comprehensive evaluation of SSDs for protocol compliance, aligning with both industry standards and OEM-specific requirements.
TP2: Benchmark Tests
This phase is dedicated to evaluating the performance, efficiency, and durability of SSDs under a variety of operational conditions. The benchmarks are crafted to emulate real-world usage scenarios and stress tests, aiming to ensure that SSDs fulfill the requisite standards for performance and longevity.
Benchmark tests will log extensive data such as performance metrics, temperature, and time, and will also generate graphical representations of this data. After a test passes, it’s crucial to further analyze these data and graphs in comparison with other drives to fully understand the SSD’s performance characteristics.
TP2 requires about 1-2 days for testing.
| TP2.a | Low Power State |
|---|---|
| Criteria | All tests should pass. |
| Duration | About 3 hours |
| Notes | Tests NVMe low power consumption, including power values, the speed of entering and exiting power state transitions, and reliability. |
| TP2.b | Performance Evaluation |
|---|---|
| Criteria | All tests should pass, with allowances for some to be skipped if not applicable. |
| Duration | 3-10 hours, depending on the DUT’s performance |
| Notes | Comprehensive performance testing, testing the performance of different workloads under different states of the drive, and obtaining data on performance, latency, power consumption, and temperature. |
| TP2.c | I/O Stress Testing |
|---|---|
| Criteria | All tests should pass. |
| Duration | 6 hours |
| Notes | Test the drive’s I/O robustness with various I/O workloads. |
| TP2.d | Power Cycle Dirty |
|---|---|
| Criteria | All tests should pass. |
| Duration | 3-10 hours, depending on the DUT’s performance |
| Notes | Tests the robustness of the drive’s power-off handling through thousands of dirty power cycles, as well as the response time of various initialization stages after power-on. |
| TP2.e | Power Cycle Clean |
|---|---|
| Criteria | All tests should pass. |
| Duration | 3-10 hours, depending on the DUT’s performance |
| Notes | Tests the robustness of the drive’s power-off handling through thousands of clean power cycles, as well as the response time of various initialization stages after power-on. |
| TP2.f | Basic CDM Benchmark |
|---|---|
| Criteria | All tests should pass. |
| Duration | About 10-30 minutes |
| Notes | Runs a CrystalDiskMark-style benchmark profile to compare sequential and random performance consistency. |
| TP2.g | Link Speed Stress |
|---|---|
| Criteria | All tests should pass. |
| Duration | About 30-90 minutes |
| Notes | Changes PCIe link speed under continuous I/O to check transition robustness and stability. |
| TP2.h | LLM Loading Workload |
|---|---|
| Criteria | All tests should pass. |
| Duration | 2-12 hours, depending on namespace size and DUT performance |
| Notes | Simulates LLM-style large dataset loading and repeated image reads to evaluate sustained throughput consistency. |
TP3: Endurance Tests
The third part of tests is dedicated to rigorously evaluating the SSD’s endurance and durability. By subjecting the SSD to extended write operations and intensive I/O stress tests, we aim to closely simulate the entire lifecycle of the SSD. This comprehensive approach allows us to precisely gauge the SSD’s ability to maintain data integrity through prolonged periods of operation.
TP3’s testing duration ranges from 1 to 2 months, depending on the DUT’s performance.
| TP3.a | Consume 1/3 Space and PE Cycles |
|---|---|
| Criteria | All tests should pass. |
| Duration | 3-14 days, depending on the DUT’s performance |
| Notes | Perform the first phase of wear, covering 1/3 of capacity and lifespan. |
| TP3.b | Wear Leveling |
|---|---|
| Criteria | All tests should pass. |
| Duration | 7 days |
| Notes | Tests the drive’s wear leveling handling under various conditions by creating cold and hot data. |
| TP3.c | Consume 2/3 Space and PE Cycles |
|---|---|
| Criteria | All tests should pass. |
| Duration | 3-14 days, depending on the DUT’s performance |
| Notes | Perform the second phase of wear, covering 2/3 of the capacity and lifespan. |
| TP3.d | Performance Evaluation |
|---|---|
| Criteria | All tests should pass, with allowances for some to be skipped if not applicable. |
| Duration | 6-24 hours, depending on the DUT’s performance |
| Notes | Performance testing, comparing performance data with TP2.b to observe the drive’s performance degradation. |
| TP3.e | Consume All Space and PE Cycles |
|---|---|
| Criteria | All tests should pass. |
| Duration | 3-14 days, depending on the DUT’s performance |
| Notes | Perform the third phase of wear, covering all capacity and lifespan. |
| TP3.f | I/O Stress Testing |
|---|---|
| Criteria | All tests should pass. |
| Duration | 10 days |
| Notes | Test the drive’s I/O robustness with various I/O workloads. |
| TP3.g | Data Retention Preparation |
|---|---|
| Criteria | All tests should pass. |
| Duration | 1-2 hours, depending on the DUT’s performance |
| Notes | Fill the entire drive and save CRC data to the OS drive in preparation for retention testing. |
| TP3.h | Data Retention Verification |
|---|---|
| Criteria | All tests should pass. |
| Duration | 1 hour |
| Notes | Verify the correctness of the entire drive’s data using CRC data from the OS drive, specifically after retention testing. |
TP4: Retention Tests
After successfully completing Test Phase 3, keep the DUT at room temperature without power for 2 months. Then, perform the following test on the same platform (with the same OS drive) to check the data reliability after a long period of inactivity.
TP4’s testing duration ranges from 1 hour to 2 hours, depending on the DUT’s performance.
| TP4.a | Data Retention Verification After 2 Months |
|---|---|
| Criteria | All tests should pass. |
| Duration | 1 hour |
| Notes | Verify the correctness of the entire drive’s data using CRC data from the OS drive, comparing the degradation in read performance and changes in response time distribution with TP3.g. |
This section of tests is crucial for understanding the SSD’s longevity and reliability, particularly in terms of data retention capabilities after extended periods without power.
8.2 Preparation
- Configure a Dell Precision Mobile Workstation following the User Guide. Use the same platform throughout the test process without changing or updating its OS/BIOS.
- The Quarch Power Analysis Module (PAM) is required for TP1 and TP2 to collect accurate power measurement data.
- Use a SATA or USB SSD as the operating system drive. Ensure that only one NVMe SSD is connected as the Device Under Test (DUT). Use the same DUT throughout the test process without changing or updating its firmware.
- If the tests are conducted for a specific OEM, obtain any necessary supplemental scripts directly from the OEM. Copy these scripts into the
PyNVMe3/scripts/conformance/09_vendordirectory on the test platform. Create the directory if it does not exist. - Before starting the tests, clear the
resultsdirectory to ensure it is ready to store logs, data files, and images generated during testing. This step is crucial for maintaining an organized and clean workspace for each test session.
8.3 Execution
The certification.sh script is designed to streamline the Client SSD certification process. To launch the automated testing sequence, run the following command in the terminal:
bash certification.sh <tp_id>
The <tp_id> parameter (e.g., TP1, TP2, TP3.c, TP4) specifies the test phase to execute. Before starting each certification test, reboot the test platform. Once the system has rebooted, start the certification test immediately.
After the test finishes, log files can be found in the PyNVMe3/results directory.
9. Contact
For further assistance or inquiries regarding the testing process, please reach out to us through the following channels:
- Business Inquiries: sales@pynv.me
- Technical Support: support@pynv.me
Our team is committed to providing support and guidance throughout the testing process, ensuring a smooth and effective certification for your SSD products.