
PyNVMe3 User Guide
Last Modified: May 28, 2024
Copyright © 2020-2024 GENG YUN Technology Pte. Ltd.
All Rights Reserved.
- PyNVMe3 User Guide
0. Change Log
| Version | Author | Date | Changes |
|---|---|---|---|
| 3.3 | cranechu | 2024-05-28 | Update for PyNVMe3 R24.5. |
| 3.2 | cranechu | 2024-05-10 | certification.sh requires one parameter as the test phase to execute. |
| 3.1 | cranechu | 2024-03-20 | Update test platform |
| 3.0 | cranechu | 2024-02-20 | Add Certification chapter |
| 2.2 | cranechu | 2024-01-07 | PyNVMe3 R24.x recommends Ubuntu 22.04. Ubuntu 20.04 will be obsoleted in 2025. |
| 2.1 | cranechu | 2023-08-25 | PyNVMe3 R23.8 now supports Ubuntu 20.04 and 22.04. |
| 2.0 | cranechu | 2022-12-28 | Re-distributed as an online document. |
| 1.5 | cranechu | 2022-11-28 | 1GB-hugepage configuration is now required. |
| Updated for PyNVMe3 R22.11. | |||
| 1.4 | cranechu | 2022-05-26 | Support for NVMe v2.0 added. |
| Updated for PyNVMe3 R22.5. | |||
| 1.3 | cranechu | 2021-11-25 | PAM is now required for TCG and benchmark tests. |
| 1.2 | cranechu | 2021-08-03 | Added benchmark test suite. |
| Introduced Quarch PAM setup. | |||
| 1.1 | cranechu | 2021-05-25 | Changed recommended platform. |
| Reports should be kept in the ‘results’ folder. | |||
| 1GB hugepage setup introduced. | |||
| Updated for PyNVMe3 R21.5. | |||
| 1.0 | cranechu | 2021-02-25 | Added an email address for technical support. |
| 0.9 | cranechu | 2021-02-06 | Updated for PyNVMe3 R21.2. |
| 0.1 | cranechu | 2021-01-11 | Initial version. |
1. Introduction
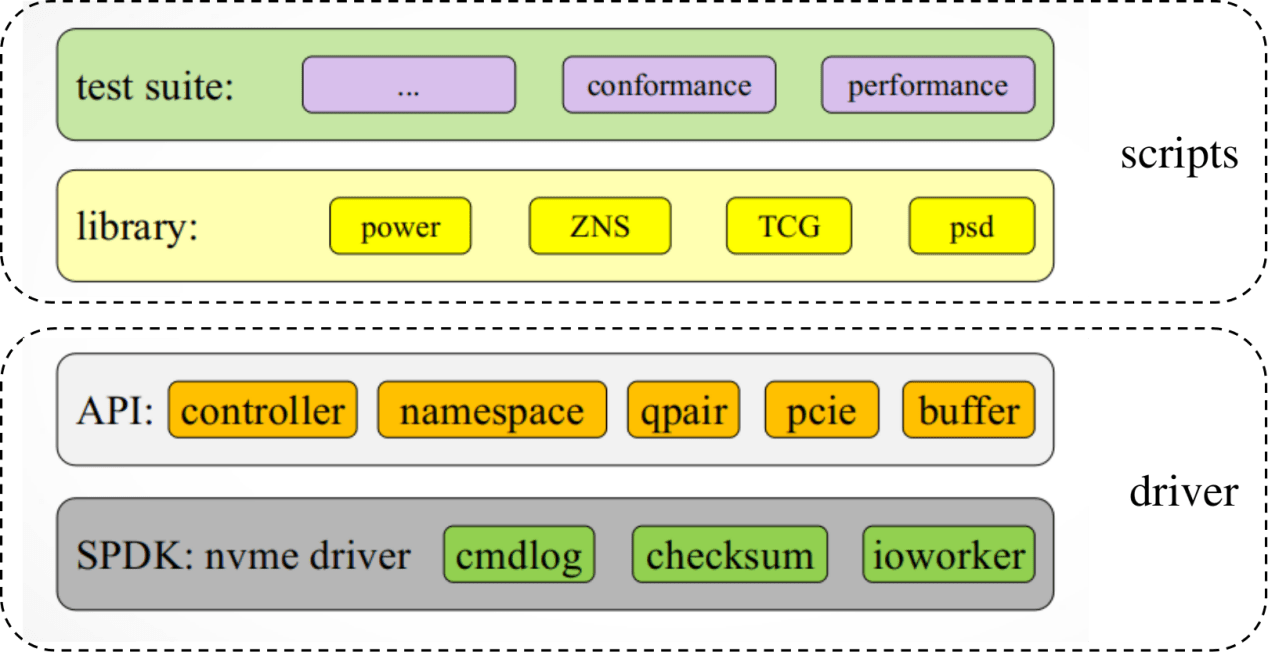
PyNVMe3 is a suite of NVMe SSD test tools implemented in Python3, supported by a dedicated NVMe testing driver developed in-house. This driver takes full command over the Device Under Test (DUT), from its registers and memory to its data buffers and commands. It delivers extensive and potent capabilities through an easy-to-use Python API. Based on this driver, PyNVMe3 offers a professional and meticulously maintained collection of NVMe test scripts.
 |
|---|
| Image 1 PyNVMe3 Block Diagram |
PyNVMe3 adheres to the NVMe Specification versions 1.4 and 2.0 but is not confined by these specifications.
2. Platform
To run PyNVMe3 effectively, your setup needs to meet the following checklist:
- CPU: Intel® Core™ i5 processor
- Memory: 16GB RAM
- OS: Ubuntu 22.04.x installed on a SATA SSD
- BIOS: disable RAID/RST/VMD, enable AHCI/NVMe
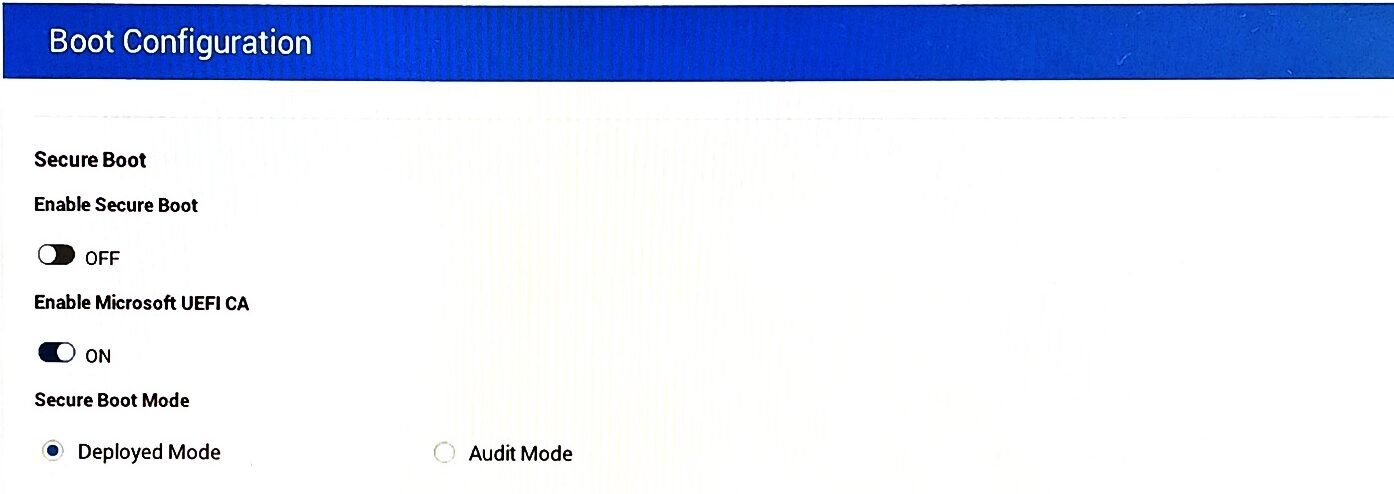
- BIOS: disable Secure Boot
 |
|---|
| Image 2 BIOS: disable RAID or RST |
 |
|---|
| Image 3 BIOS: disable Secure Boot |
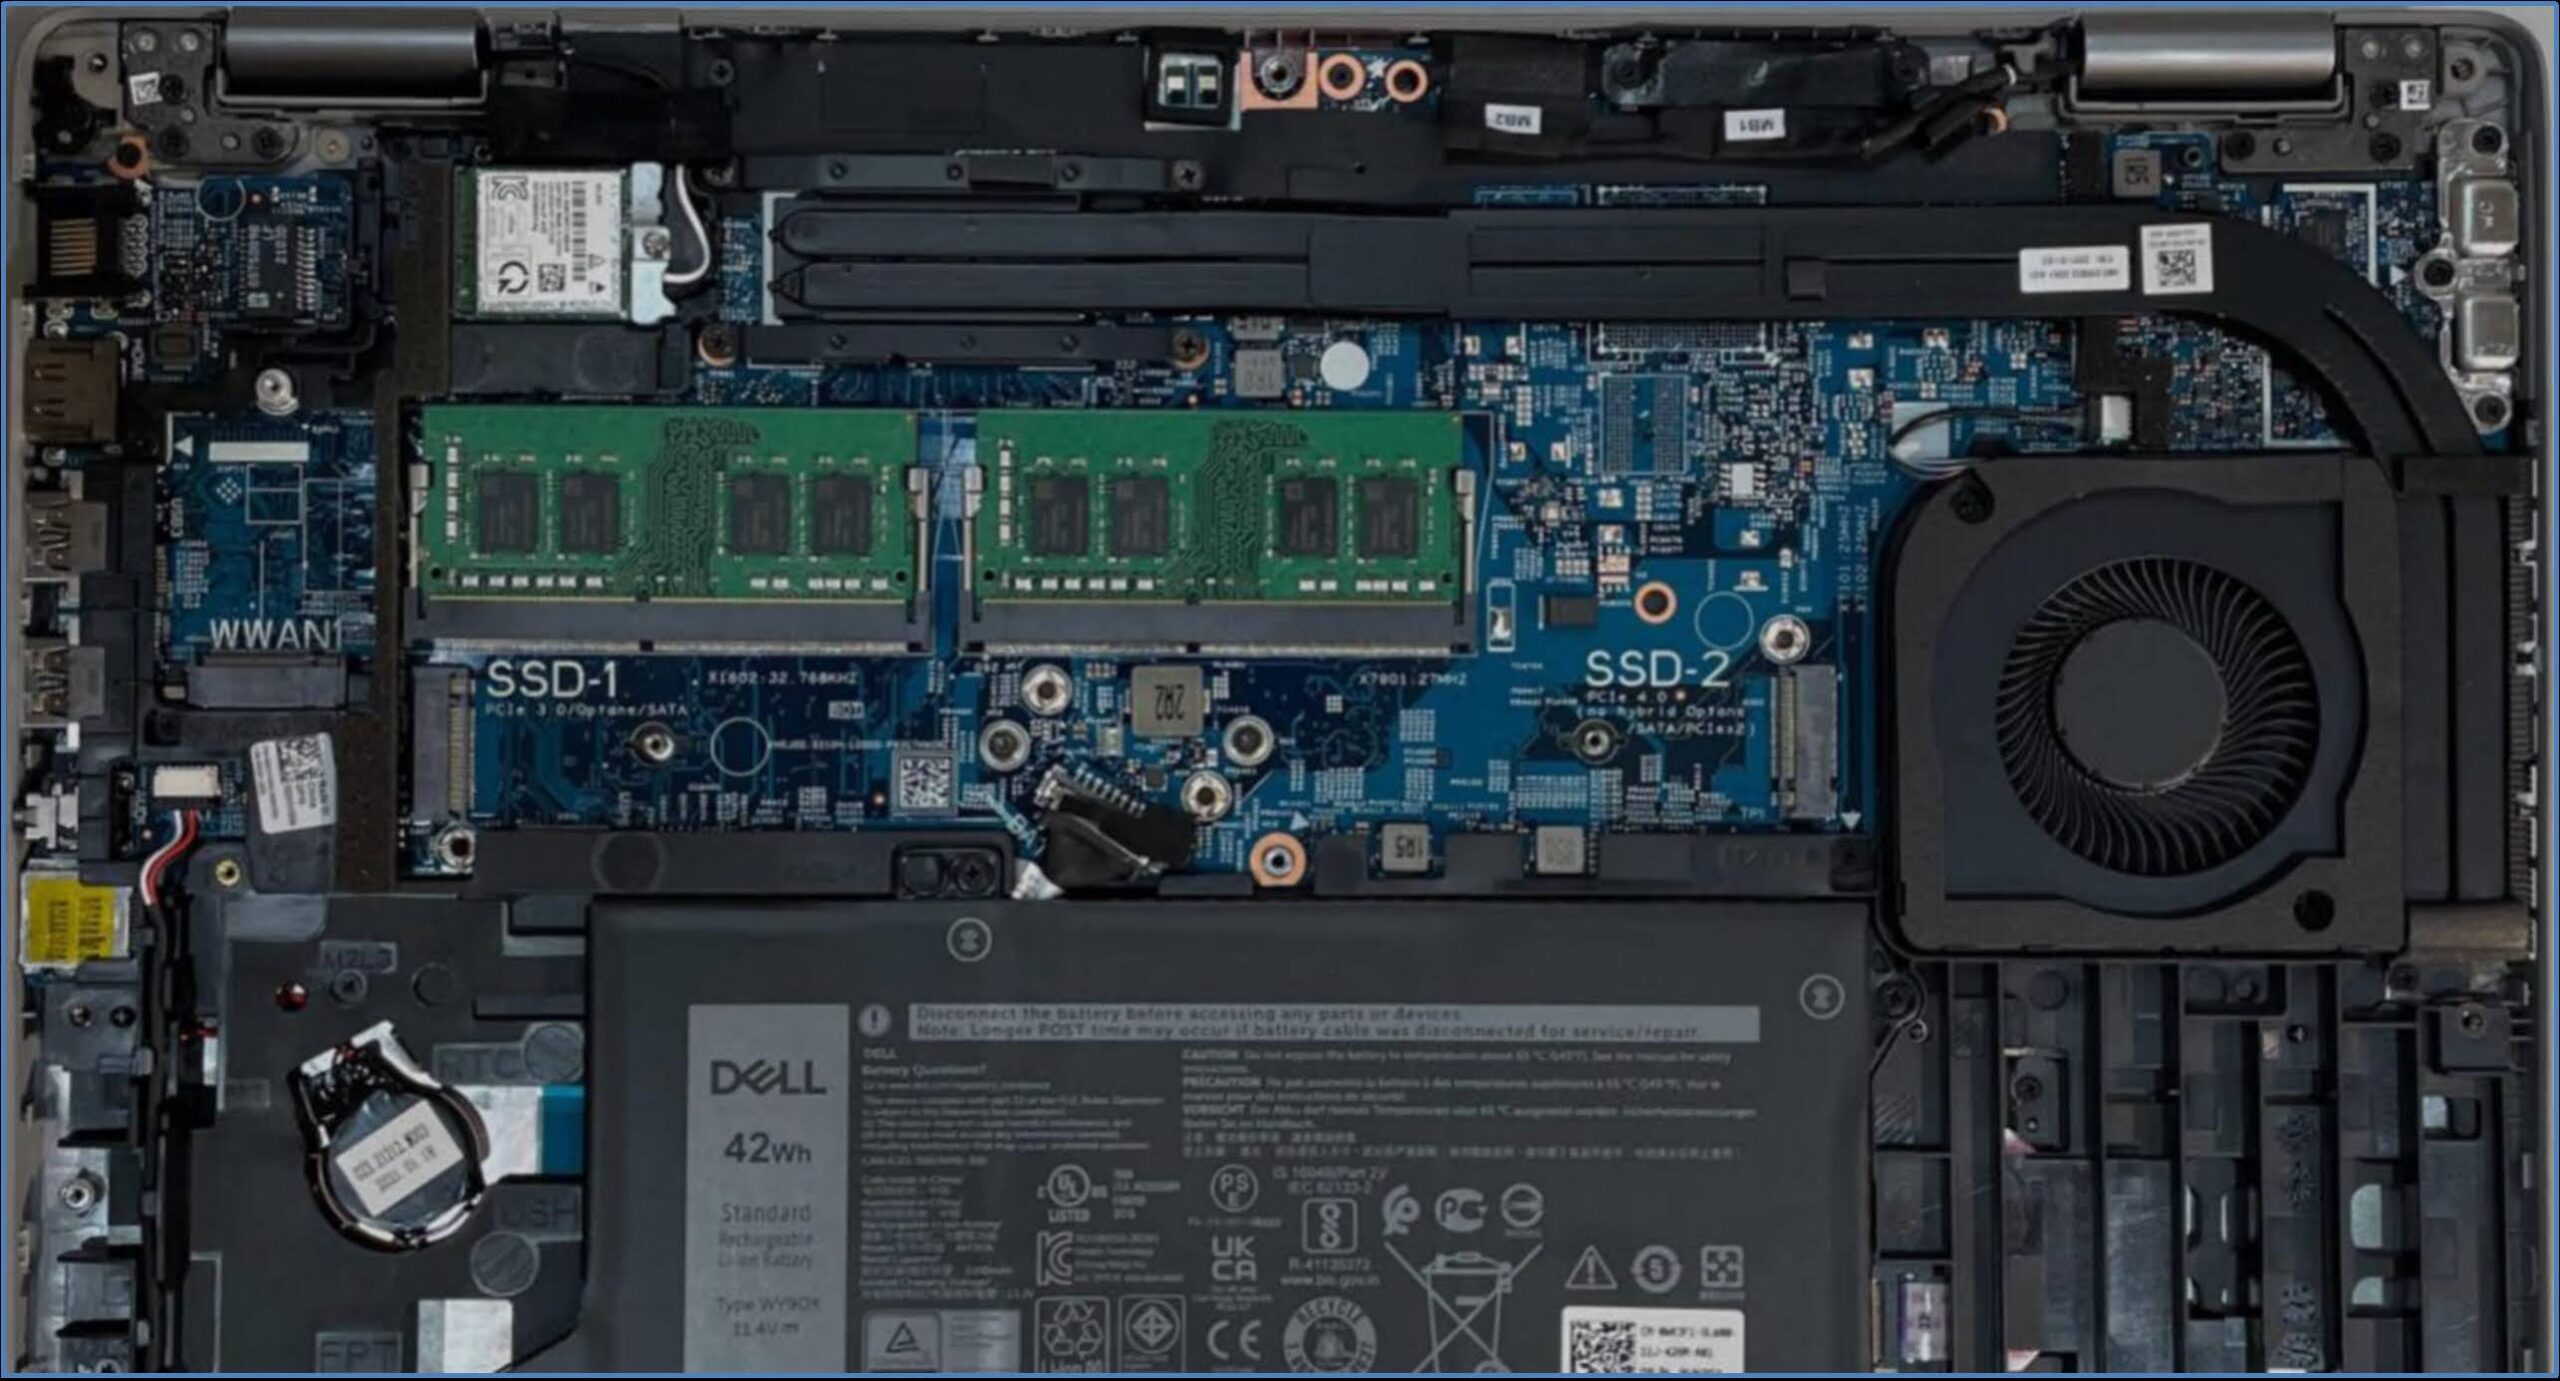
For the testing platform, we suggest the Dell Precision Mobile Workstation. Ubuntu OS should be installed on a SATA SSD to minimize the overhead and influence of the Kernel’s NVMe device driver. The PCIe M.2 slot should be reserved for the DUT (Device Under Test).
 |
|---|
| Image 4 Recommended System |
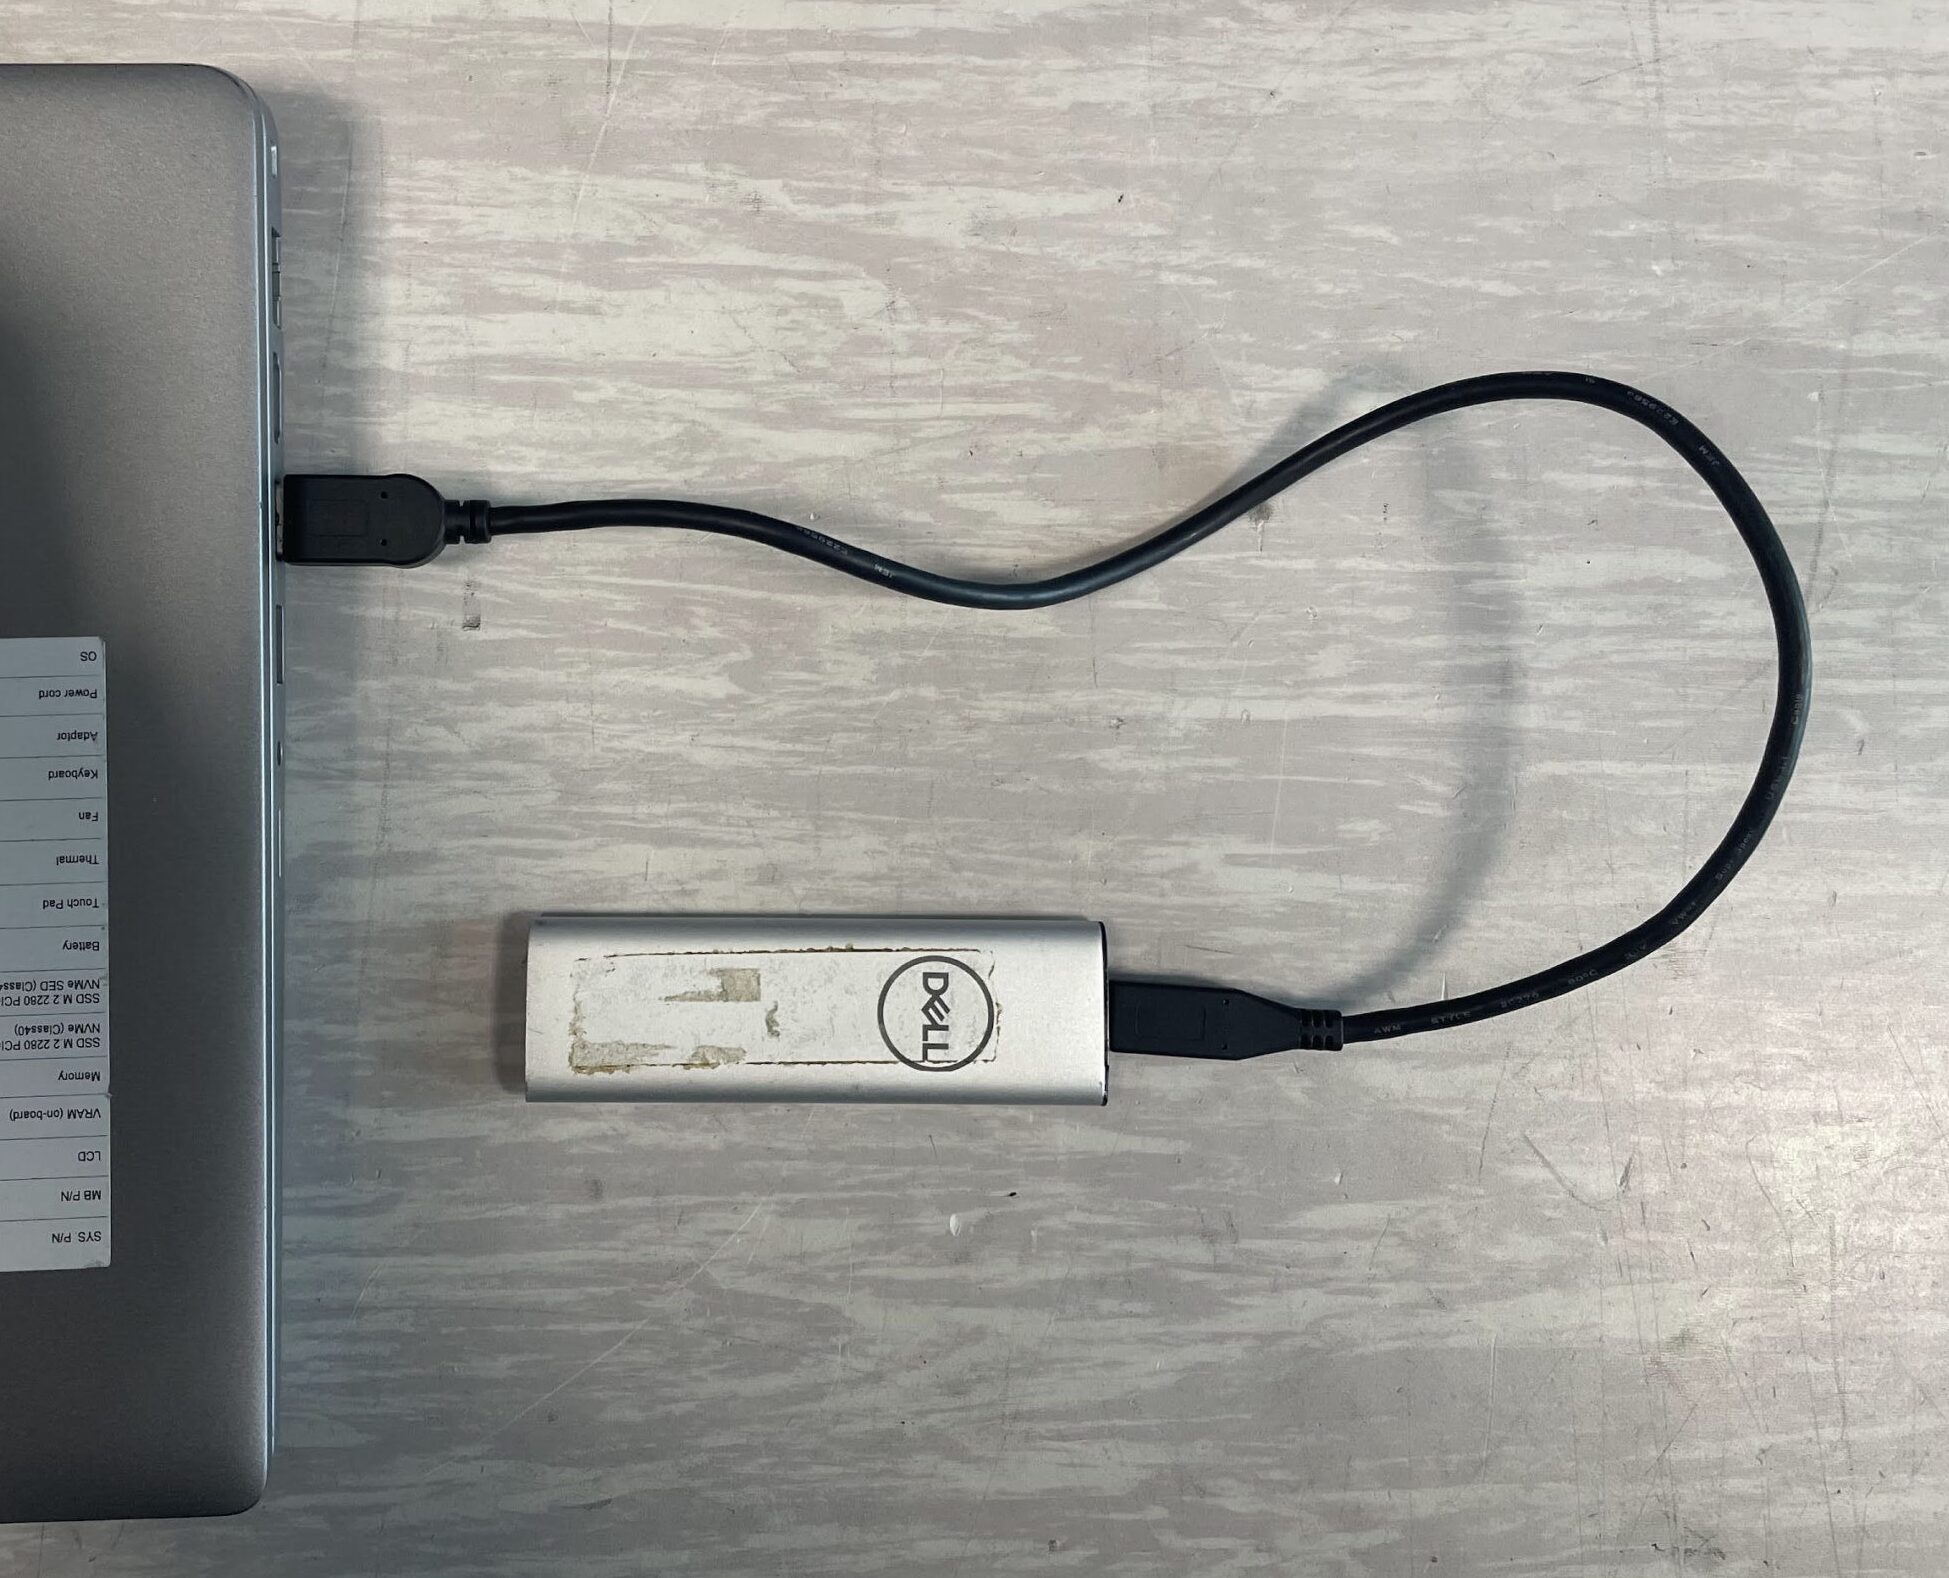
If the platform lacks a built-in SATA slot, we still cannot install the OS on an NVMe drive. Instead, we can install the OS on a USB SSD, as illustrated below. But, please always use the internal SATA slot (M.2 or traditional 2.5″ SATA port) on mainboard when it is available.
 |
|---|
| Image 5 External USB SSD for OS |
Because Thunderbolt SSDs also utilize PCIe and require the NVMe driver, they cannot be used as the OS drive for PyNVMe3.
3. Install
Before installing PyNVMe3, please first install Ubuntu LTS. After that, open a Terminal to install PyNVMe3 via command lines. Ensure you have internet access during the installation process.
- Update Ubuntu
sudo apt update
sudo apt upgrade - On Ubuntu 24.04, disable PEP 668
sudo rm -f /usr/lib/python3.12/EXTERNALLY-MANAGED
- Install pip3
sudo apt install -y python3-pip
- Uninstall PyNVMe3 if it has already been installed
sudo pip3 uninstall PyNVMe3
sudo rm -rf /usr/local/PyNVMe3 - Install the PyNVMe3 package with pip3
sudo pip3 install pynvme3-24.5.1.tar.gz
PyNVMe3 is installed in the folder /usr/local/PyNVMe3.
4. Configuration
Follow these steps to configurate Ubuntu Linux Kernel.
- Open GRUB configuration file to edit:
sudo gedit /etc/default/grub
- modify the line of GRUB_CMDLINE_LINUX_DEFAULT to:
GRUB_CMDLINE_LINUX_DEFAULT="quiet splash default_hugepagesz=2M hugepagesz=1G hugepages=1 iommu=off modprobe.blacklist=nvme pcie_aspm=off" - Update GRUB
sudo update-grub
- Open fstab configuration file to edit:
sudo gedit /etc/fstab
- add one new line to the end of file
/etc/fstabnone /mnt/huge hugetlbfs pagesize=1G,size=1G 0 0 - reboot Ubuntu
sudo reboot
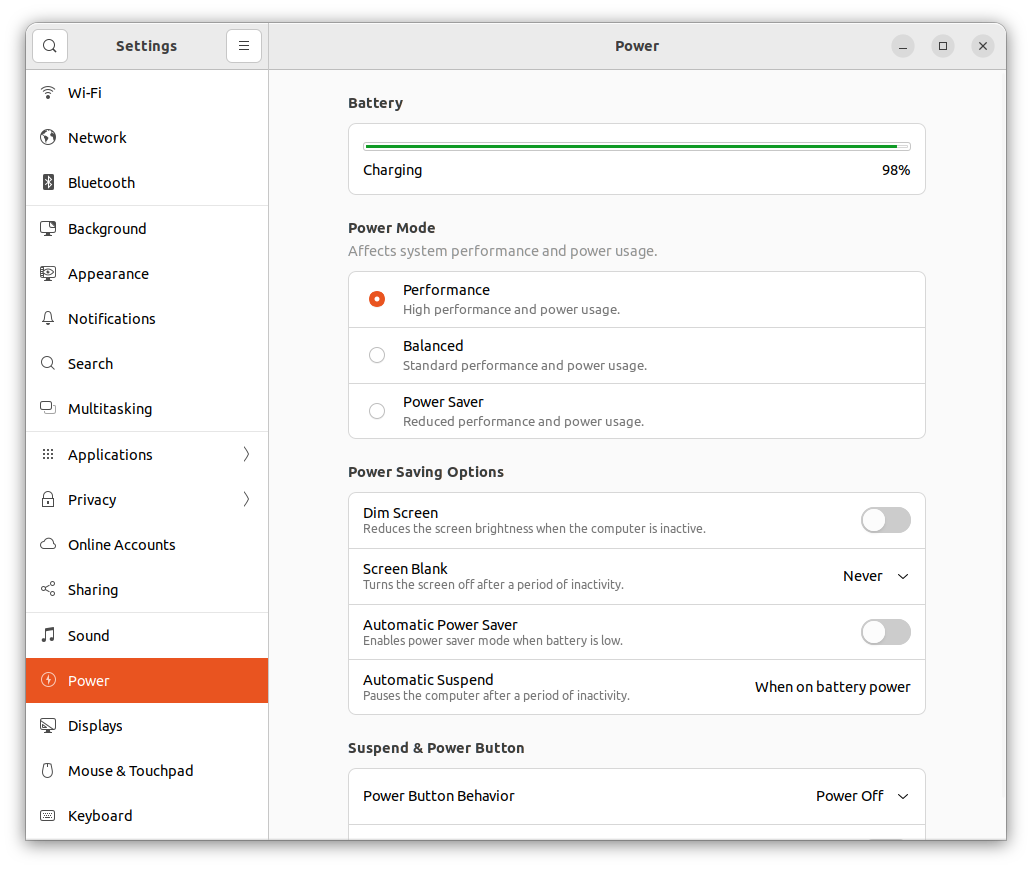
And change the Ubuntu power setting as below, to keep the test platform working all the time.
 |
|---|
| Image 6 Ubuntu power setting |
5. PAM Setup
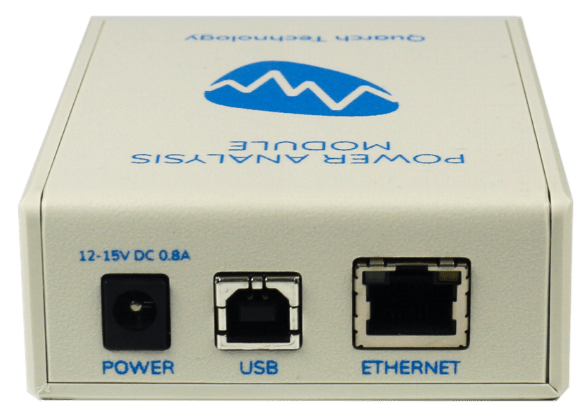
Quarch Power Analysis Module (PAM) is a 3-rd party power module used to control PCIe power (on/off) and monitor device power consumption. It is required by TCG tests, as well as power-related benchmark tests in PyNVMe3. PAM consists of 2 units: a control unit in a white box, and the m.2 fixture in 2280 form factor.
 |
 |
|---|---|
| Image 7 Front-view of the control unit | Image 8 Back-view of the control unit |
 |
|---|
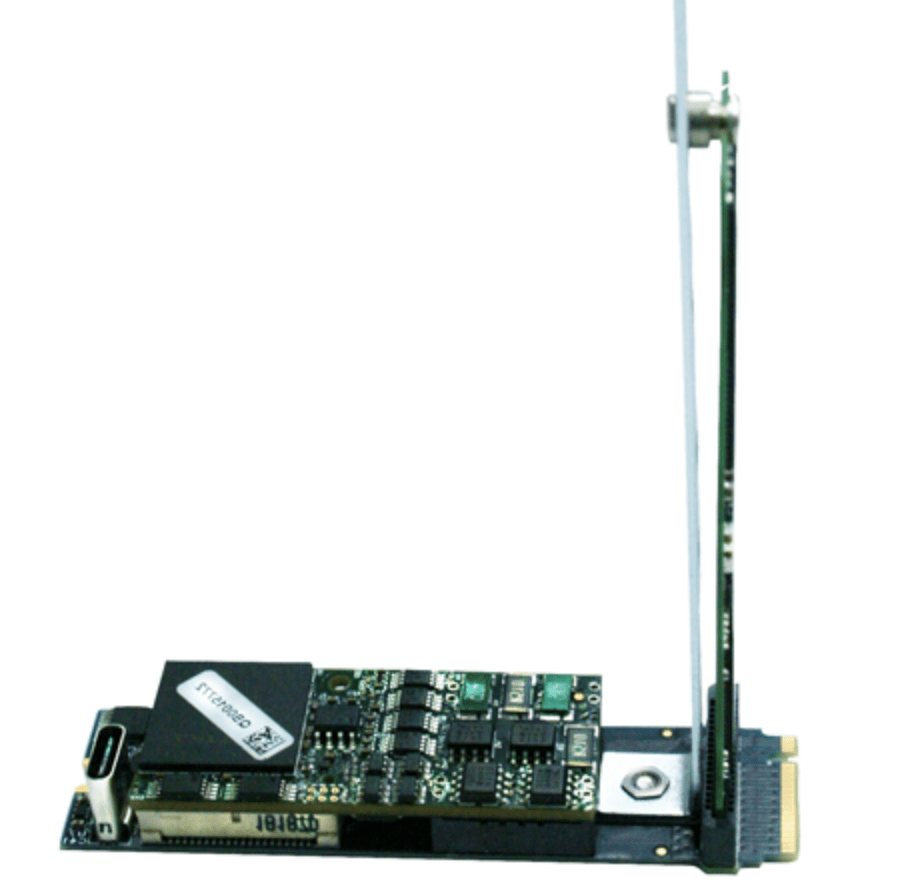
| Image 9 M.2 Fixture |
There 2 units are connected to the System Under Test (SUT) in the following steps:
- insert the m.2 fixture to the SUT, for example, SSD-2 (PCIe Gen4) slot of the recommended system;
- plug the DUT into the m.2 fixture;
- connect the control unit and the m.2 fixture with the (Quarch provided) type-C to type-C USB cable;

Image 10 Connection among SUT, DUT, fixture, and control unit - connect the control unit to the SUT with the (Quarch provided) type-B to type-A USB cable;
- connect (Quarch provided) power adaptor to the control unit, and power on;
- power on the SUT.
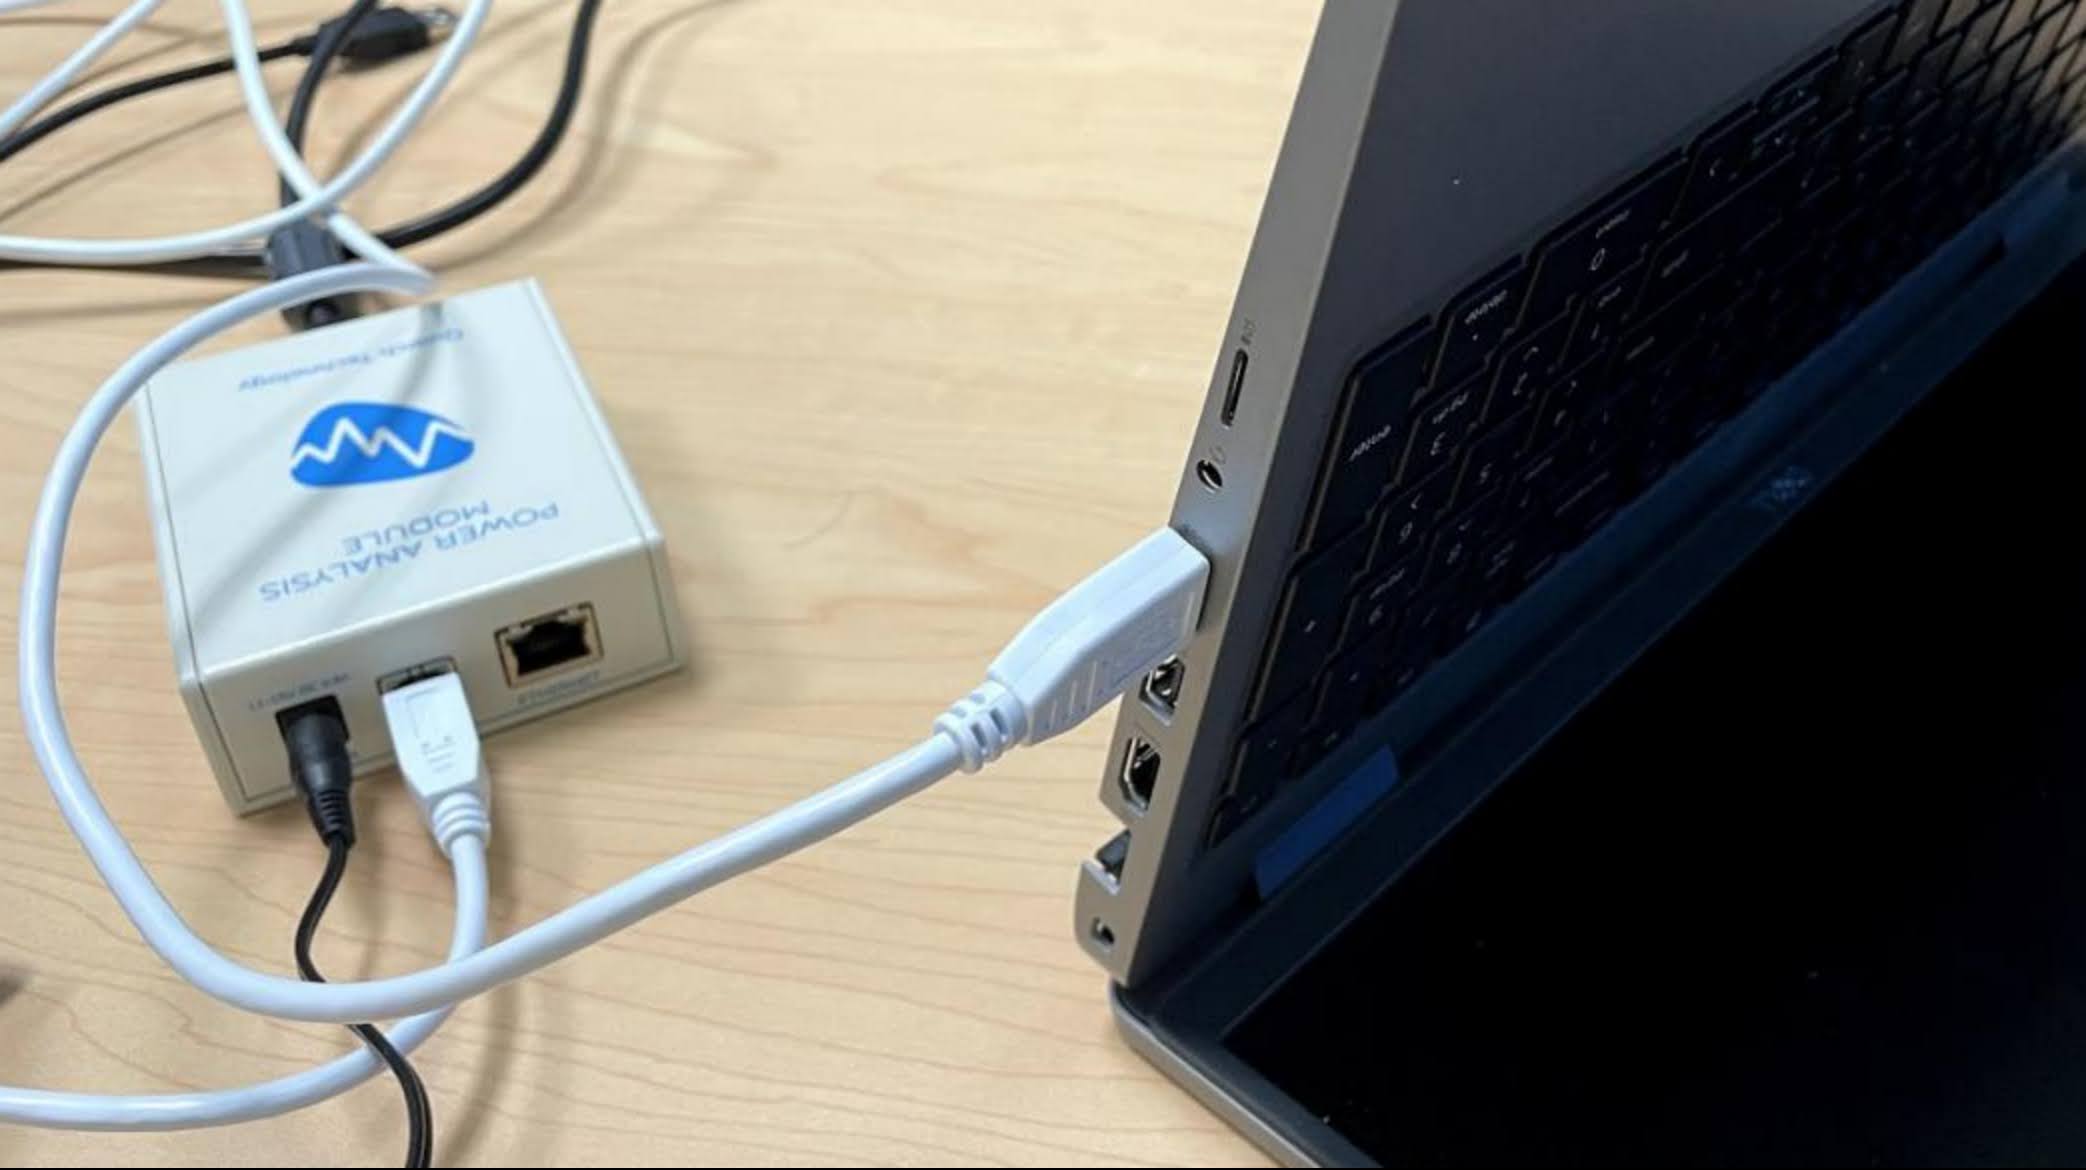
Image 11 Connection between SUT and controller unit
In step 4, as an alternative, when the scripts neither require PAM to control the power on/off, nor collect power data by the scripts themselves, we can connect the control unit to another computer where Quarch Power Studio (QPS) collects and presents the power data.
6. Test
In Ubuntu, open a Terminal to run PyNVMe3 in command lines. Internet access is not required to run PyNVMe3 tests. The external power supply shall be connected throughout the test.
- change directory to PyNVMe3 folder.
cd /usr/local/PyNVMe3
- switch to root user.
sudo su
- run the conformance tests with NVMe DUT.
make test
- or, run the specified tests with NVMe DUT in following ways.
make test TESTS=scripts/test_folder
make test TESTS=scripts/test_folder/test_file.py
make test TESTS=scripts/test_folder/test_file.py::test_functionFor more information, please refer to pytest documents.
- or when multiple NVMe DUTs are attached in the SUT, run the tests with a specified NVMe DUT by its BDF address.
make test pciaddr=BB:DD.F
NOTICE: The test may remove or overwrite the data in your NVMe DUT. Before running any PyNVMe3 test, please backup your data and delete all partitions in your DUT.
When PyNVMe3 test is running, the test-dedicated driver takes over control of NVMe DUT from Linux Kernel’s inbox driver. So, the Kernel, as well as the Kernel-based utilities (e.g. fio, nvme-cli), cannot detect and manipulate the NVMe DUT during PyNVMe3 tests.
6.1 Conformance Tests
PyNVMe3 provides conformance test suite to test DUT against specifications. Quarch PAM is required by some test scripts (e.g. TCG tests). If PAM is not available, these tests are skipped.
6.2 Benchmark Tests
PyNVMe3 provides benchmark test suite to test DUT in real workloads. We can compare test results of different DUTs. Quarch PAM is required by some of the benchmark tests (e.g. power_cycle.py). Users can run benchmark test as below:
make test TESTS=./scripts/benchmark/poweron_time.py
7. Results
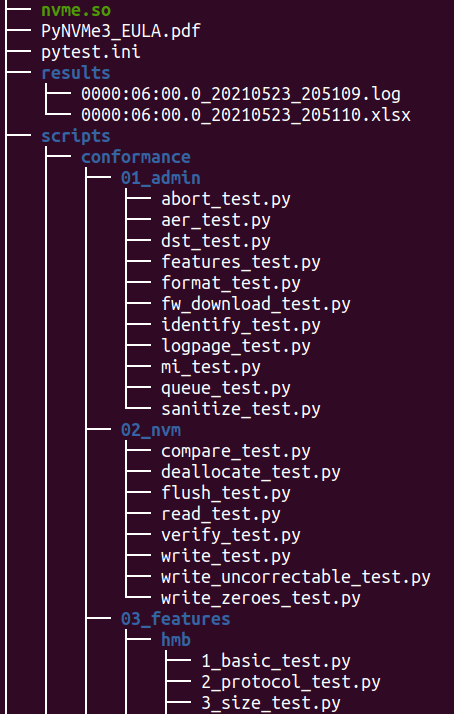
After the test is completed, we can find the test report (.xlsx) and log (.log) files in folder PyNVMe3/results. Benchmark tests could generate more files and pictures in this folder.
 |
|---|
| Image 12 Test result files |
There are some possible test results of each test item:
- SKIPPED: test skipped.
- FAILED: test failed.
- PASSED: test passed, but may have some warnings.
For more information on the test log and report, please refer to pytest.
7.1 Troubleshooting
When the test is terminated abnormally, users can find more debug information from the log files in the PyNVMe3/results folder. Users can also add a prefix ‘_’ to the function name of the FAILED tests to bypass them temporarily. Please provide us the test log file when we need to investigate issues together.
8. Certification
To effectively test and qualify Client SSD products, adhere to the procedures outlined in this chapter.
8.1 Preparation
- Use a Dell Precision Mobile Workstation equipped with a Quarch Power Analysis Module (PAM) for precise power measurement. Use the same platform without changing it or updating its OS/BIOS throughout the test process.
- Use a SATA or USB SSD as the Operating System drive. Ensure that only one NVMe SSD is connected, serving as the sole Device Under Test (DUT) on the test platform. Use the same DUT without changing or updating its firmware throughout the test process.
- If the tests are conducted for a specific OEM, acquire any necessary supplemental scripts directly from the OEM. Copy these scripts into the directory
PyNVMe3/scripts/conformance/09_vendorto the test platform. Create the directory if it does not exist. - Prior to commencing the tests, clear the
resultsdirectory to ensure it is ready to store logs, data files, and images generated during the testing process. This step is crucial for maintaining an organized and clean workspace for each testing session.
8.2 Test Phases
Test Phase 1: Protocol Tests
The first phase involves protocol compliance testing, including NVMe, PCIe, TCG, and etc. TP1 requires about 2 hours for testing.
| TP1.a | NVMe Admin Command Compliance |
|---|---|
| Command | make test TESTS=./scripts/conformance/01_admin logdir=./results/TP1.a_admin_cmd |
| Criteria | All tests should pass, with allowances for some to be skipped if not applicable. |
| Duration | < 1 hour |
| Notes | Tests all admin commands, including various legal or illegal parameters in SQE. |
| TP1.b | NVMe I/O Command Compliance |
|---|---|
| Command | make test TESTS=./scripts/conformance/02_nvm logdir=./results/TP1.b_nvme_io |
| Criteria | All tests should pass, with allowances for some to be skipped if not applicable. |
| Duration | < 1 hour |
| Notes | Tests all I/O commands, including various legal or illegal parameters in SQE. |
| TP1.c | Host Memory Buffer Test |
|---|---|
| Command | make test TESTS=./scripts/conformance/03_features/hmb logdir=./results/TP1.c_hmb_feature |
| Criteria | All tests should pass. Skipped tests are acceptable if the feature is not applicable. |
| Duration | < 1 hour |
| Notes | Tests various memory layouts for initializing HMB, the interaction stress test between HMB and IO, and error injection tests for HMB memory. It’s acceptable if error injection tests cause ERROR in the test disk, but it should not affect the execution of subsequent tests. |
| TP1.d | Boot Partition Functionality |
|---|---|
| Command | make test TESTS=./scripts/conformance/03_features/boot_partition_test.py logdir=./results/TP1.d_boot_partition |
| Criteria | All tests should pass. Skipped tests are acceptable if the feature is not applicable. |
| Duration | < 1 hour |
| Notes | Write and read tests for BP, checking the consistency of image data. Test the impact of abnormal power-off on BP data consistency. |
| TP1.e | Reset Behavior |
|---|---|
| Command | make test TESTS=./scripts/conformance/03_features/reset_test.py logdir=./results/TP1.e_reset_behavior |
| Criteria | All tests should pass, with allowances for some to be skipped if not applicable. |
| Duration | < 1 hour |
| Notes | Various PCIe, controller, subsystem reset operations, and their interactions with IO tests. |
| TP1.f | Power Management |
|---|---|
| Command | make test TESTS=./scripts/conformance/03_features/power_management_test.py logdir=./results/TP1.f_power_management |
| Criteria | All tests should pass, with allowances for some to be skipped if not applicable. |
| Duration | < 1 hour |
| Notes | Tests on NVMe power states, reliability of switching power states under various conditions. |
| TP1.g | Register Handling |
|---|---|
| Command | make test TESTS=./scripts/conformance/04_registers logdir=./results/TP1.g_register_handling |
| Criteria | All tests should pass, with allowances for some to be skipped if not applicable. |
| Duration | < 1 hour |
| Notes | Tests on the operations of PCIe and NVMe registers. |
| TP1.h | Controller Functionality |
|---|---|
| Command | make test TESTS=./scripts/conformance/05_controller logdir=./results/TP1.h_controller_func |
| Criteria | All tests should pass, with allowances for some to be skipped if not applicable. |
| Duration | < 1 hour |
| Notes | Tests NVMe controller features, such as SQ arbitration, PRP, interrupts, SQ, SQE, and other legal and illegal operations. |
| TP1.i | TCG Storage Security |
|---|---|
| Command | make test TESTS=./scripts/conformance/06_tcg logdir=./results/TP1.i_tcg_security |
| Criteria | All tests should pass, with allowances for some to be skipped if not applicable. |
| Duration | < 1 hour |
| Notes | Implemented according to the TCG test specification for testing applicable to Opal/Pyrite. |
| TP1.j | OEM-Specific Testing |
|---|---|
| Command | make test TESTS=./scripts/conformance/09_vendor logdir=./results/TP1.j_oem_specific |
| Criteria | All tests should pass, with allowances for some to be skipped if not applicable. |
| Duration | < 1 hour |
| Notes | Tests for OEM manufacturer’s custom specifications. |
This structured testing process ensures a comprehensive evaluation of SSDs for protocol compliance, performance, and reliability, adhering to industry standards and OEM-specific requirements.
Test Phase 2: Benchmark Tests
This phase is dedicated to evaluating the performance, efficiency, and durability of SSDs under a variety of operational conditions. The benchmarks are crafted to emulate real-world usage scenarios and stress tests, aiming to ensure that SSDs fulfill the requisite standards for performance and longevity.
Benchmark tests will log extensive data such as performance metrics, temperature, and time, and will also generate graphical representations of this data. After a test passes, it’s crucial to further analyze these data and graphs in comparison with other drives to fully understand the SSD’s performance characteristics.
TP2 requires about 20 hours for testing.
| TP2.a | Low Power State |
|---|---|
| Command | make test TESTS=./scripts/benchmark/saw_diagram.py logdir=./results/TP2.a_low_power_state |
| Criteria | All tests should pass. |
| Duration | About 3 hours |
| Notes | Tests NVMe low power consumption, including power values, the speed of entering and exiting power state transitions, and reliability. |
| TP2.b | Performance Evaluation |
|---|---|
| Command | make test TESTS=./scripts/benchmark/performance.py logdir=./results/TP2.b_performance_evaluation |
| Criteria | All tests should pass, with allowances for some to be skipped if not applicable. |
| Duration | 4-10 hours, depending on the DUT’s performance |
| Notes | Comprehensive performance testing, testing the performance of different workloads under different states of the drive, and obtaining data on performance, latency, power consumption, and temperature. |
| TP2.c | I/O Stress Testing |
|---|---|
| Command | make test TESTS=./scripts/benchmark/ioworker_stress.py logdir=./results/TP2.c_ioworker_stress limit=6 |
| Criteria | All tests should pass. |
| Duration | 6 hours |
| Notes | Test the drive’s I/O robustness with various I/O workloads. |
| TP2.d | Power Cycle Dirty |
|---|---|
| Command | make test TESTS=./scripts/benchmark/por_sudden.py logdir=./results/TP2.d_power_cycle_dirty |
| Criteria | All tests should pass. |
| Duration | 3 hours, depending on the DUT’s performance |
| Notes | Tests the robustness of the drive’s power-off handling through thousands dirty power cycles, as well as the response time of various initialization stages after power-on. |
| TP2.e | Power Cycle Clean |
|---|---|
| Command | make test TESTS=./scripts/benchmark/por_typical.py logdir=./results/TP2.e_power_cycle_clean |
| Criteria | All tests should pass. |
| Duration | 3 hours, depending on the DUT’s performance |
| Notes | Tests the robustness of the drive’s power-off handling through thousand clean power cycles, as well as the response time of various initialization stages after power-on. |
Test Phase 3: Endurance Tests
The third part of tests is dedicated to rigorously evaluating the SSD’s endurance and durability. By subjecting the SSD to extended write operations and intensive I/O stress tests, we aim to closely simulate the entire lifecycle of the SSD. This comprehensive approach allows us to precisely gauge the SSD’s ability to maintain data integrity through prolonged periods of operation.
TP3’s testing duration ranges from 1 to 2 months, depending on the DUT’s performance.
| TP3.a | Consume 1/3 Space and PE Cycles |
|---|---|
| Command | make test TESTS=./scripts/benchmark/longtime_readwrite.py::test_stage_2_1 logdir=./results/TP3.a_longtime_1 |
| Criteria | All tests should pass. |
| Duration | 3-14 days, depending on the DUT’s performance |
| Notes | Perform the first phase of wear, covering 1/3 of capacity and lifespan. |
| TP3.b | Wear Leveling |
|---|---|
| Command | make test TESTS=./scripts/benchmark/wear_leveling.py logdir=./results/TP3.b_wear_leveling |
| Criteria | All tests should pass. |
| Duration | 7 days |
| Notes | Tests the drive’s wear leveling handling under various conditions by creating cold and hot data. |
| TP3.c | Consume 2/3 Space and PE Cycles |
|---|---|
| Command | make test TESTS=./scripts/benchmark/longtime_readwrite.py::test_stage_2_2_qlc logdir=./results/TP3.c_longtime_2 |
| Criteria | All tests should pass. |
| Duration | 3-14 days, depending on the DUT’s performance |
| Notes | Perform the second phase of wear, covering 2/3 of the capacity and lifespan. |
| TP3.d | Performance Evaluation |
|---|---|
| Command | make test TESTS=./scripts/benchmark/performance.py logdir=./results/TP3.d_performance_2 |
| Criteria | All tests should pass, with allowances for some to be skipped if not applicable. |
| Duration | 6-24 hours, depending on the DUT’s performance |
| Notes | Performance testing, comparing performance data with TP2.b to observe the drive’s performance degradation. |
| TP3.e | Consume All Space and PE Cycles |
|---|---|
| Command | make test TESTS=./scripts/benchmark/longtime_readwrite.py::test_stage_2_3_qlc logdir=./results/TP3.e_longtime_3 |
| Criteria | All tests should pass. |
| Duration | 3-14 days, depending on the DUT’s performance |
| Notes | Perform the third phase of wear, covering all capacity and lifespan. |
| TP3.f | I/O Stress Testing |
|---|---|
| Command | make test TESTS=./scripts/benchmark/ioworker_stress.py logdir=./results/TP3.f_ioworker_stress |
| Criteria | All tests should pass. |
| Duration | 10 days |
| Notes | Test the drive’s I/O robustness with various I/O workloads. |
| TP3.g | Data Retention Preparation |
|---|---|
| Command | make test TESTS=./scripts/benchmark/read_retention.py::test_prepare logdir=./results/TP3.g_retention_prepare |
| Criteria | All tests should pass. |
| Duration | 1-2 hours, depending on the DUT’s performance |
| Notes | Fill the entire drive and save CRC data to the OS drive in preparation for retention testing. |
| TP3.h | Data Retention Verification |
|---|---|
| Command | make test TESTS=./scripts/benchmark/read_retention.py::test_verify logdir=./results/TP3.h_retention_verify_1 |
| Criteria | All tests should pass. |
| Duration | 1 hour |
| Notes | Verify the correctness of the entire drive’s data using CRC data from the OS drive, specifically after retention testing. |
Test Phase 4: Retention Tests
After successfully completing Test Phase 3, keep the DUT at room temperature without power for 2 months. Then, perform the following test on the same platform (with the same OS drive) to check the data reliability after a long period of inactivity.
TP4’s testing duration ranges from 1 hour to 2 hours, depending on the DUT’s performance.
| TP4.a | Data Retention Verification After 2 Months |
|---|---|
| Command | make test TESTS=./scripts/benchmark/read_retention.py::test_verify logdir=./results/TP4.a_retention_verify_2 |
| Criteria | All tests should pass. |
| Duration | < 2 hour |
| Notes | Verify the correctness of the entire drive’s data using CRC data from the OS drive, comparing the degradation in read performance and changes in response time distribution with TP3.g. |
This section of tests is crucial for understanding the SSD’s longevity and reliability, particularly in terms of data retention capabilities after extended periods without power.
8.3 Execution
The certification.sh script is tailored to streamline the Client SSD certification process. For launching the automated testing sequence, run the following command in your terminal:
bash certification.sh tp_id
Before starting each certification test phase, reboot the test platform first. Once the system has rebooted, start the certification test immediately. The tp_id represents the test phase to be executed, e.g. TP1, tp2, TP3.c, tp4. It is a mandatory parameter to provide when running the certification test phases.
9. Contact
For further assistance or inquiries regarding the testing process, please reach out to us through the following channels:
- Business Inquiries: sales@pynv.me
- Technical Support: support@pynv.me
Our team is committed to providing support and guidance throughout the testing process, ensuring a smooth and effective certification for your SSD products.