
PyNVMe3 Design
Last Modified: April 6, 2026
Copyright © 2020-2026 GENG YUN Technology Pte. Ltd.
All Rights Reserved.
- 1. Architecture
- 2. Performance
- 3. Data Verification
- 4. Extended Features
- 5. API Abstraction
- 6. Hello World
- 7. ioworker
- 8. metamode
- 9. Hardware Support
- 10. Conclusion
1. Architecture
PyNVMe3 builds on the SPDK PCIe/NVMe user-space driver to deliver high throughput and tight, deterministic timing. We expose SPDK’s capabilities through a clean Python API so test authors can script at the protocol level without touching C or kernel paths. The result is a fast, reproducible NVMe test platform that maps directly to NVMe concepts—controllers, namespaces, and queue pairs—while adding the testability features production drivers lack.

Figure 1. PyNVMe3 System Architecture
2. Performance
By leveraging SPDK’s polling-based I/O engine and exposing it through a Python API, PyNVMe3 removes the overhead imposed by the Linux kernel NVMe driver. This yields higher IOPS, lower latency, and more efficient CPU utilization than traditional tools such as fio.
The figure below compares Random Read IOPS for fio (green) and PyNVMe3 (orange) as the number of CPU cores increases from 1 to 5.
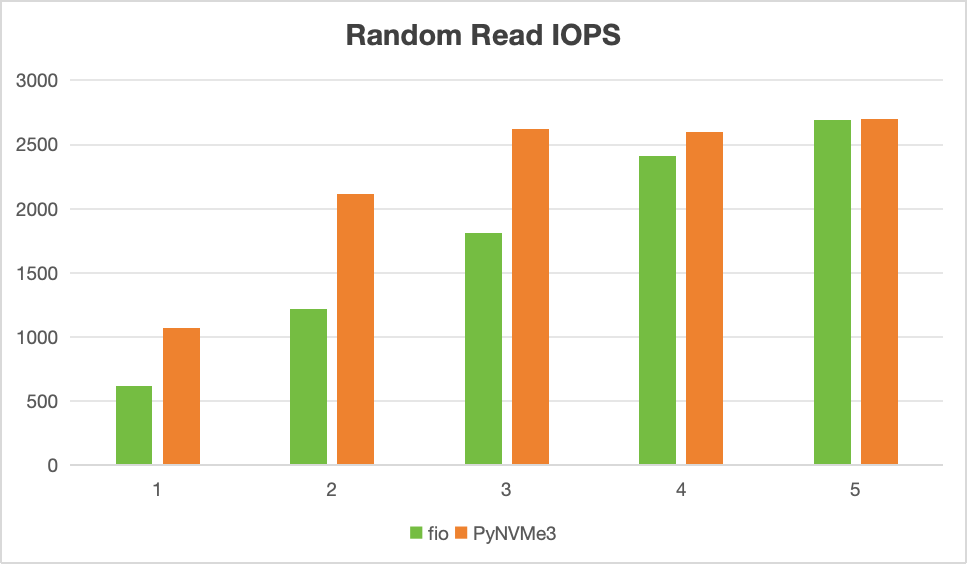
Figure 2. Random Read IOPS: fio vs. PyNVMe3
- Single-core performance
- With a single CPU core, PyNVMe3 achieves 1.1M IOPS—nearly double fio’s 600K under the same conditions.
- This advantage comes from the user-space design: PyNVMe3 avoids system calls, interrupts, and context switches, relying instead on direct memory access and polling-based queue management.
- This higher single-core throughput enables testers to stress SSDs more effectively and uncover potential issues earlier.
- Scalability across multiple cores
- As core counts increase, both fio and PyNVMe3 scale in IOPS. However, PyNVMe3 consistently reaches peak SSD throughput with fewer cores.
- By the time 3–4 cores are active, PyNVMe3 has already saturated device performance, while fio requires additional cores to match it.
- This demonstrates PyNVMe3’s better CPU efficiency, as it extracts maximum I/O capability without wasting compute cycles.
PyNVMe3 reveals SSD performance characteristics and potential issues using limited hardware resources. For SSD validation, soak testing, and performance benchmarking, PyNVMe3 provides not only speed and scalability, but also observability and integrity checks that fio lacks.
3. Data Verification
Ensuring data consistency is the most fundamental requirement of any storage validation system. While PyNVMe3 provides high throughput and rich testing features, its data verification mechanism is carefully designed to offer transparent, reliable, and high-performance consistency checks without compromising flexibility.
- Transparent, Script-Free Verification
PyNVMe3 supports automatic data verification through a built-in CRC (Cyclic Redundancy Check) mechanism. Test authors do not need to explicitly compare read and write buffers—instead, enabling theverifyfixture in a test case activates automatic integrity checks at the driver level. - High Performance via In-Memory CRC
Each LBA’s checksum is stored in huge-page memory, with a 1-byte CRC per 512-byte LBA. For a 4TB drive, this requires approximately 8GB of DRAM. PyNVMe3 allocates this memory duringNamespaceinitialization. If insufficient memory is available, a warning is issued and verification is disabled—tests will still run, but without integrity checks. Users may restrict the range of verification via thenlba_verifyparameter, which limits the number of LBAs tracked for CRC. This enables partial verification for large-capacity drives in resource-constrained environments. - Enhanced Data Patterns for Collision Detection
CRC alone is insufficient in some edge cases—such as repeated writes of identical data across all LBAs. To detect such anomalies, PyNVMe3 injects semantic patterns into each I/O payload. Scripts can disable this injection usingNamespace.inject_write_buffer_disable(), in which case only CRC is used for validation.- First 8 bytes of each LBA: Encodes
(NSID, LBA)as an identifier, similar to Protect Information (PI), enabling detection of address mix-ups. - Last 8 bytes of each LBA: Injects a global incrementing token per LBA, simulating a data version number to detect stale reads or out-of-order writes.
- First 8 bytes of each LBA: Encodes
- Concurrency-Safe via LBA Locking
NVMe operates asynchronously and command completions are not ordered. To ensure meaningful verification, PyNVMe3 implements an in-process LBA lock mechanism. This prevents concurrent I/O from corrupting or racing over shared LBA ranges, ensuring that every verified I/O is isolated and deterministic.- Before any I/O is issued, all targeted LBAs are checked for lock status.
- An I/O is only submitted when all its LBAs are unlocked.
- Upon command completion, the LBAs are unlocked.
⚠️ Note: LBA locks are valid within a single process. If multiple
ioworkerinstances in different processes target overlapping LBAs, false verification failures may occur. Scripts should avoid LBA collisions or disable verification for stress tests.
PyNVMe3’s data verification mechanism is thoughtfully engineered to ensure storage correctness without sacrificing performance or automation simplicity. Through an in-memory CRC system, injected semantic data patterns, and concurrency-safe LBA locking, PyNVMe3 offers transparent, high-speed, and robust validation for every I/O path.
Unlike traditional tools, PyNVMe3 makes data integrity checks the default—integrated directly into the driver layer, requiring no extra scripting effort. Its design supports persistence, stress handling, and protocol edge-case coverage, making it ideal for both functional validation and long-duration reliability testing.
In short, PyNVMe3 treats data consistency not as an optional feature, but as a first-class requirement—aligning with the core purpose of storage testing.
4. Extended Features
SPDK’s NVMe driver targets production environments and deliberately omits test-oriented instrumentation. PyNVMe3 adds three foundational modules to close that gap:
- cmdlog
Records, per queue, the SQEs you submit and the CQEs you receive—each with precise timestamps. By preserving the full, ordered command history at the queue level, cmdlog accelerates root cause analysis for both script authors and firmware engineers (e.g., correlating a media error with preceding feature changes or format events). - ioworker
A high-performance, low-latency I/O generator—conceptually similar to fio, but scriptable via Python and tightly coupled to SPDK. ioworker lets you describe complex, dynamic workloads (rates, mixes, distribution of LBAs, queue depths, affinity) while extracting maximal performance from the user-space engine. It’s the preferred tool for sustained load, soak, and tail-latency studies. - checksum
Transparent data-integrity verification for tests. For each LBA, PyNVMe3 maintains a CRC in DRAM. On successful writes, the CRC is updated; on successful reads, a fresh CRC is computed and compared against DRAM. This catches integrity regressions immediately without cluttering test logic, enabling broad and continuous verification during long runs.
5. API Abstraction
PyNVMe3 packages SPDK’s capabilities into a small set of objects that mirror NVMe’s model:

Figure 3. PyNVMe3 Classes
- Pcie: Represents the SSD as a PCIe device, providing interfaces for reading and writing to its configuration and memory space. This class is especially useful for early-stage SSD prototypes that do not yet support full NVMe functionality, enabling low-level inspection and execution of various PCIe-level reset operations. Users can create multiple
Pcieobjects for multiple DUTs. - Controller: Models the NVMe controller, capable of issuing and receiving all administrative commands. It provides the main interface for initializing the NVMe device and supports controller-level reset operations. It typically serves as the primary point of interaction for user test scripts. Users can create multiple
Controllerobjects for multiple DUTs. - Namespace: Represents an NVMe namespace, enabling the submission and completion of I/O commands such as read, write, flush, etc. It encapsulates the logical storage space exposed to the host. Users can create multiple
Namespaceobjects for multiple namespaces in the DUT. - Qpair: Encapsulates a one-to-one relationship between a Submission Queue and a Completion Queue. It is used in conjunction with a
Namespaceto submit and process I/O commands. It reflects the core I/O command path as defined by the NVMe specification. Users can create multipleQpairobjects. - Subsystem: Represents an NVMe subsystem, providing operations such as power on/off and subsystem-level reset. Users can provide callback functions to support new power control modules.
- Others (Low-Level Objects): Include classes that model NVMe protocol data structures such as SQE (Submission Queue Entry), CQE (Completion Queue Entry), PRP (Physical Region Page), and PRPList. These are primarily used in metamode or advanced testing scenarios where direct manipulation of protocol-level fields is required.
6. Hello World
The Hello World example is the simplest PyNVMe3 test, yet it captures the entire flow of NVMe command submission and completion. It also serves as the best entry point to understand ns.cmd, the most fundamental way PyNVMe3 sends and reaps I/O.
import time
import pytest
import logging

import nvme as d

def test_hello_world(nvme0, nvme0n1, qpair, verify):
    # allocate DMA-capable buffers
    read_buf = d.Buffer(512)
    write_buf = d.Buffer(512)
    write_buf[10:21] = b'hello world'  # insert test pattern

    # callback triggered when the write completes
    def write_cb(cdw0, status):
        nvme0n1.read(qpair, read_buf, 0, 1)

    # issue the write; the callback submits the read
    nvme0n1.write(qpair, write_buf, 0, 1, cb=write_cb)

    # verify data pattern before and after
    assert read_buf[10:21] != b'hello world'
    qpair.waitdone(2)  # wait for both write and read to complete
    assert read_buf[10:21] == b'hello world'
At first glance, this script appears simple: it writes “hello world” into LBA0, then reads LBA0 back and checks the result. But under the surface, it demonstrates how ns.cmd embodies the asynchronous, queue-based nature of NVMe. When the script calls nvme0n1.write(), it does not block; instead, it places a submission queue entry into the qpair and immediately returns. The actual completion will only arrive later in the form of a CQE.
To handle this, the script attaches a callback function to the write. When PyNVMe3 reaps the write CQE, it triggers the callback, which issues a read command to the same LBA. This chaining of operations shows the natural way to express dependencies in an asynchronous system: the read does not wait in Python code; it is launched as soon as the device signals that the write has finished.
The line qpair.waitdone(2) is crucial. Since two commands have been submitted (the write and the read), the script tells PyNVMe3 to wait until both completions are collected. Unlike blocking system calls in traditional drivers, here waiting is explicit and deterministic: the script decides when and how many completions to wait for. This control makes it possible to synchronize precisely with the device, reproduce timing-sensitive bugs, or measure latency accurately.
Finally, the assertions before and after waitdone() highlight data movement in the test. With the verify fixture enabled, the driver computes and checks CRC checksums for every LBA, so the script does not need to implement data comparison logic.
This Hello World example demonstrates the essence of ns.cmd: commands are submitted to the device asynchronously, callbacks allow dependent operations to be chained, waitdone() provides deterministic synchronization, and data integrity is checked automatically in the background. From here, test authors can extend the same model to more complex scenarios—multiple queue pairs, mixed read/write workloads, or stress loops—but the fundamental mechanism remains unchanged.
ns.cmd is the fundamental building block of PyNVMe3, and Hello World is its simplest yet most illustrative demonstration. However, while ns.cmd is ideal for understanding the command flow and constructing fine-grained test logic, it becomes inefficient when used to generate large numbers of I/Os directly in Python. For sustained or batch workloads, the right tool is ioworker, which automates high-volume I/O generation with far greater efficiency.
7. ioworker
In PyNVMe3, ioworker is a built-in, high-performance I/O generator designed for producing synthetic NVMe workloads directly from Python scripts. It is conceptually similar to tools like fio, but implemented entirely on top of the SPDK user-space NVMe driver, and fully integrated into the PyNVMe3 API.
Unlike manually submitting I/Os via ns.cmd, which can be inefficient for high-volume workloads, ioworker autonomously issues and reclaims I/O commands according to user-defined parameters—maximizing both test development productivity and runtime performance.
7.1 Key Features
- User-space speed: Leverages SPDK’s polling engine to bypass the kernel stack for extremely low latency and high throughput.
- Simple Python API: Easily embedded into test scripts and CI environments.
- Parameter-rich configuration: Control workload shape via
io_size,qdepth,read_percentage,lba_random,iops,time, and more. - Built-in data verification: Seamless integration with PyNVMe3’s
verifyfixture for CRC-based integrity checks. - Automatic metrics: Returns IOPS, bandwidth, latency percentiles, and other statistics upon completion.
7.2 Basic Usage
The following script runs a 4KB-aligned random write workload for 2 seconds:
def test_ioworker(nvme0, nvme0n1, qpair):
    r = nvme0n1.ioworker(
        io_size=8,            # 4KB I/O (8 * 512B)
        lba_align=8,          # 4KB alignment
        lba_random=True,      # random access
        read_percentage=0,    # write-only workload
        time=2                # duration: 2 seconds
    ).start().close()
.start()launches theioworkerin a child process pinned to a CPU core..close()blocks until completion and returns workload statistics.
PyNVMe3 supports using ioworker with Python’s with statement to improve script readability and control:
with nvme0n1.ioworker(io_size=8, time=10) as w:
    while w.running:
        time.sleep(1)
        speed, iops = nvme0.iostat()
        logging.info("iostat: %dB/s, %d IOPS" % (speed, iops))
While the ioworker is running in the background, the main process remains responsive and can:
- Monitor real-time I/O statistics
- Send admin commands
- Trigger resets, power cycles, or background operations
This asynchronous execution model is ideal for building stress tests, error recovery scenarios, and mixed workload tests.
7.3 Internal Design
Each ioworker instance:
- Spawns a dedicated child process, pinned to a CPU core
- Builds its own submission and completion queues
- Executes I/O in tight polling loops for maximum throughput
- Automatically tracks and reports performance data
ioworker is a core component of PyNVMe3’s design philosophy: combining raw performance with scriptable control. It replaces external tools like fio in most test workflows and unlocks precise workload generation, observability, and repeatability—entirely from Python. Whether for simple throughput checks or complex long-running tests, ioworker is the ideal tool for I/O generation at scale.
8. metamode
High-level interfaces like ns.cmd and ioworker provide excellent usability and performance by running through PyNVMe3’s NVMe driver (which itself wraps SPDK). They’re ideal for functional and performance testing. However, when you need to probe protocol corner cases or inject low-level errors that production drivers deliberately prevent, you need direct control of the queues and doorbells. That’s what metamode is for.

Figure 4. metamode: access the SSD in pure Python without the SPDK driver
metamode bypasses the PyNVMe3 NVMe driver and SPDK entirely, letting your script treat the SSD as a raw PCIe device. In metamode you build and manage the NVMe data path yourself:
- Construct SQEs (Submission Queue Entries)—including fields like CID and PRP/SGL—then place them into the submission queue buffer.
- Ring doorbells explicitly to notify the controller of new submissions.
- Manage shared memory buffers via
Buffer,PRP, andPRPList. - Inspect CQEs directly as they appear in the completion queue and drive your own completion handling logic.
This gives you protocol-level control to exercise behaviors and error conditions that are otherwise blocked by higher-level stacks.
8.1 Basic Example
The following test submits two write commands with the same CID—a condition disallowed by standard drivers but perfectly valid to test at the protocol level:
import nvme as d

def test_metamode_write(nvme0):
    # Construct Completion Queue
    cq = d.IOCQ(nvme0, qid=1, qsize=10, prp=d.PRP(10 * 16))

    # Construct Submission Queue and link it to the CQ
    sq = d.IOSQ(nvme0, qid=1, qsize=10, prp=d.PRP(10 * 64), cq=cq)

    # Manually construct an SQE; duplicate CID is intentional for error injection
    sqe = d.SQE(cid=(1 << 16), opc=1)  # 'opc=1' is typically WRITE

    # Place two identical SQEs and ring the SQ doorbell
    sq[0] = sqe
    sq[1] = sqe
    sq.tail = 2  # advance tail to notify hardware
This pattern is representative of metamode’s power: you control the exact SQE contents, queue pointers, and doorbells, and you observe raw completions from the CQ—enabling tests that are impossible through driver-mediated paths.
8.2 When to use metamode
Use metamode when you must validate spec corner cases, perform error injection, or debug firmware behavior at the queue/doorbell level. For most functional coverage, ns.cmd is sufficient; for sustained or mixed workloads, ioworker delivers the best throughput and flexibility. When you need unfiltered, protocol-accurate access, metamode is the tool that closes the gap between the NVMe spec and an executable test.
8.3 Complicated SGL Chain
PyNVMe3 inherits SegmentSGL, LastSegmentSGL, DataBlockSGL, and BitBucketSGL from the Buffer class to construct various SGL Descriptors. The following script implements the SGL example listed in the NVMe Specification. The total length of the data in this example is 13KB (26 LBA), divided into 3 SGLs:
- seg0: Contains a 3KB block of memory and points to seg1;
- seg1: contains a 4KB block of memory and a 2KB hole, and points to seg2;
- seg2: is the last SGL and contains a 4KB block of memory.
The specific memory layout and corresponding PyNVMe3 scripts are as follows: 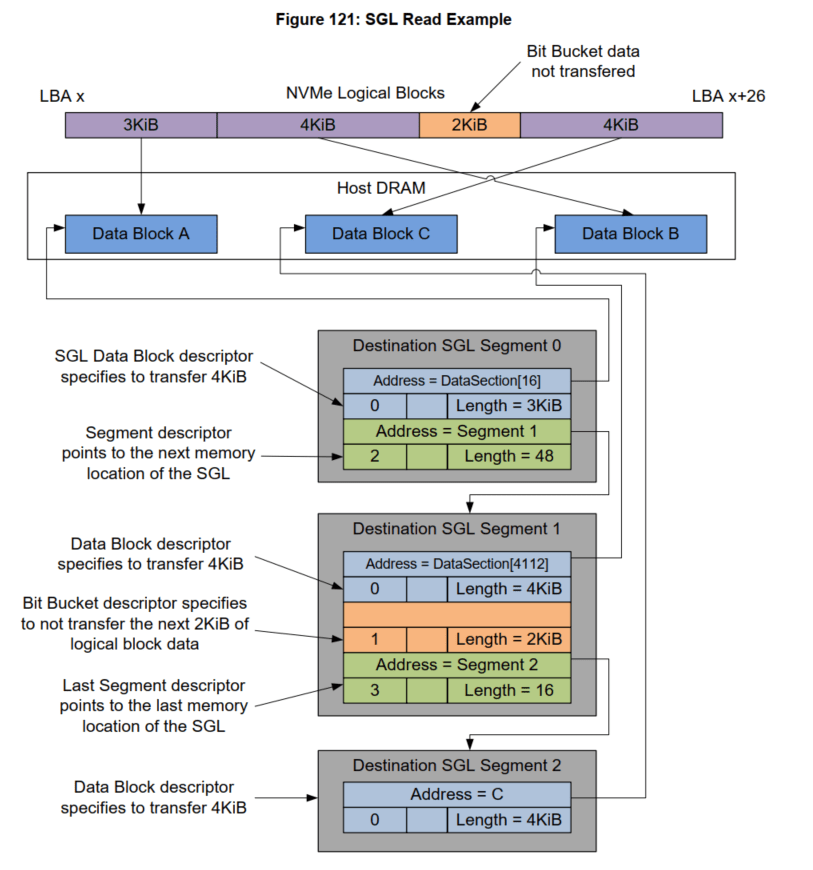
Example PyNVMe3 script in metamode for this complicated SGL test case:
   def test_sgl_segment_example(nvme0, nvme0n1):
       sector_size = nvme0n1.sector_size
       cq = IOCQ(nvme0, 1, 10, PRP(10*16))
       sq = IOSQ(nvme0, 1, 10, PRP(10*64), cq=cq)

       sseg0 = SegmentSGL(16*2)
       sseg1 = SegmentSGL(16*3)
       sseg2 = LastSegmentSGL(16)
       sseg0[0] = DataBlockSGL(sector_size*6)
       sseg0[1] = sseg1
       sseg1[0] = DataBlockSGL(sector_size*8)
       sseg1[1] = BitBucketSGL(sector_size*4)
       sseg1[2] = sseg2
       sseg2[0] = DataBlockSGL(sector_size*8)

       sq.read(cid=0, nsid=1, lba=100, lba_count=26, sgl=sseg0)
       sq.tail = sq.wpointer
       cq.waitdone(1)
       cq.head = cq.rpointer

       sq.delete()
       cq.delete()
9. Hardware Support
PyNVMe3 is designed with broad hardware compatibility and integration in mind, enabling robust testing across a wide range of platforms and test environments.
9.1 Platform Compatibility
PyNVMe3 supports all mainstream x86-based systems, including those built with Intel and AMD processors. It is compatible with a variety of computing platforms such as:
- Consumer laptops and desktops
- Professional workstations
- Enterprise-grade servers
This ensures that NVMe device testing can be performed across development, validation, and deployment environments with consistent behavior.
9.2 Power Fixtures
To support advanced test scenarios, PyNVMe3 provides seamless integration with industry-standard and custom power control systems:
- Quarch PAM (Power Analysis Module): Full support for automated power cycling and control, enabling accurate and repeatable power-related testing.
- Custom Power Switch Control: Users can register Python callbacks to integrate proprietary or in-house power control hardware into PyNVMe3 test scripts.
- Power Consumption Sampling: Power telemetry data can be collected and analyzed during test execution, enabling validation of power states and efficiency.
9.3 Management Fixtures
PyNVMe3 supports external communication interfaces used for out-of-band management:
- TotalPhase Aardvark: Enables control over I²C/SMBus buses to inject low-level test sequences or commands.
- Protocol Stack Extensions: Users can extend Python scripts to implement and validate full SMBus-based out-of-band management protocols, enabling comprehensive system-level testing.
- VDM controller
- I3C controller
9.4 High-Density Test Server
To facilitate large-scale and long-duration NVMe validation, PyNVMe3 is deployed on a custom-built 12-bay NVMe test server developed in-house. This platform is engineered for:
- High concurrency
- Enhanced thermal and power stability
- Scalable test execution
- Improved reliability during continuous stress testing

Figure 5. PyNVMe3 Test Server
This setup is particularly suited for qualification labs, regression testing environments, and production-level validation workflows.
10. Conclusion
PyNVMe3 delivers a modern, high-performance, and test-focused NVMe validation framework built on the strengths of SPDK while addressing its limitations in testability and extensibility. By exposing protocol-level control through a clean Python API, PyNVMe3 empowers developers, validation engineers, and firmware teams to create precise, deterministic, and reproducible test scenarios—from functional conformance and error injection to large-scale performance and soak testing. Its architecture combines:
- User-space speed with kernel-free I/O for maximum throughput,
- Protocol-level abstraction for intuitive NVMe modeling,
- Advanced tooling such as
cmdlog,ioworker, andchecksumfor observability and data integrity, - Flexible hardware integration, supporting power control, out-of-band interfaces, and dense test infrastructure.
Whether validating a single namespace or stress-testing an entire subsystem, PyNVMe3 provides the scalability, precision, and transparency needed for modern NVMe device development. It is not just a testing tool—it is a robust platform for building confidence in NVMe SSD quality, reliability, and performance.
