
PyNVMe3 Platforms
Last Modified: May 21, 2026
Copyright © 2020-2026 GENG YUN Technology Pte. Ltd.
All Rights Reserved.
- 1. Visual Studio Code (VSCode)
- 2. Laptop Test Platform
- 3. Desktop Test Platform
- 4. Server Test Platform
- 5. Summary
PyNVMe3 provides a comprehensive suite of test platforms purpose-built for NVMe SSD validation, combining a powerful software framework with flexible hardware environments. It supports the entire workflow from development and debugging to large-scale production testing, covering protocol compliance, performance benchmarking, power efficiency, and out-of-band management. To meet diverse testing requirements, PyNVMe3 defines three representative platforms: the laptop platform, ideal for precise power consumption analysis for Client NVMe SSD; the desktop platform, optimized for performance, stress, and management interface testing; and the server platform, designed for high-density, parallel validation at scale.
1. Visual Studio Code (VSCode)
To complement these hardware platforms, PyNVMe3 integrates seamlessly with modern development tools, enabling engineers to build and debug test scripts with efficiency. Visual Studio Code (VSCode) is the recommended integrated development environment (IDE) for PyNVMe3. With its rich ecosystem of extensions and support for remote development over SSH, VSCode allows developers to write scripts on their local workstation while executing them directly on remote test machines. The PyNVMe3 VSCode extension further enhances this workflow by providing real-time visibility into queues, command logs, and performance metrics, ensuring that script development and debugging are both intuitive and closely aligned with the behavior of the underlying SSD under test.
⚠️ Note: Use a native terminal or SSH for day‑to‑day, long‑running test execution. Use VSCode primarily for authoring, quick runs, and debugging.
1.1 Prerequisites
- Work PC: any laptop or desktop computer (Windows/macOS/Linux) with VSCode installed
- Test Machine: the platform with Ubuntu and PyNVMe3 installed
- Network access: SSH login from Work PC to Test Machine
1.2 Steps
- Download the VSCode installer from the official website and install it on the Work PC (Windows, Linux, or macOS).
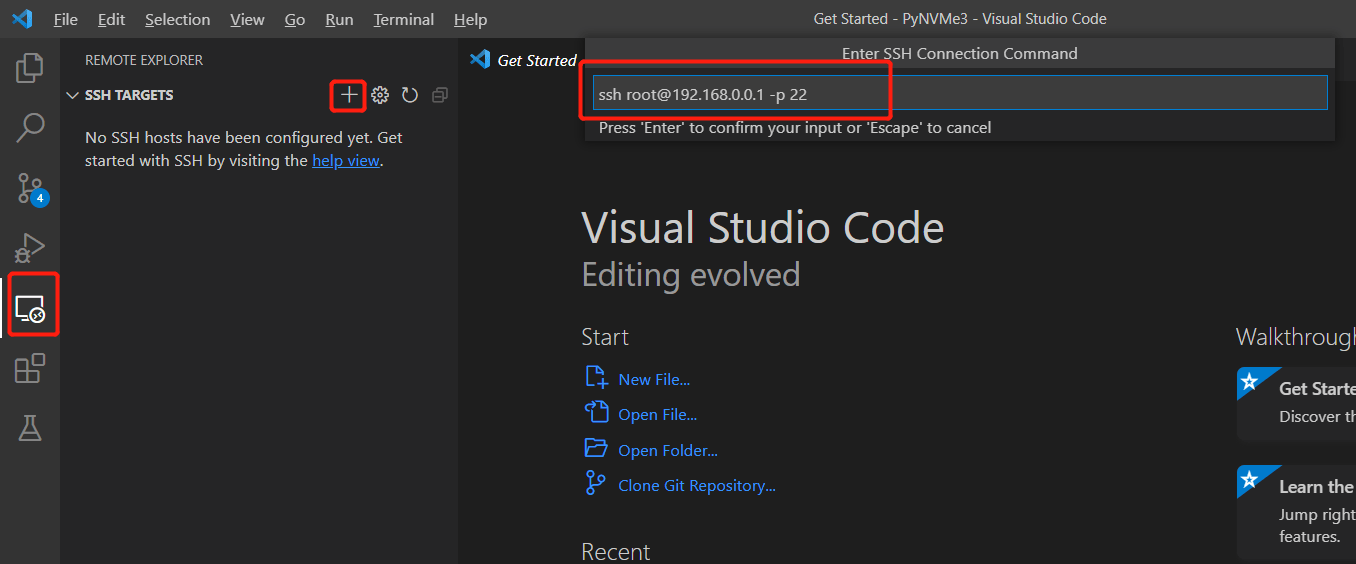
- Install the Remote‑SSH extension.

- In VSCode, open the Remote Explorer (left sidebar) and add the test host as a target. Use the full SSH command (add
-p <port>if you use a custom port).
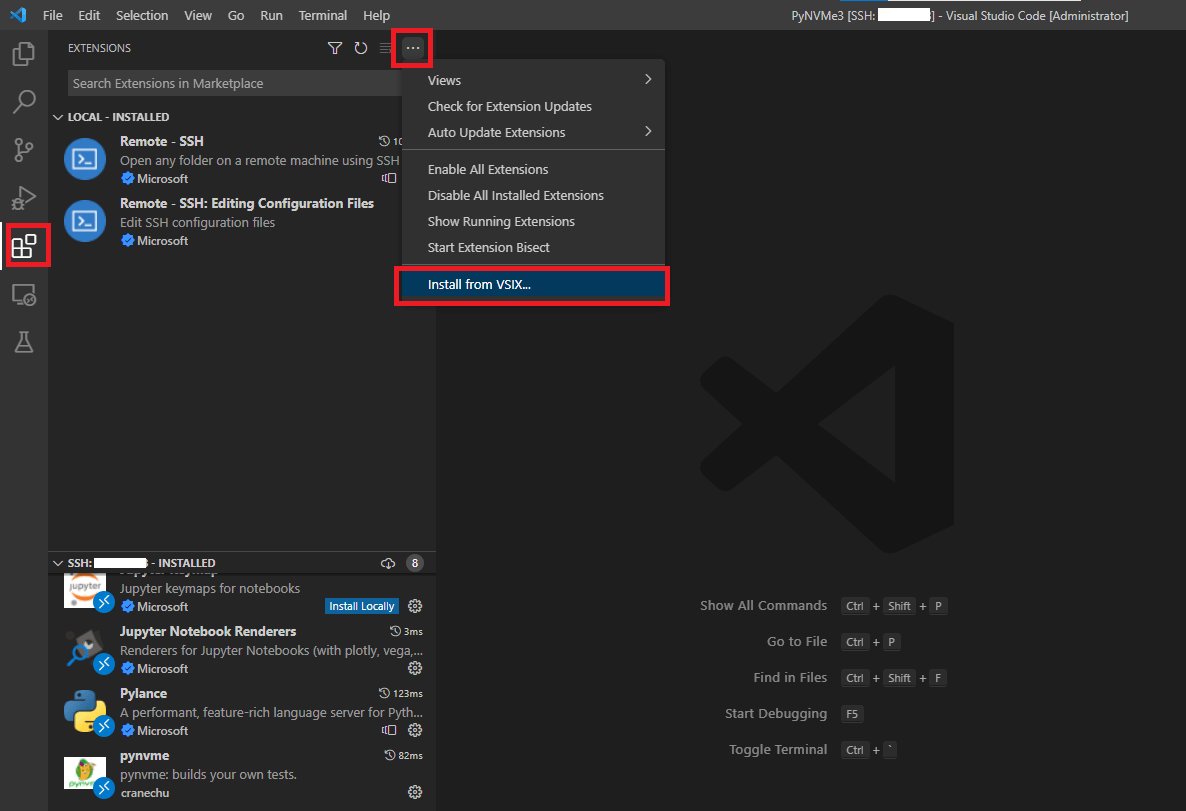
- When the remote window opens, install the PyNVMe3 extension. Choose Install from VSIX and select the VSIX package under
PyNVMe3/.vscode.
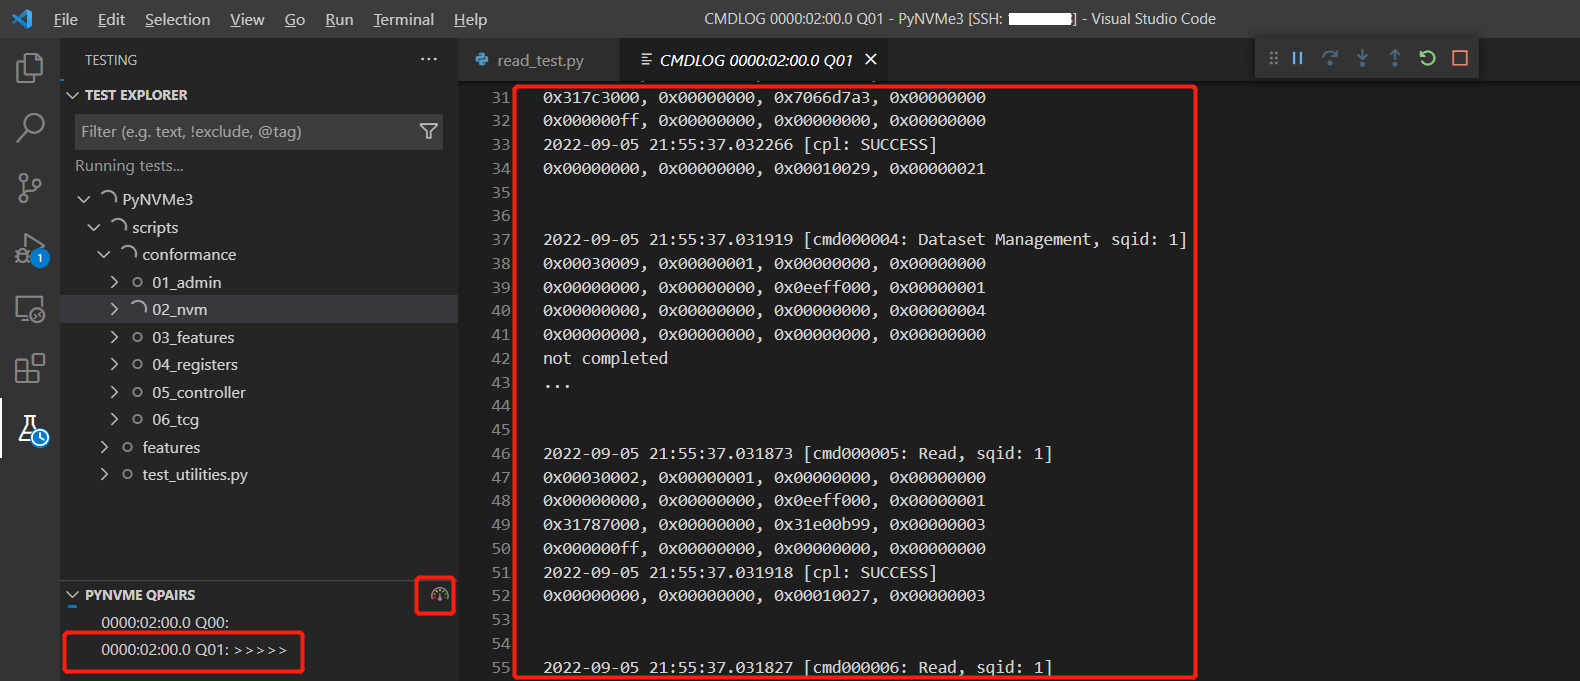
- The PyNVMe3 extension displays the current queue state, commands, and performance information in VSCode.
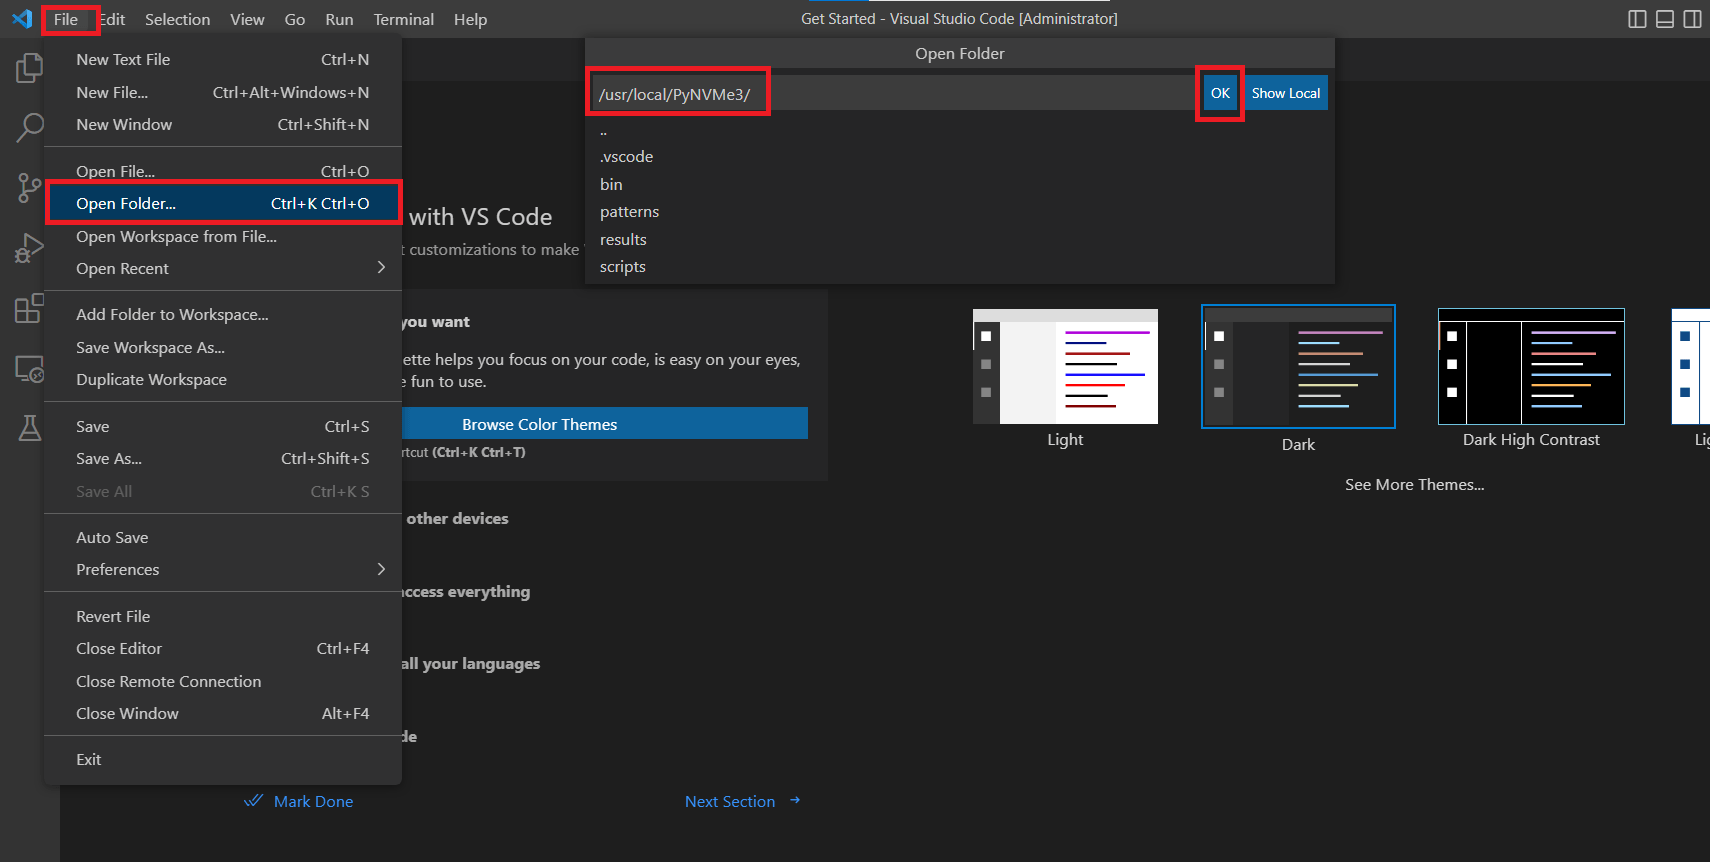
- Select the PyNVMe3 directory in the remote window.
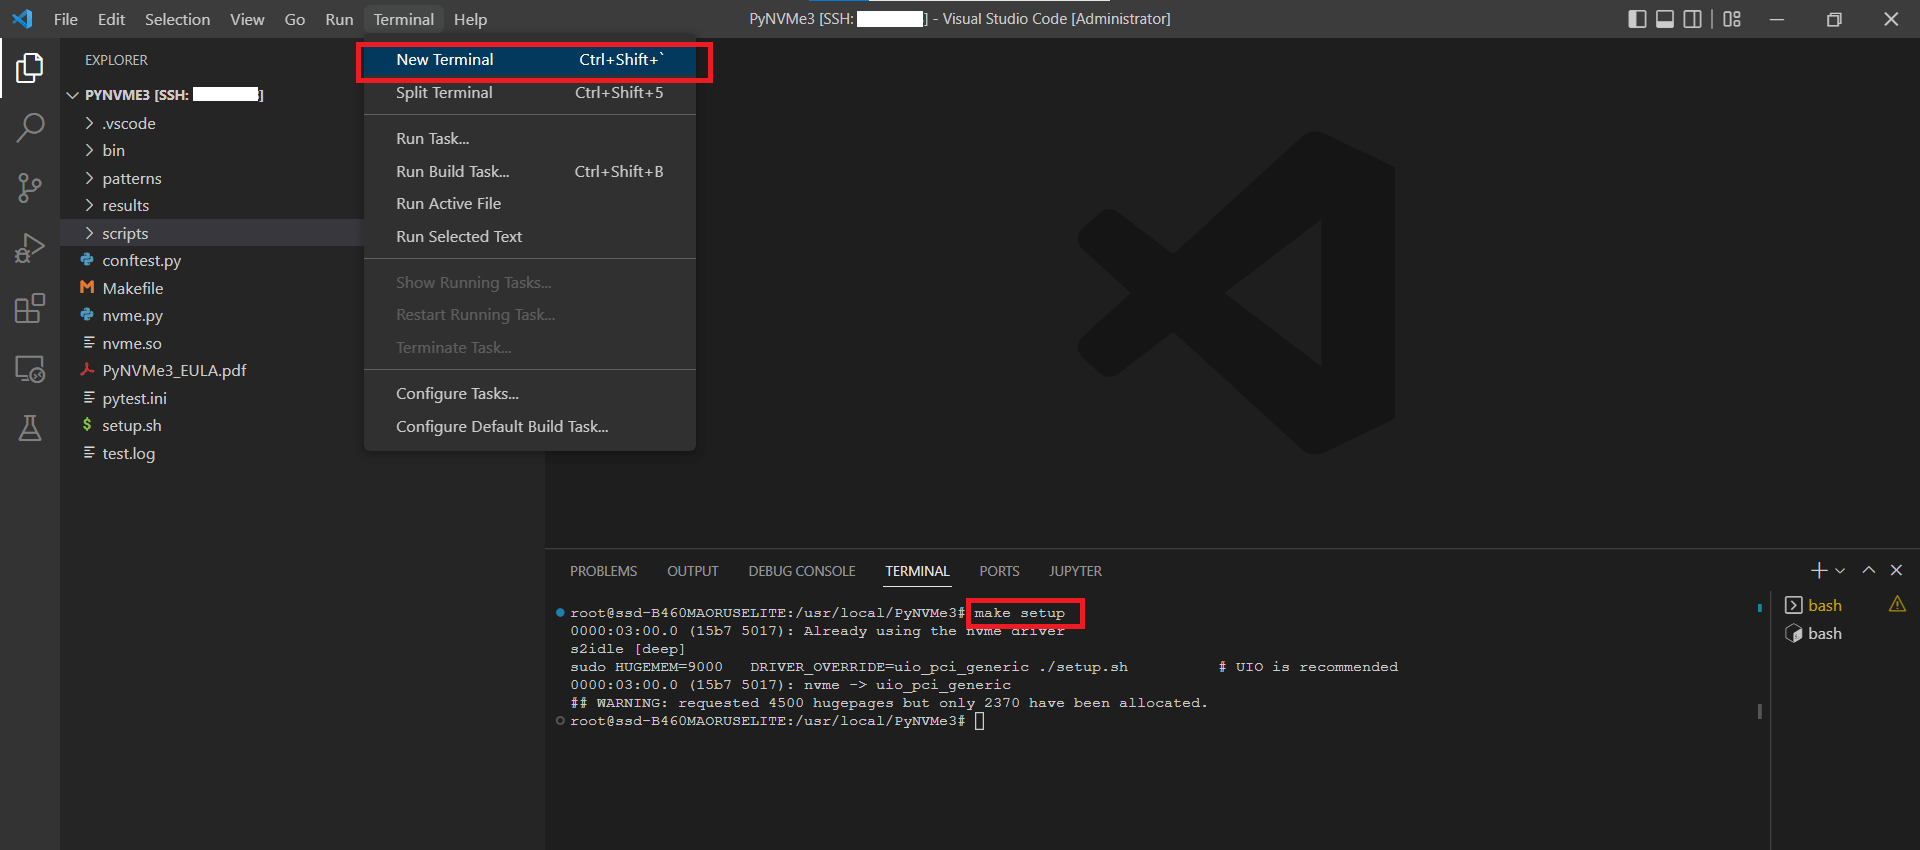
- Open a terminal and run the initial setup:
make setupFrom the
make setupoutput, note the PCIe BDF of the DUT.
- Edit
.vscode/settings.jsonand set the BDF field.
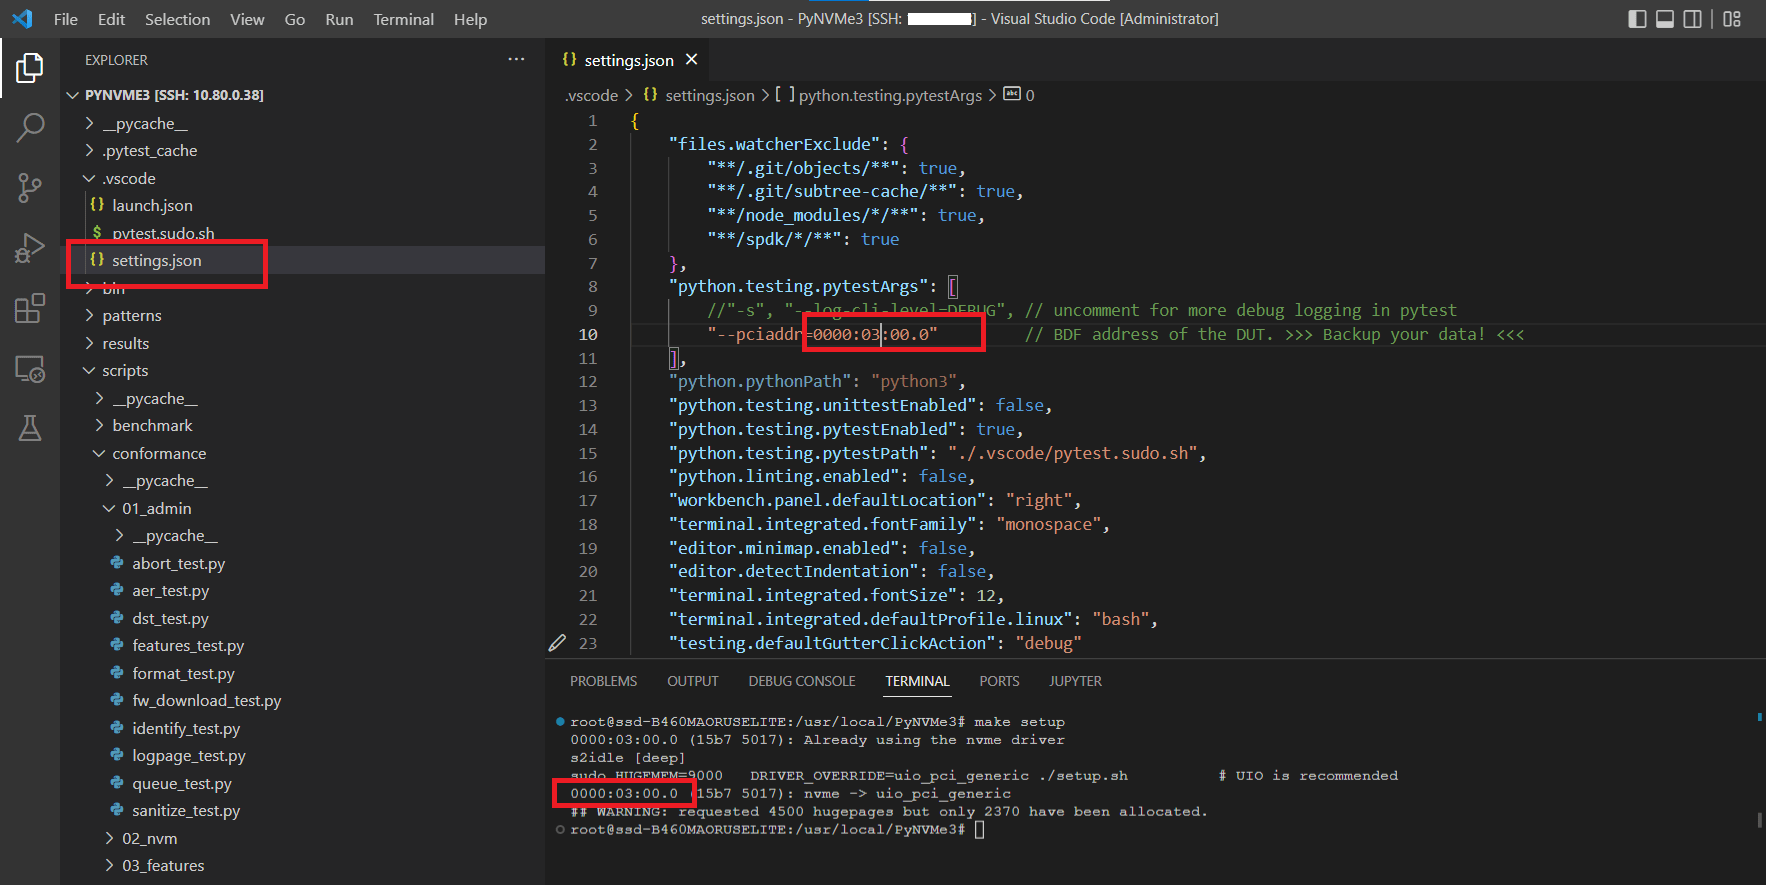
⚠️ Note: Remember to check and update the BDF address in
.vscode/settings.json. - The Python Test Explorer extension discovers PyNVMe3 tests automatically. Open the Testing view to see collected cases. Click the Run (triangle) icon next to a test to execute it. For parameterized tests, right‑click the icon to select a parameter set.
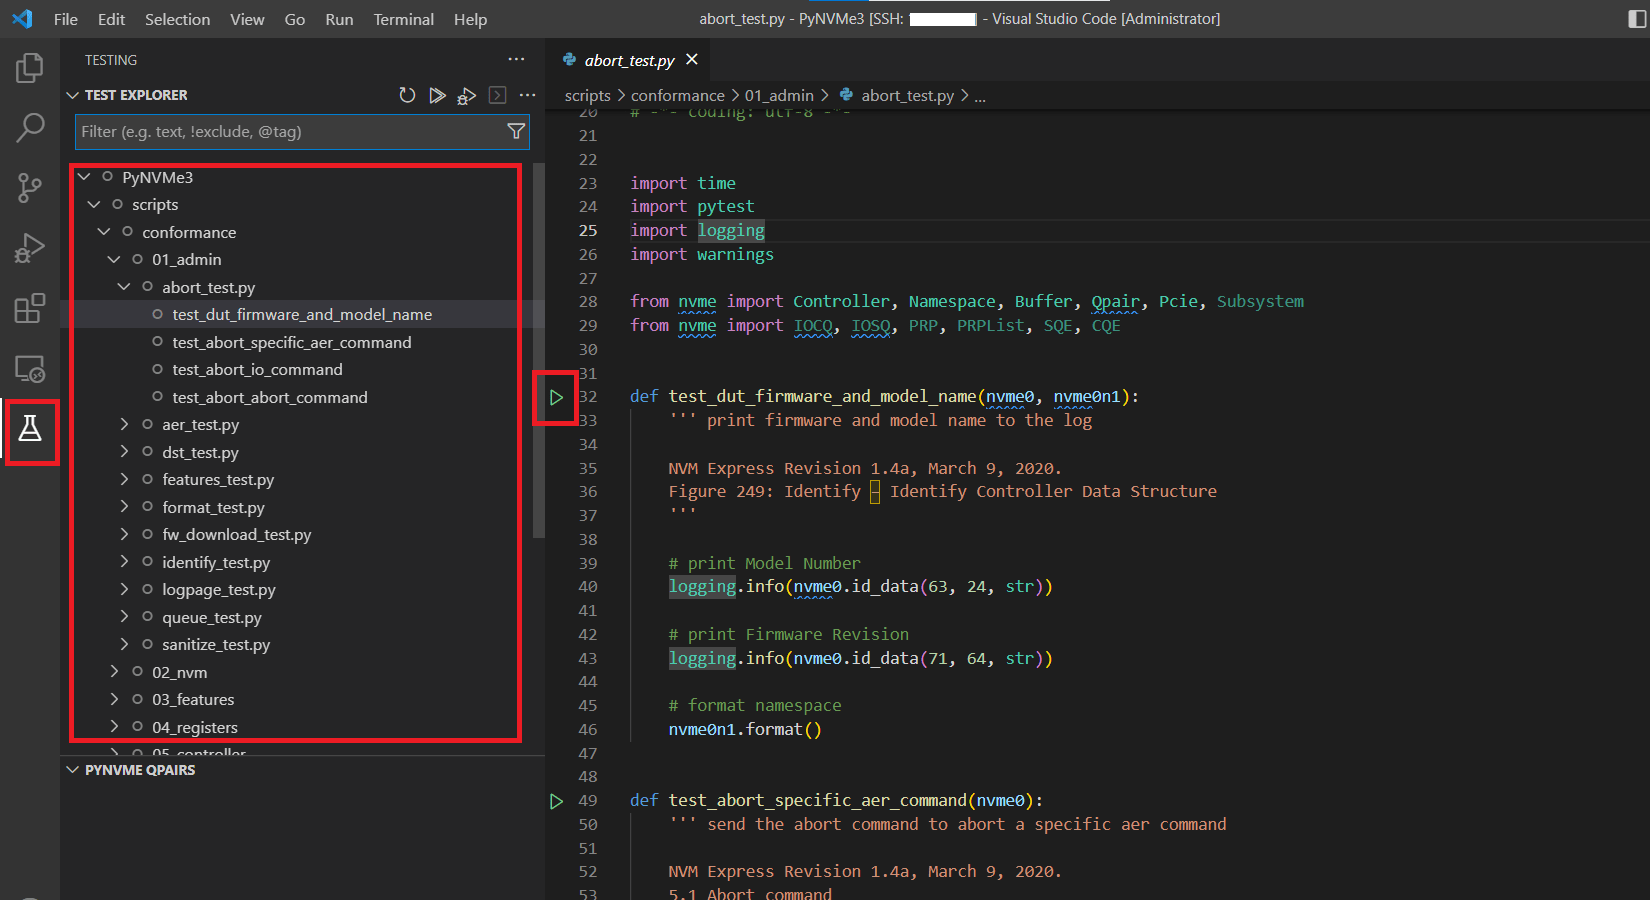
- During execution, logs stream to the terminal.
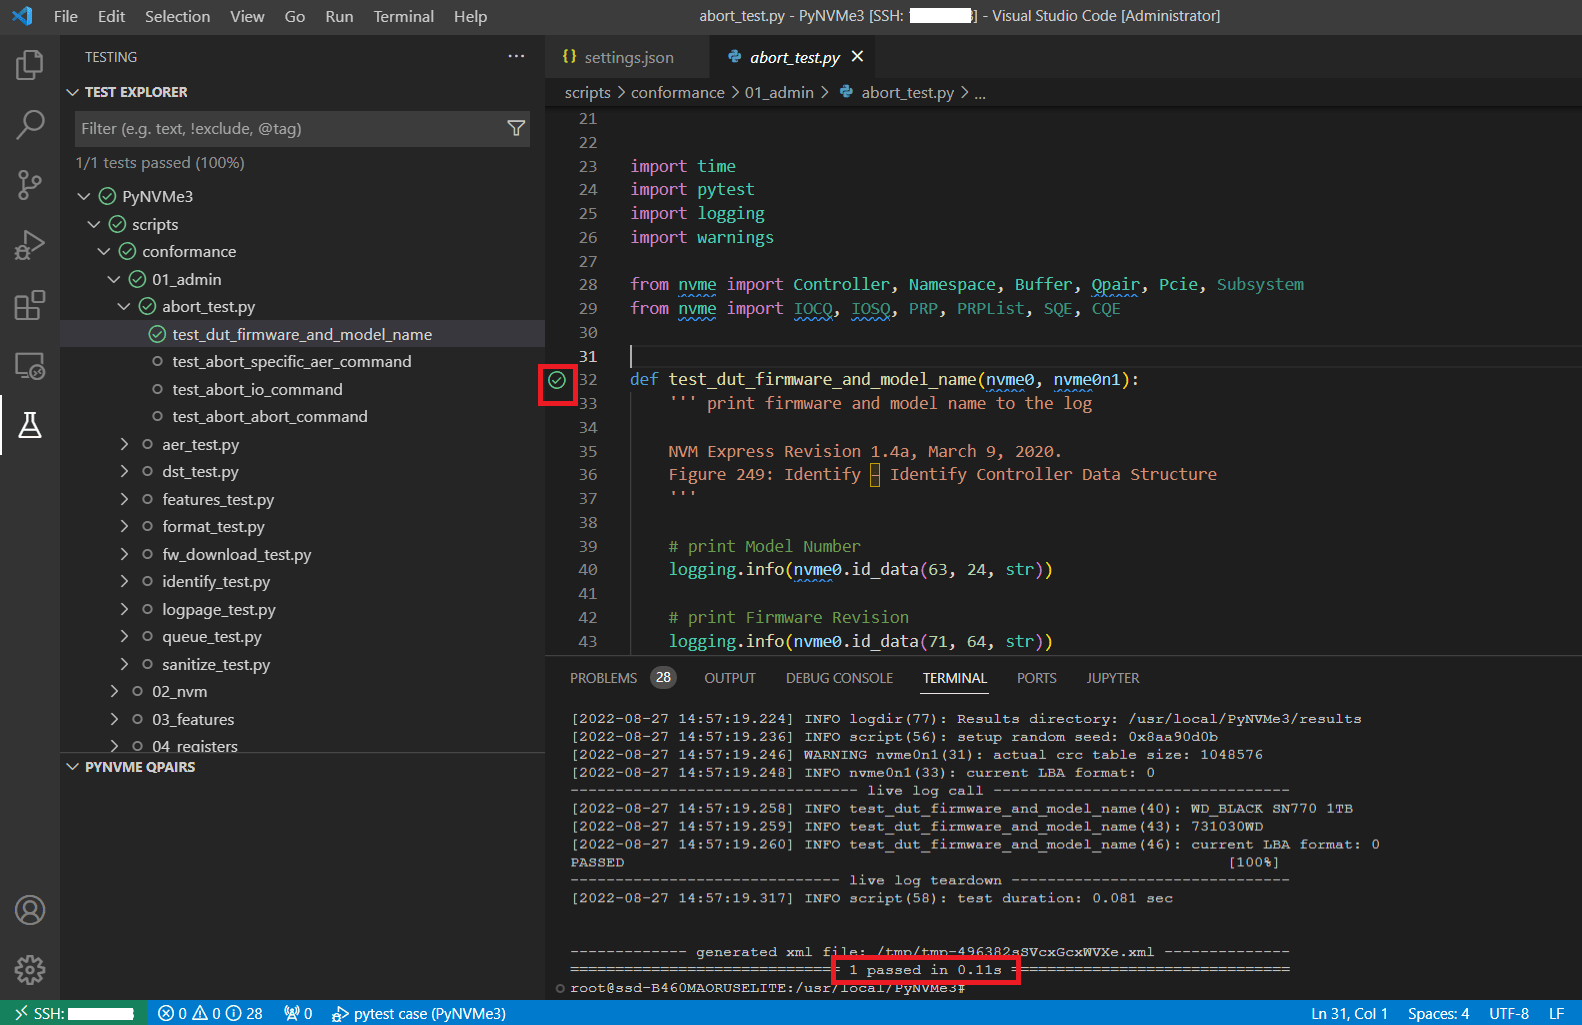
- VSCode runs tests in Debug mode when launched from the editor. Breakpoints and watch windows are supported, and the PyNVMe3 extension remains active while paused.
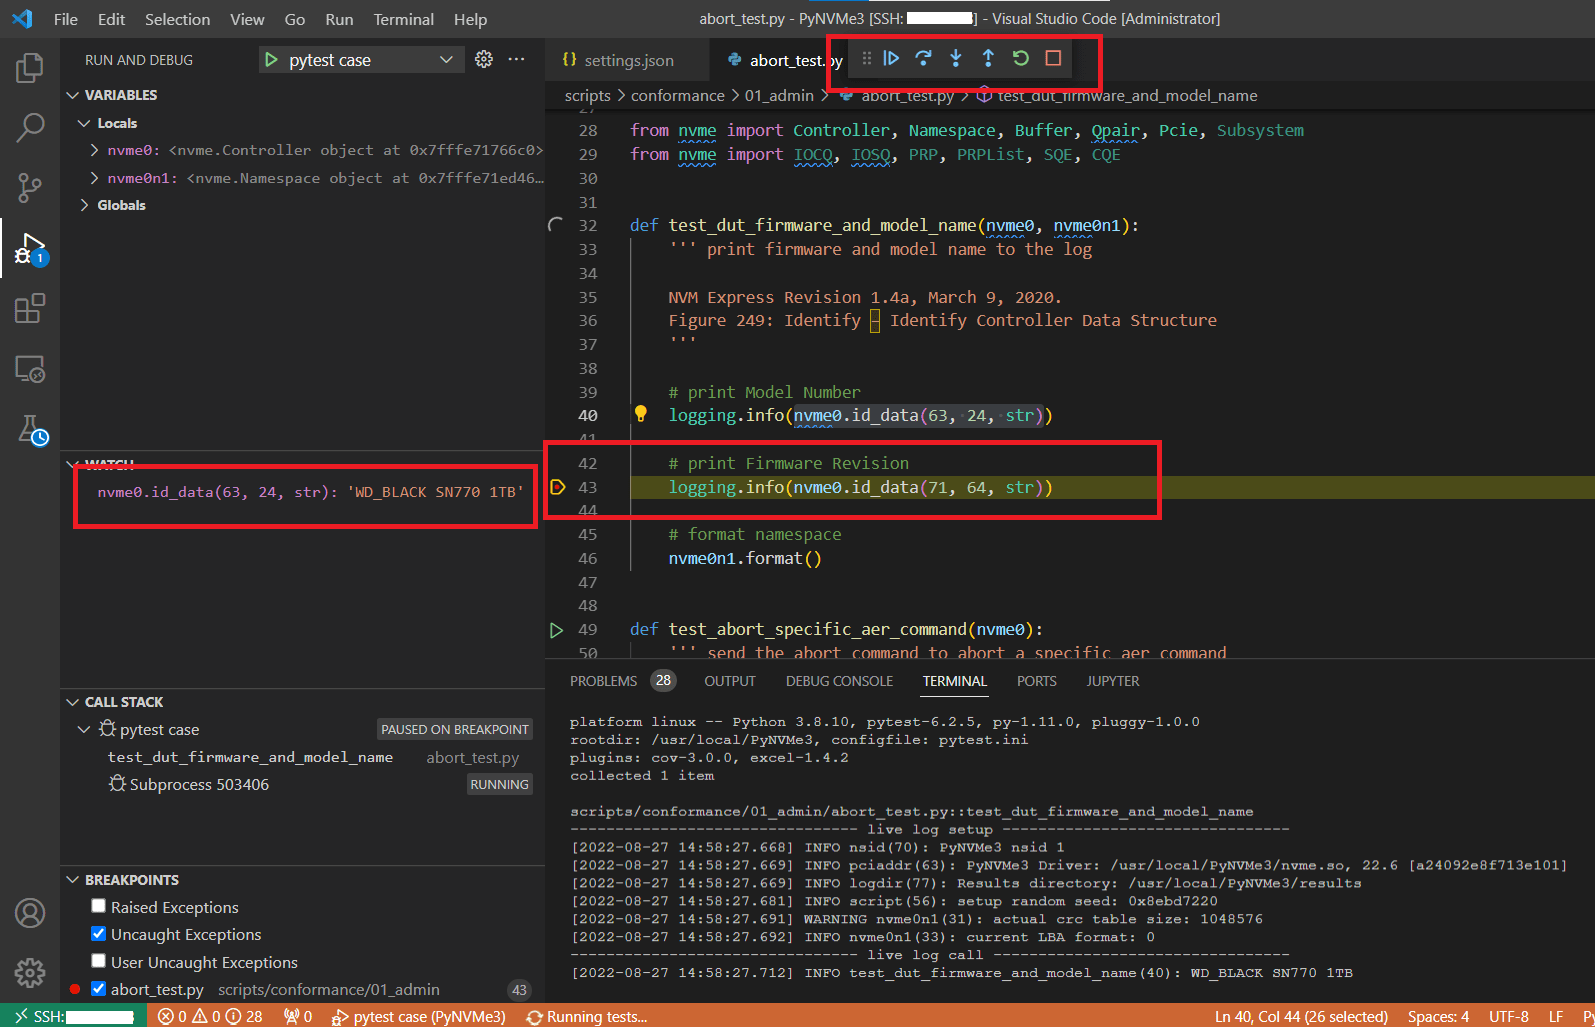
⚠️ Note: The PyNVMe3 driver enforces I/O timeouts. If you pause execution while commands are in flight, timeouts may occur. Avoid breakpoints immediately before or after I/O submissions or waits. If you need to pause for debugging, consider setting a longer timeout to prevent test failures.
1.3 Codex Workflow
Codex is available in the VSCode remote workspace to help draft or edit PyNVMe3 tests quickly; use it as a coding teammate rather than a replacement for validation.
- Install OpenAI Codex (Codex extension) in VSCode.
- Open the integrated terminal in VSCode (connected to the remote host) and start a Codex session.
- Describe the task clearly; Codex will use AGENTS.md as the system prompt.
- Review and run the generated test.
- If required, copy logs from terminal windows to Codex, and Codex will update the script.
2. Laptop Test Platform
PyNVMe3 can run on a wide range of laptops and is ideal for low-power characterization and rapid script development. When paired with the Quarch Power Analysis Module (PAM), it delivers high-resolution, repeatable power measurements without requiring a full desktop test bench. For a complete walkthrough of setup and operation, see the User Guide.
3. Desktop Test Platform
The Desktop Test Platform is the most widely used option. It is a high-performance, cost-effective testing environment designed for NVMe SSD validation. It provides a flexible solution for developers, enabling comprehensive protocol, performance, power management, and out-of-band (OOB) management interface testing. It is fully integrated with PyNVMe3.
We do not sell this desktop test platform. Instead, users can purchase all necessary hardware components from the market, including:
- Desktop PC Motherboard
- PMU2 Interposer (Email Inquiry)
- Total Phase Aardvark I2C Host Adapter (Product Page)
This approach provides users with the flexibility to build a cost-effective and customizable testing environment.
3.1 Motherboard
The desktop PC motherboard is the foundation of the PyNVMe3 Desktop Test Platform, providing PCIe connectivity for NVMe SSD testing. A suitable motherboard should meet the following criteria:
- PCIe Gen5 support to ensure compatibility with the latest high-speed NVMe SSDs
- Stable power delivery for accurate power consumption and performance measurements
- Proper ventilation to maintain system stability during extended testing
One recommended motherboard for the PyNVMe3 Desktop Test Platform is:
- Model: Asus X670E ROG Crosshair Gene
- CPU: AMD Ryzen 5 7600X
- Memory: DDR5 16GB × 2
- System drive: 2.5-inch SATA SSD (running Ubuntu OS)
This configuration offers strong single-core performance, PCIe Gen5 support, and DDR5 compatibility, making it well-suited for enterprise NVMe SSD testing.
3.2 PMU2: Power Management Unit
PMU2 is a power management and monitoring unit designed for enterprise NVMe SSD testing. It provides precise power control, real-time power consumption monitoring, and support for out-of-band (OOB) management interface testing. It is compatible with PCIe Gen5 and supports both U.2 and M.2 SSDs, making it a versatile solution for SSD validation.
| Category | Features |
|---|---|
| PCIe | Supports PCIe Gen5 |
| Supports both U.2 and M.2 SSDs | |
| Future support planned for E1.S SSDs | |
| Power | Controls DUT power on/off |
| Monitors DUT power consumption | |
| OOB | Enables NVMe-MI OOB testing with Aardvark |
| Independent AUX power control for enhanced OOB tests | |
| Built-in voltage level shifting on the M.2 version |
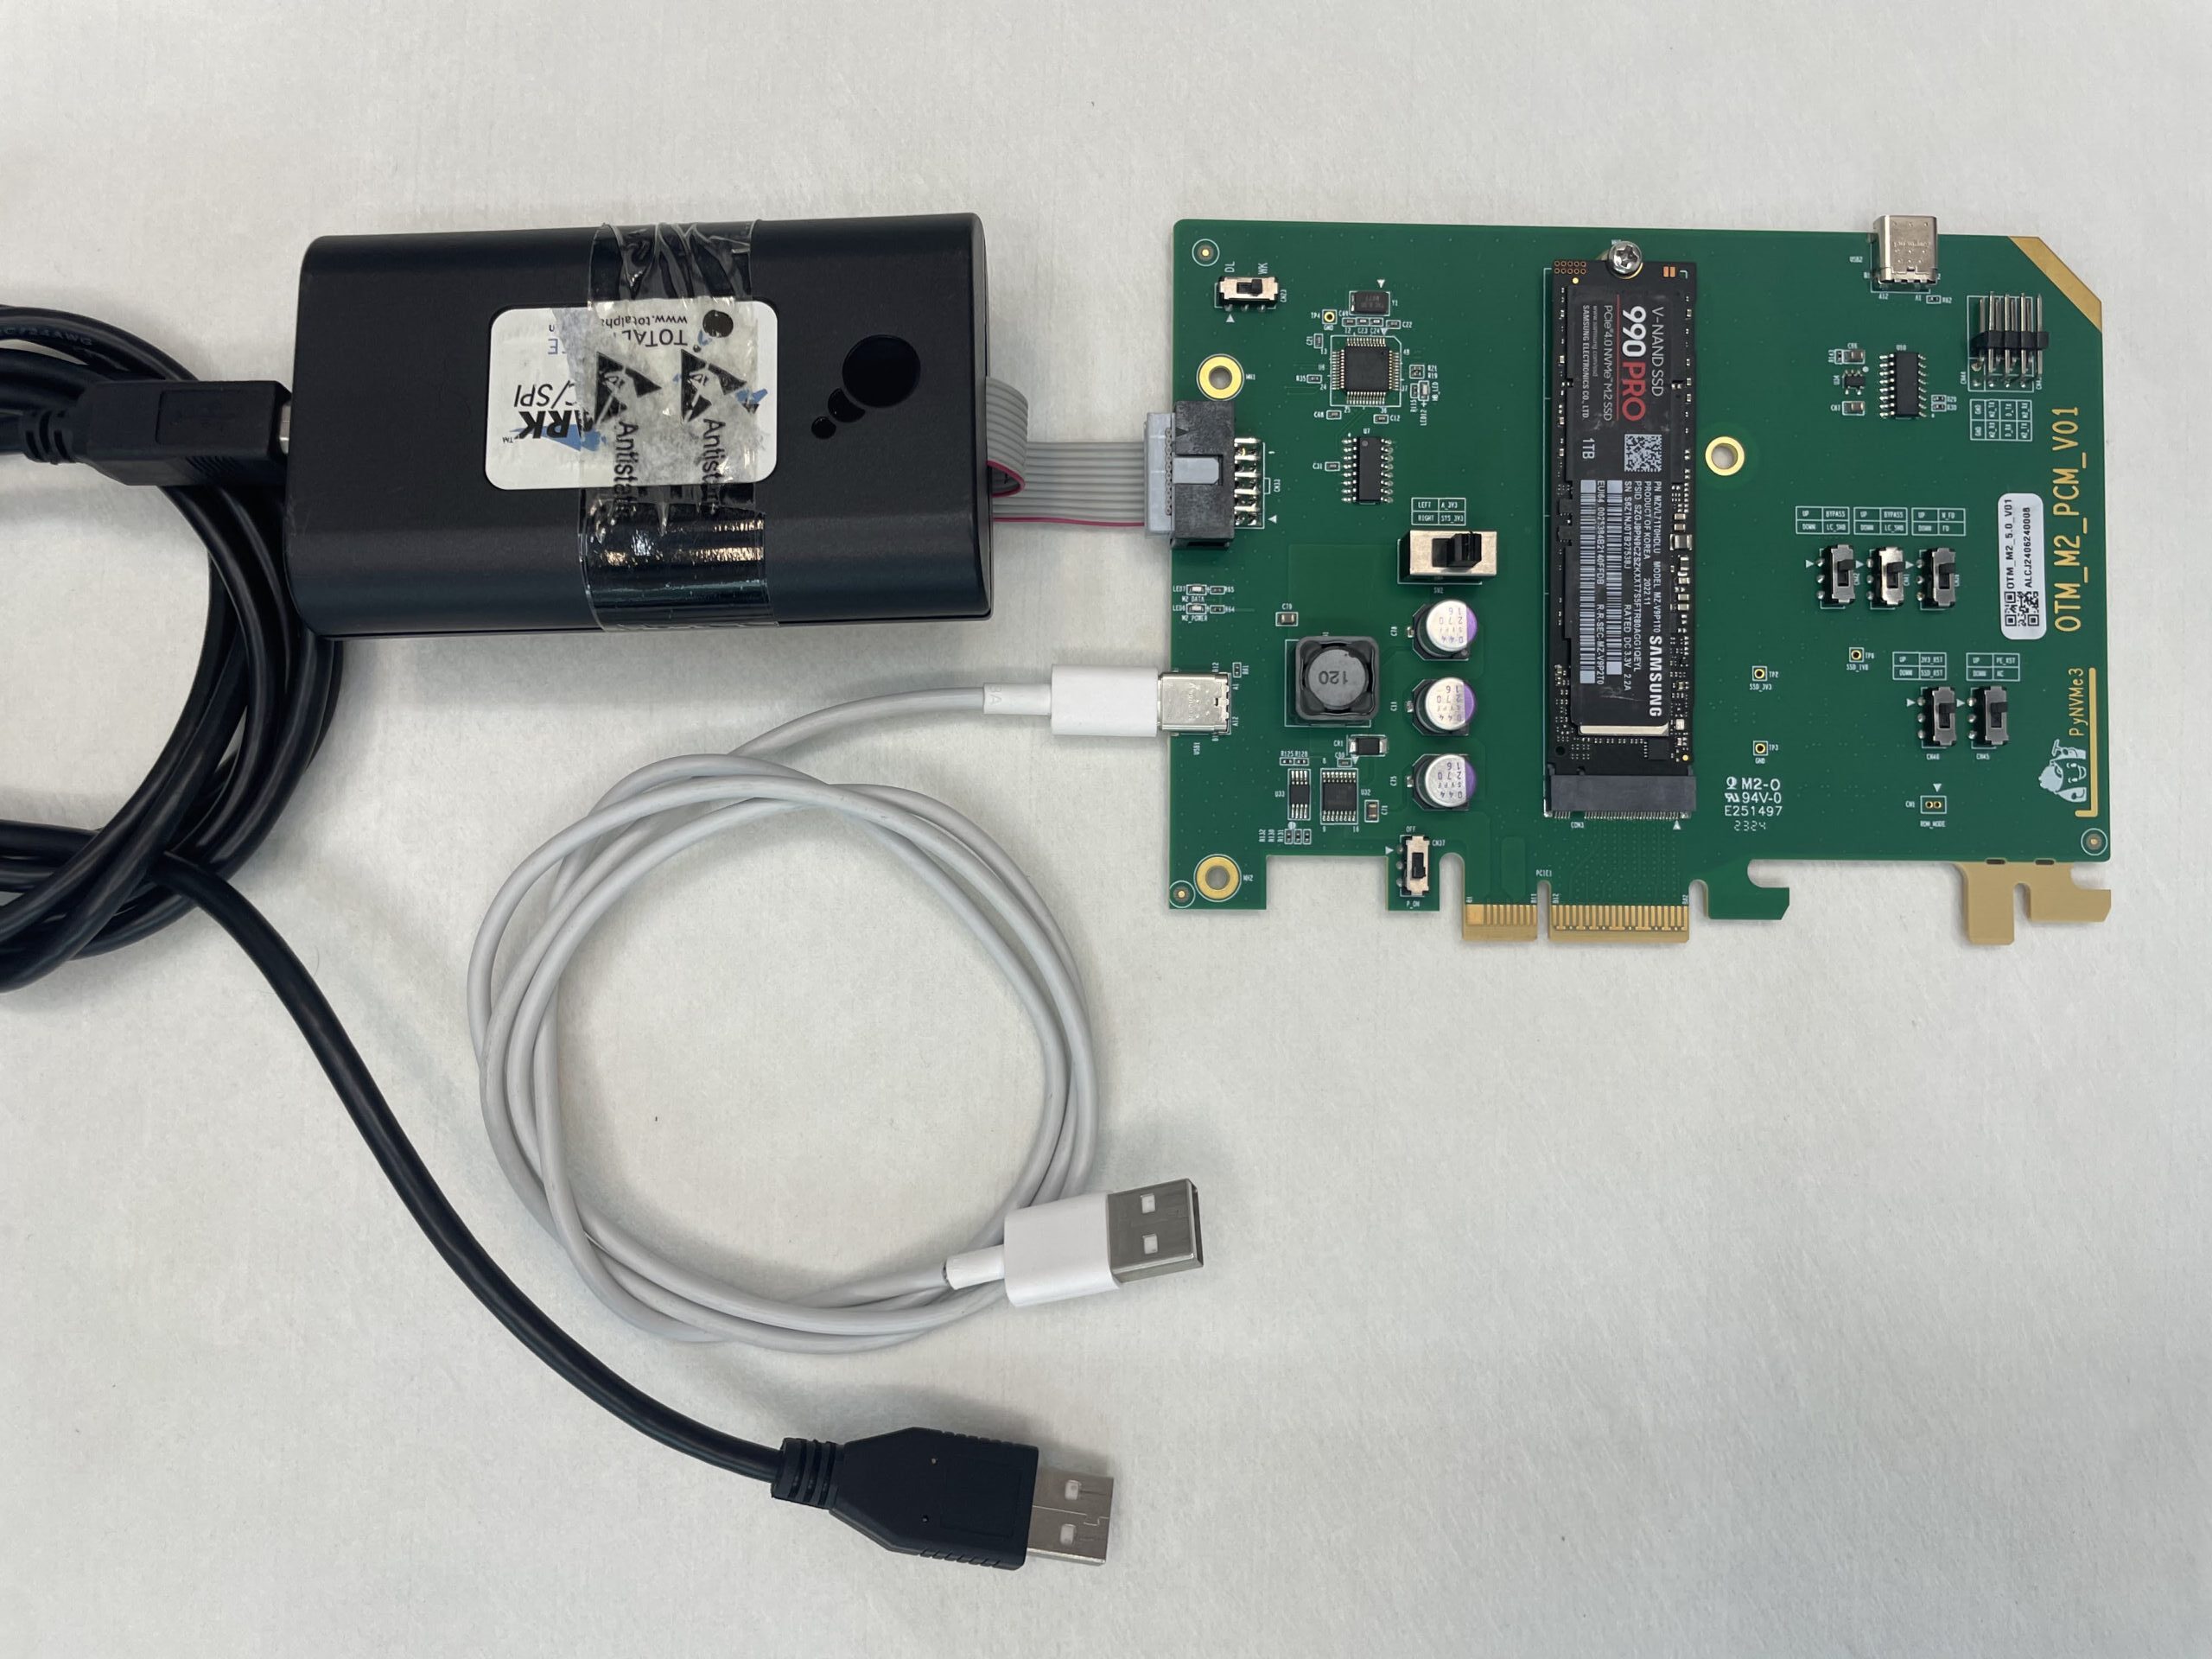
PMU2 is easy to set up and integrates seamlessly with the PyNVMe3 framework.
- Insert the DUT into the PMU2 test slot.
- Insert PMU2 into the motherboard.
- Connect PMU2 to the desktop test platform via the Type-C USB port (white USB cable in the image above).
- Connect PMU2 to the Total Phase I2C host adapter and then to the desktop test platform (black USB cable in the image above).
- Power on the desktop test platform.
PMU2 will be automatically recognized and is ready for PyNVMe3 tests.
3.3 I2C/I3C Adapter
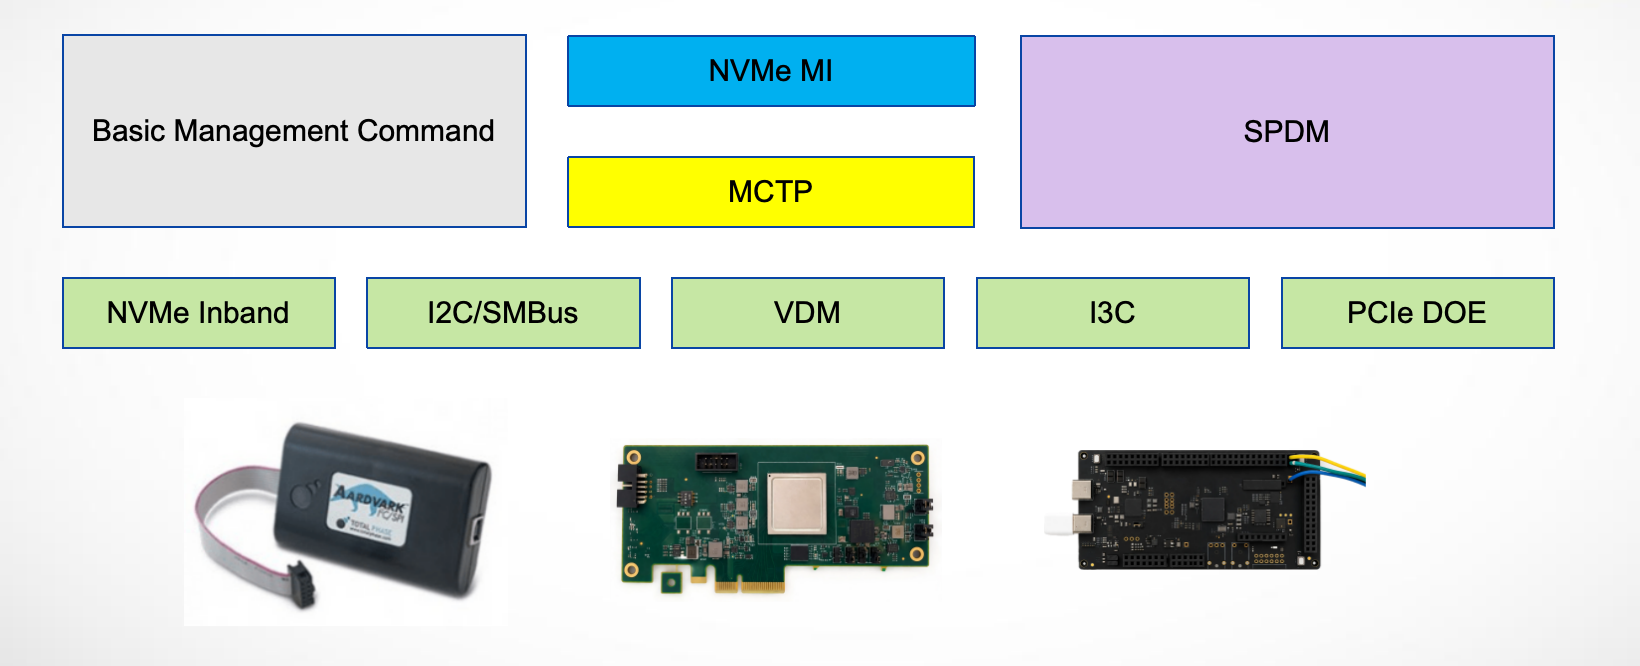
The Aardvark I2C/SPI Host Adapter from Total Phase is a USB-to-I2C adapter that serves as the physical layer device for NVMe-MI out-of-band (OOB) testing over I2C/SMBus. Unlike traditional setups that rely on a baseboard management controller (BMC) in server environments, PyNVMe3 leverages this compact adapter to enable MI testing on standard desktop platforms. This eliminates the need for expensive server-grade infrastructure while maintaining full testing capabilities.

The Aardvark adapter plays a crucial role in NVMe-MI testing by facilitating SMBus communication between the test machine and the NVMe SSD. It enables sending and receiving NVMe-MI messages, as well as interacting with other protocols such as SPDM. This allows developers to construct and transmit custom packets, monitor responses, and inject errors at different layers, including the physical, transport, and protocol layers. Additionally, the adapter supports configurable controller settings, allowing adjustments to frequency and transfer unit sizes to match specific testing scenarios.
One of the key advantages of using Aardvark is its seamless integration with PMU2. Together, these components provide complete NVMe-MI test coverage, enabling a wide range of management interface validations. PyNVMe3 also allows simultaneous testing of both out-of-band (OOB) and in-band NVMe commands, making it possible to evaluate MI interactions while performing standard NVMe operations.
By using the Aardvark I2C/SPI Host Adapter, PyNVMe3 delivers a reliable and flexible infrastructure for NVMe-MI testing, eliminating the need for dedicated server systems while providing all the essential capabilities required for thorough management interface validation.
PyNVMe3 also supports an NXP I3C adapter for OOB management validation on devices that expose I3C management transport. In the repository, the root conftest.py provides nxp and i3c fixtures for this path. I3C is especially useful on newer platforms that require higher transport bandwidth or more modern sideband connectivity than SMBus.
3.4 VDM Adapter
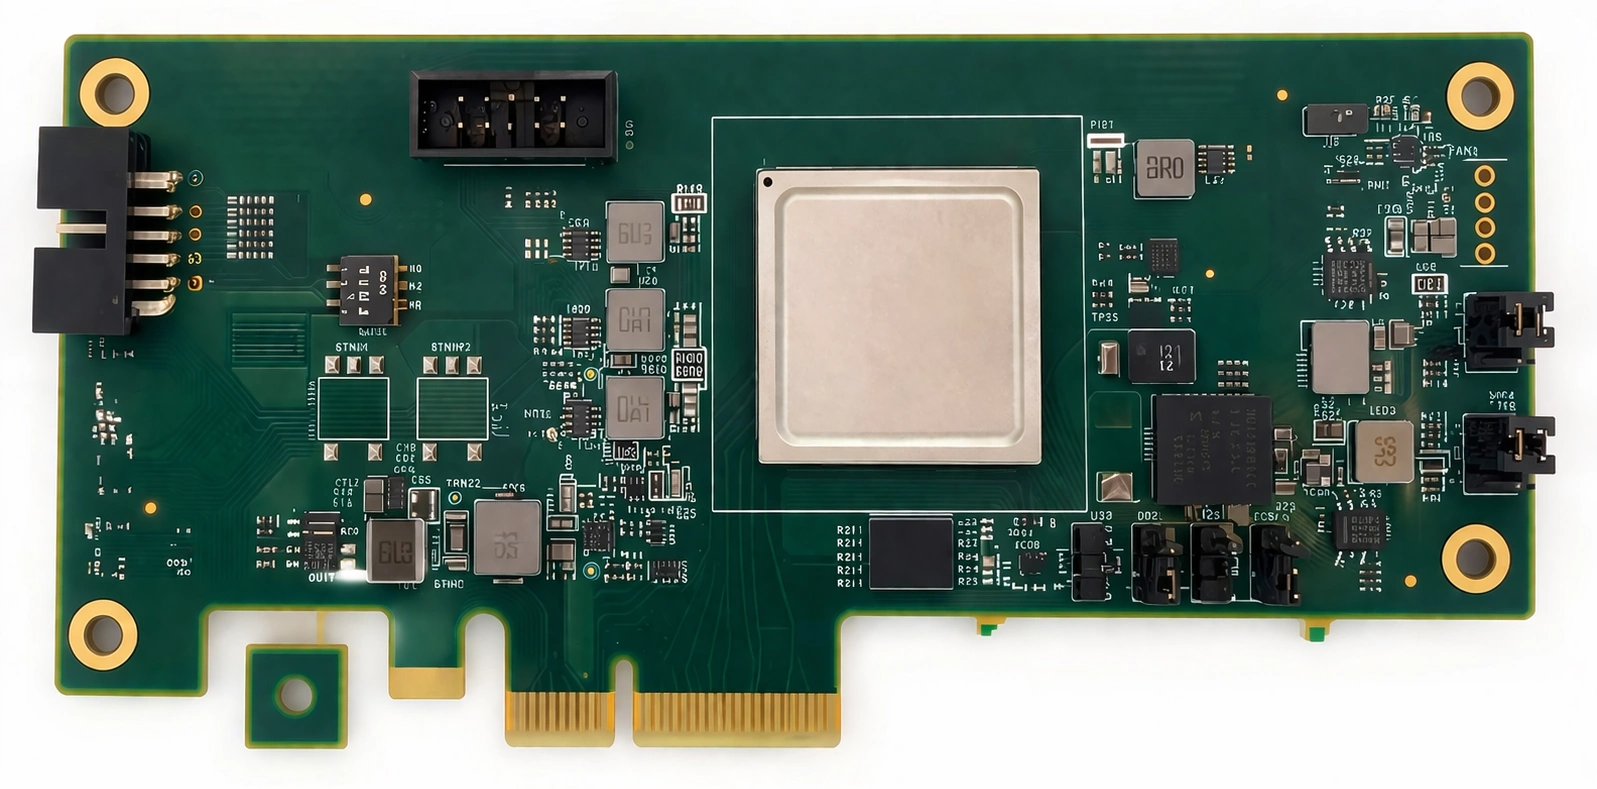
The VDM (Vendor Defined Message) Adapter provides an MCTP transport over the PCIe VDM path, enabling NVMe-MI and SPDM management interface validation on a desktop platform without external cabling.
Setup and usage:
- Insert the VDM into the motherboard AIC slot; no additional cables are required.
- Use an AMD desktop platform.
- Run the dedicated VDM test:
make test TESTS=./scripts/management/12_vdm_test.py
Supported platforms (we will add more models later):
| CPU | Motherboard |
|---|---|
| AMD Ryzen 5 7600X | Asus X670E ROG Crosshair |
| AMD Ryzen 3 3200G | BIOSTAR B450GT3 |
| ASUS PRIME X570-PRO | |
| AMD Ryzen 9 9900X3D | MSI MPG X870E CARBON WIFI |
In the current repository, the management suite no longer assumes a single OOB path. The transport fixture automatically chooses the first available physical transporter in this order:
- SMBus through the Aardvark adapter (
smbus) - VDM through the PCIe VDM adapter (
vdm) - I3C through the NXP adapter (
i3c)
This fallback order is implemented in scripts/management/conftest.py. As a result, users normally do not need to edit the fixture just to switch among physical OOB transports. Only the dedicated 12_vdm_test.py script requires the VDM adapter specifically.
3.5 Management Test Suite
The scripts/management directory contains specialized test scripts for validating management functionalities, including basic management commands, MI, SPDM, VDM, FRU, I3C, and MCTP initialization flows.
| Test Script | Description |
|---|---|
01_mi_inband_test.py |
Tests in-band management interface commands for NVMe devices. |
02_basic_mgmt_cmd_test.py |
Validates basic NVMe management commands for legacy compatibility. |
03_mi_cmd_set_test.py |
Provides comprehensive testing of the NVMe Management Interface Command Set. |
04_mi_admin_cmd_test.py |
Focuses on administrative commands within the Management Interface. |
05_mi_control_primitive_test.py |
Evaluates control primitives in NVMe devices via the Management Interface. |
06_mi_pcie_cmd_test.py |
Targets PCIe-specific commands in the NVMe Management context. |
07_mi_feature_test.py |
Tests features including endpoint buffer configurations and MCTP Transport Unit sizes. |
08_mi_error_inject_test.py |
Injects errors into MCTP and MI packet headers to assess error handling. |
09_mi_stress_test.py |
Stresses the device by interweaving MI with various commands for robust testing. |
10_mi_ocp_test.py |
Validates OCP (Open Compute Project) NVMe-MI compliance. |
11_spdm_test.py |
Tests SPDM (Security Protocol and Data Model) functionality over MCTP. |
12_vdm_test.py |
Tests MCTP over PCIe VDM. |
13_fru_test.py |
Validates FRU data structures, VPD reads, and FRU behavior across power events. |
14_i3c_test.py |
Exercises NVMe-MI over I3C transport, including I3C-side initialization and protocol behavior. |
15_mctp_init_test.py |
Verifies MCTP initialization and transport bring-up behavior. |
We can start the management tests on Desktop Test Platform using the following command:
make test TESTS=./scripts/management
3.6 Fixtures and API
PyNVMe3 provides several fixtures for OOB management validation. They map directly to the available transport hardware and to the fallback logic in scripts/management/conftest.py.
| Fixture | Role | Typical hardware / path |
|---|---|---|
i2c |
Low-level adapter access for basic management commands | Total Phase Aardvark |
smbus |
SMBus transporter used by NVMe-MI | Aardvark + PMU2 |
vdm |
PCIe VDM transporter for MCTP over PCIe | VDM adapter |
i3c |
I3C transporter for NVMe-MI OOB tests | NXP I3C adapter |
transport |
Auto-selects the first available physical OOB path | smbus -> vdm -> i3c |
mi |
MI.Requester wrapper built on transport |
Any physical OOB path |
spdm |
SPDM.Requester wrapper |
Physical OOB path first, then DOE fallback |
port |
Discovers the active management port from MI data structures | Derived from mi |
The fixture behavior is intentionally layered:
- Use
i2cwhen you need raw basic-management access. - Use
smbus,vdm, ori3cwhen validating a specific physical transport. - Use
transportwhen the testcase should run on whichever physical OOB path is currently present. - Use
miorspdmfor protocol-level tests; they build on the selected transporter automatically. - If no physical OOB transport is present,
spdmfalls back to DOE over PCIe, so SPDM validation can still run on supported platforms.
Below are examples demonstrating how to write management-related test scripts using PyNVMe3. For more details, please check the source code under PyNVMe3/scripts/management.
Example 1: Reading Drive Static Data
def test_mi_spec_appendix_a_read_drive_static_data(i2c, buf):
    """ Read drive static data (VID and serial number) via I2C. """
    i2c.i2c_master_write(i2c.ENDPOINT, [8], flags=pyaardvark.I2C_NO_STOP)
    buf[:] = i2c.i2c_master_read(i2c.ENDPOINT, 24)[:]
    logging.info(buf.dump(64))
Example 2: Retrieving SMART Log Page
def test_mi_admin_get_log_page(mi, nvme0):
    """ Retrieve SMART log page via NVMe-MI admin command. """
    resp = mi.nvme_getlogpage(2, length=20).receive()
    resp_data = resp.response_data(12)
    ktemp = resp_data.data(2, 1)
    logging.info("Temperature (via MI): %d degrees F" % ktemp)
Example 3: SPDM Get Capabilities Command
def test_spdm_get_capabilities_multiple(spdm):
    """ Test SPDM GET_CAPABILITIES request with an invalid sequence. """
    spdm.get_version().receive()
    spdm.get_capabilities().receive()
    with pytest.warns(UserWarning, match="SPDM ERROR response, code: 0x04"):
        spdm.get_capabilities().receive()
3.7 SRIOV Testing
PyNVMe3 provides comprehensive support for testing the Single Root Input/Output Virtualization (SRIOV) feature. SRIOV allows a device, such as a NVMe SSD, to separate access to its resources among various PCIe hardware functions. These hardware functions consist of one Physical Function (PF) and one or more Virtual Functions (VF).
In terms of testing, PyNVMe3 facilitates the creation of VFs and namespaces, and the attachment of namespaces to VFs. This is done through a demo script file located in the scripts/features folder. It’s important to note that before any SRIOV testing can be performed, virtual functions need to be enabled in the Device Under Test (DUT).
⚠️ Note: For SRIOV testing, Linux kernel inbox NVMe driver shall be enabled in GRUB configuration.
make setup numvfs=5
make test TESTS=./scripts/features/sriov_test.py pciaddr=0000:01:00.0
PyNVMe3’s testing capabilities extend to executing tests on a single VF or multiple VFs simultaneously. This is carried out by using existing scripts and specifying the id of the VF to be tested. Before running the tests on VFs, we shall create namespaces, attach them to VFs, and make all VFs online.
make setup numvfs=5
make test TESTS=./scripts/test_utilities.py::test_create_ns_attach_vf
make test TESTS=./scripts/test_utilities.py::test_vf_init
Then we can run multiple tests in different Terminals:
make test TESTS=./scripts/benchmark/ioworker_stress.py pciaddr=0000:01:00.0 vfid=0 nsid=2
make test TESTS=./scripts/benchmark/ioworker_stress.py pciaddr=0000:01:00.0 vfid=1 nsid=1
make test TESTS=./scripts/benchmark/ioworker_stress.py pciaddr=0000:01:00.0 vfid=2 nsid=3
make test TESTS=./scripts/conformance/02_nvm pciaddr=0000:01:00.0 vfid=4 nsid=4
All these features make PyNVMe3 a powerful tool for validating and exploring the capabilities of SRIOV.
4. Server Test Platform
In the early stages of an SSD R&D project, the number of drives under test is usually small, and a PC-based PyNVMe3 test platform is often sufficient for bring-up, debugging, and focused validation. As the project matures, test demand increases significantly, and the R&D team must expand test scale to prepare for a smooth transition into the production stage. At that point, a PC-based setup is no longer efficient enough.

To address this scaling requirement, we developed the F6 Test Server: a high-density NVMe SSD validation system designed for high performance, reliable operation, and long-duration stress testing. Housed in a compact 3U chassis, F6 provides 12 independent PCIe Gen5 x4 slots with independent power control, hot-swap capability, and precise power monitoring, enabling parallel testing at scale. Each DUT slot includes an independent power-control module, so any test validated on the Desktop platform can run on F6 without script changes. Backed by years of production use, PyNVMe3 also includes a comprehensive library of enterprise-grade test scripts, making F6 a practical platform for SSD R&D and QA teams that require scalable, efficient, and repeatable NVMe SSD testing from development through production.
4.1 System Overview
The F6 Test Server features a well-balanced hardware configuration so that no single component becomes a bottleneck. With high-performance computing capability, ample memory, PCIe 5.0 bandwidth, optimized airflow and cooling, and precise power delivery, the system allows each DUT to reach its performance limits without being constrained by the test platform.

| Category | Label | Specification |
|---|---|---|
| Chassis | ||
| Form Factor | 3U rack-mounted chassis | |
| Dimensions | 482.00 mm (W) × 133.00 mm (H) × 639.77 mm (D) | |
| Weight | 14.8 kg | |
| Cooling System | 5 × 4-wire fans for high-efficiency cooling | |
| System | ||
| Processor | Intel(R) Xeon(R) Gold 6421N | |
| Memory | DDR5 ECC, 128 GB or 256 GB, 4400 MT/s, 2DPC | |
| System Storage | (5), (6) | 2 × 2.5-inch SATA SSDs (480 GB, RAID 1 for OS, non-removable) |
| Power | ||
| Input Voltage | (7) | 100-240 V AC, single-phase |
| Power Ratings | 220 V: 4.5 A, 110 V: 9.0 A | |
| Power Switch | (8) | On/off switch for system power |
| Connectivity | ||
| Video Output | (3) | 1 × VGA |
| USB Ports | (4) | 4 × USB 2.0 |
| Network | (1) | 1 × LAN |
| Management | (2) | 1 × IPMI (reserved) |
| Compliance & Safety | ||
| Certification | CE safety certified | |
| Environmental Conditions | ||
| Operating Temperature | 5 °C to 50 °C |
Standard servers can limit SSD performance because of shared resources, cooling constraints, and software overhead. The F6 Test Server is designed to address these limitations with a purpose-built hardware and software architecture.
| Did you know? | |
|---|---|
 |
Standard servers often face challenges in large-scale SSD testing, affecting performance efficiency, system cost, and validation time. |
| PCIe Bandwidth | Standard servers commonly use PCIe switches to connect multiple SSDs, which can introduce bandwidth contention and prevent each SSD from achieving full PCIe Gen5 x4 performance. This limitation becomes more significant in high-throughput test scenarios. |
| CPU Resources | When multiple SSDs share limited CPU cores, resource contention can reduce test efficiency and measurement consistency. Adding more CPU sockets may increase total processing capability, but it also introduces inter-socket communication overhead, which can affect performance stability. |
| Memory Bandwidth | Standard servers can be configured with sufficient memory bandwidth and capacity, but the configuration must still be planned carefully to ensure that memory does not become a system bottleneck. PyNVMe3 relies on fast memory access and large CRC tables for real-time data integrity checks. |
| Thermal and Mechanical | High-performance SSDs generate significant heat during stress testing, while standard server cooling solutions are typically designed for general-purpose workloads rather than continuous high-power SSD operation. Insufficient cooling can lead to thermal throttling and affect test consistency. |
| Software Overhead | Many SSD test tools depend on kernel-based drivers, which introduce context-switching overhead and consume CPU resources. This can reduce the ability of the platform to fully saturate SSD performance, especially in high-concurrency environments. |
The F6 Test Server is designed to address these challenges with optimized PCIe bandwidth, dedicated CPU resources, carefully planned memory performance, advanced cooling, and low-overhead user-space software.
4.2 DUT Slots
Each DUT slot in the F6 Test Server is independently controlled and optimized for PCIe Gen5 x4 performance, enabling high-speed SSD testing.

| Feature | Label | Description |
|---|---|---|
| DUT Slots | ||
| U.2 Form Factor | (1) | U.2 PCIe 5.0 slots (M.2 supported via adapter; E1.S support is under development). |
| Eject Button | (2) | Allows SSDs to be inserted or removed without affecting other slots. Some slot numbers are marked on the button. |
| LED Indicators | ||
| Power | (3) | Indicates SSD power status (green). |
| Activity | (4) | Displays SSD activity (blue). |
| Status | (5) | Test status: off = test in progress, green = pass, red = fail, yellow = stopped. |
| Power Management | ||
| Monitoring | Real-time voltage and current monitoring with high accuracy (voltage: ±0.5%, current: ±1.5%). | |
| Control | Adjustable voltage range from 0.6 V to 14.5 V in 1 mV increments. | |
| Protection | Overcurrent protection up to 6 A per slot, preventing power surges. | |
| System Power Button | (6) | Controls system power and provides status indication. |
4.3 Production Tests
The F6 Test Server streamlines enterprise SSD validation with pre-built test scripts in PyNVMe3/scripts/production. These suites can be used as provided or customized so that teams can adapt workflows to product-specific requirements while preserving repeatability and scale.
F6 supports long-duration, large-scale evaluations that sustain realistic workloads and drive DUTs to their operational limits without sacrificing measurement accuracy.
Included tests
01_normal_io_test.py– long‑duration sequential and random read/write baselines with multiple block sizes.02_mix_io_test.py– mixed IO size and read/write ratio sweeps with sequential/random phases.03_data_model_test.py– application data‑model workloads (cloud, SQL, CDN style mixes).04_trim_format_test.py– performance and stability with trim/format sequences and mixed IO.05_small_range_test.py– hot‑spot IO on constrained LBA ranges and small random regions.06_jesd_workload_test.py– JEDEC JESD219 client workload (full‑drive prep plus mixed IO).07_power_cycle_test.py– dirty/clean power‑cycle resilience across 1000 iterations.08_wl_stress_test.py– wear‑leveling stress with hot/cold data distribution.09_io_stress_test.py– multi‑namespace IO stress blended with admin/MI events and resets.
⚠️ Note: Production runs can enable and exercise multiple namespaces—each provisioned with distinct LBA formats (LBAF) and Protection Information (PI) settings—for broader coverage. Pre‑create the required namespaces on the DUT and format each to the target LBAF/PI profile before starting the production test; the suite will discover them and apply I/O‑stress across all namespaces.
Typical production runs last 1-3 weeks. Per-slot parallelism across multiple DUTs shortens total wall-clock time. F6 also enables cross-vendor benchmarking in a single server, ensuring a consistent environment and reducing platform-to-platform variation.
⚠️ Note: Backup and delete the
PyNVMe3/resultsdirectory before the test to free disk space for future logging use.
⚠️ Note: Do not upgrade the Ubuntu system (e.g. with apt commands) to avoid unexpected system changes.
4.4 Slot Configuration
The F6 Test Server uses a configuration file, slot.conf, to manage its 12 NVMe SSD test slots, allowing flexible and efficient test execution. Each slot configuration defines resource-allocation parameters, including:
- BDF Address – Specifies the PCIe bus, device, and function of the NVMe SSD, ensuring correct device mapping.
- CPU Affinity – Assigns a dedicated CPU core to each slot, minimizing resource contention and maximizing I/O efficiency.
- Namespace ID – Selects the namespace used by the test flow for that slot.
- Test Targets – Defines one or more Python test scripts or pytest node ids to be executed for the slot.
Example slot.conf Configuration
# slot_N = BDF, CPU, NSID, TESTS
slot_0  = 0000:6f:00.0,  0, 1, ./scripts/production/01_normal_io_test.py::test_case1_16k_randrw_1day | ./scripts/production/02_mix_io_test.py::test_case4_mixrw_stress
slot_1  = 0000:70:00.0,  2, 1, ./scripts/production/01_normal_io_test.py::test_case2_64k_seqrw_1hour
slot_2  = 0000:46:00.0,  4, 2, ./scripts/production/02_mix_io_test.py::test_case4_mixrw_stress
In this example, slot 0 is mapped to PCIe address 0000:6f:00.0, assigned to CPU core 0, uses namespace 1, and runs two pytest targets. When multiple targets are listed with |, make test slot=<n> expands them into a single pytest command line so they execute in one pytest session for that slot.
⚠️ Note: Users typically only need to modify the
NSIDandTESTSfields. TheTESTSfield accepts one or more targets separated by|.
With the slot.conf configuration file, the test execution command can be simplified as follows:
make test slot=1
This command locates the BDF address of the test drive, the corresponding CPU core, namespace id, and pytest targets based on the slot.conf configuration. The all target runs the make action after all for slots 0 through 11 simultaneously. It uses nohup inside the shell for loop, forwards command-line variables to each make call, and appends output to nohup.out:
make all test
Monitor the combined background output with:
tail -f nohup.out
Stop tests on all slots with:
make all stop
To run a specific test target on all slots:
make all test TESTS=./scripts/production/08_wl_stress_test.py
Since starting tests on 12 drives simultaneously creates a large number of log files in the results directory, we recommend clearing or archiving the results directory before testing.
Operational Examples
Run the test configured in slot.conf on a single slot:
make test slot=3
Override the configured test target from the command line:
make test slot=3 TESTS=./scripts/production/08_wl_stress_test.py
Stop the current test on a single slot:
make stop slot=3
After make stop slot=<n> completes, the slot Status LED is set to yellow.
Test logs for each slot are stored under the results directory. For example, list logs for slot 3 with:
ls results/slot_3
The slot LEDs can also be used to check status:
Power: DUT power statusActivity: DUT activity statusStatus: test status indicator. A flashing red LED indicates test failure. A flashing green LED indicates test pass. No flashing indicates that the test is still running.
⚠️ Note: Do not remove the DUT while the Status LED is off.
4.5 Hot-Swap
The F6 Test Server fully supports hot-swap operations, allowing users to remove and replace NVMe SSDs in specific slots without disrupting other tests. Use make stop before removing an SSD so all running PyNVMe3 test activity for that slot is terminated.
- Stop the Ongoing Test
Before removing an SSD, stop any running test activity on the slot and place it in a safe state.
Example: To stop tests on slot 3:make stop slot=3 - Replace the SSD
Remove the SSD and insert the replacement drive. - Restart Test
Once the drive is inserted, restart testing as usual. The test entrypoint prepares the PCIe device before launching pytest.make test slot=3
Hot-swap support minimizes downtime by allowing each slot to be managed independently.
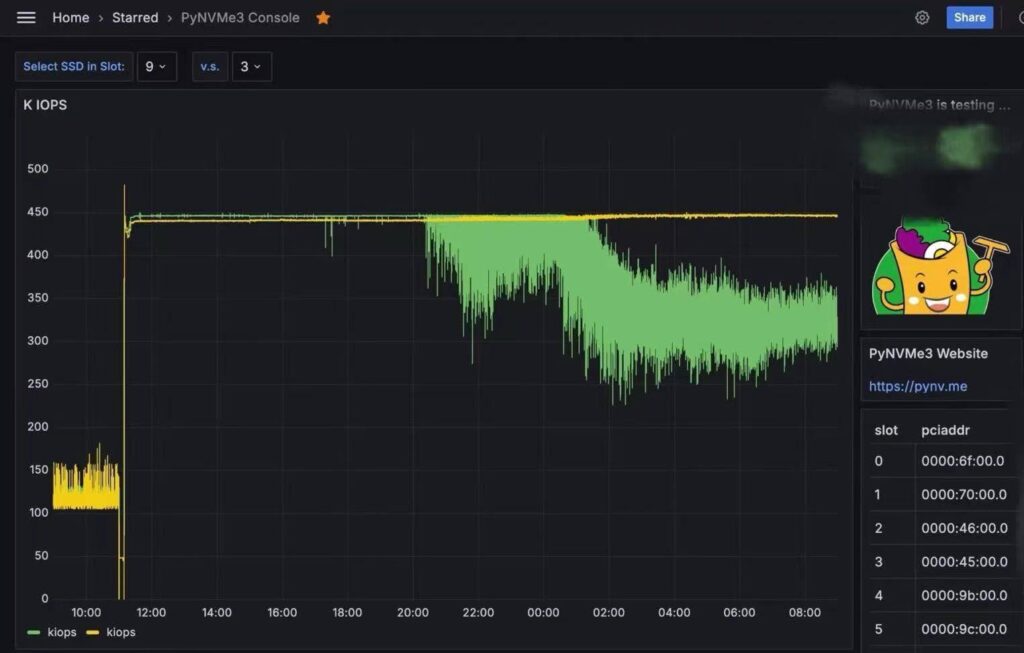
4.6 WebUI
When testing a single drive, users can monitor the log files to check the current test status. However, when testing many SSDs across multiple platforms, this approach becomes inefficient. Therefore, we provide a WebUI to display test status, performance, and other information for a specified platform and slot in the test cluster, as shown below.
This WebUI provides several important benefits:
- Real-Time Monitoring:
Through the WebUI, users can monitor all active DUTs (Devices Under Test) in real time, including slot numbers, BDF (Bus, Device, Function) addresses, and model names. This allows users to quickly identify the current status and location of each SSD. - Performance Charts:
The WebUI provides detailed performance charts showing IOPS (Input/Output Operations Per Second) and throughput (in MB/s or GB/s) over a specified time range. These charts help users assess SSD performance and identify potential bottlenecks or anomalies. - Comparison Feature:
The WebUI allows users to select and compare the performance of two DUTs. This is useful for evaluating differences between SSD models or between the same model under different test conditions. - Detailed Information:
In addition to performance metrics, the WebUI provides other detailed information about the selected DUT, such as firmware version, temperature, and health status. This helps users better understand the operating condition of each SSD. - Custom Monitoring Functions:
The WebUI allows users to define their own monitoring functions. PyNVMe3 periodically collects data from these custom functions and displays it on the WebUI. - No Impact on Existing Tests:
The addition of this WebUI does not affect the functionality or performance of existing tests. Users can continue to run their tests as usual while benefiting from centralized monitoring and data visualization.
By using this WebUI, users can improve monitoring efficiency, reduce manual work, and obtain more comprehensive and visualized test data. This is particularly useful in environments where many SSDs are tested across multiple platforms.
PyNVMe3’s WebUI uses Grafana to visualize data stored in QuestDB. This enables real-time monitoring of DUT SSD performance through customizable dashboards.
1. QuestDB
The F6 Test Server integrates QuestDB to enable real-time monitoring and logging of SSD test metrics through PyNVMe3.
PyNVMe3 automatically collects core SSD metrics, such as IOPS. Users only need to add custom monitors for vendor-specific data.
Example: Add Temperature Monitoring
def get_temperature(nvme0):
    smart_log = Buffer(4096)
    nvme0.getlogpage(0x02, smart_log, 512).waitdone()  # SMART log page 0x02
    return int(k2c(smart_log.data(2, 1)))  # Kelvin → Celsius

# Monitor temperature every 5 seconds
nvme0.add_monitor("temperature", get_temperature, interval=5)

# Run test workload
nvme0n1.ioworker(time=15, read_percentage=100).start().close()
The F6 Test Server includes a pre-installed QuestDB (8.2.1) instance that automatically stores monitoring data. No manual setup or configuration is required. Refer to the QuestDB official website for more details.
After system reboot, start the service with:
./questdb/bin/questdb.sh start
2. Grafana
- Install Grafana
Follow the official installation guide to install Grafana on your PC or Mac. Grafana runs locally on the work PC to avoid resource contention on the test machine. - Connect to QuestDB
In the Grafana web interface athttp://localhost:3000, navigate to Menu > Connections > Data sources, then add a new data source by selecting PostgreSQL. - Edit data source
Use the following configurations:Name: PyNVMe3 Host URL: <questdb-ip>:8812 # QuestDB in F6 Test Server Username: admin Password: quest TLS/SSL Mode: disable - Save data source
Click Save & Test to verify that the connection to QuestDB is successful. - Build Dashboards
Import pre-configured dashboard templates for rapid deployment and visualization.
4.7 Application Scenarios
The F6 Test Server is built to address common SSD testing challenges by providing higher efficiency, better repeatability, and faster turnaround than traditional server or PC-based platforms. It is suitable for firmware development, troubleshooting, and performance benchmarking.
Daily Build Testing
In fast-paced development cycles, every firmware or hardware update requires thorough validation. F6 enables multiple SSDs to be tested simultaneously, covering different capacities, over-provisioning settings, and configurations within a single system. This improves test coverage and speeds up CI workflows.
Problem Analysis
Diagnosing SSD issues often requires comparing different firmware versions, models, and sometimes products from multiple vendors. F6 enables side-by-side comparisons, helping engineers isolate issues more quickly and validate solutions under a consistent platform environment.
Bug-Fix Verification
Fixing one issue should not introduce another. F6 allows bug fixes to be validated across multiple DUTs and configurations in parallel. This supports regression testing and helps confirm that new updates do not disrupt existing functionality before release.
5. Summary
PyNVMe3 spans three complementary platforms—Laptop, Desktop, and F6 Server—covering the arc from low‑power bring‑up to high‑density production validation. All platforms support power cycling and precise power monitoring; choosing the right platform ensures accurate, repeatable results and efficient use of lab resources.
- Laptop platform — When paired with the Quarch Power Analysis Module (PAM), it delivers high‑resolution power data, ideal for low‑power profiling, script prototyping, and reproducing field issues.
- Desktop platform — Provides stable thermals and ample CPU/memory for protocol, performance, stress testing, and out‑of‑band validation. With dedicated fixtures and transport adapters, it supports SMBus, VDM, I3C, MI, SPDM, and DOE fallback workflows.
- F6 Server platform — Designed for high‑density, long‑duration runs with per‑slot power control and hot‑swap, enabling parallel validation at scale and consistent cross‑vendor benchmarking.
Recommended platform by goal
| Test Goal | Recommended Platform | Why it fits |
|---|---|---|
| Low‑power characterization | Laptop | High‑resolution measurements with Quarch PAM |
| Performance & stress | Desktop | Dedicated resources and better cooling for stable, repeatable throughput |
| OOB management (SMBus/VDM/I3C/MI/SPDM/DOE) | Desktop | Purpose‑built fixtures, transport adapters, and management tooling |
| High‑density / long‑duration | F6 Server | 12× PCIe Gen5 x4 slots, per‑slot power, hot‑swap |
| Cross‑vendor benchmarking | F6 Server | Consistent environment across many DUTs |
| CI / daily regression | F6 Server | Parallelism shortens wall‑clock and increases coverage |
